D01205220A UH-7000 HDIA Mic Preamp / USB Audio Interface OWNER'S MANUAL Before connecting this unit to a computer, you must download and install a dedicated driver.
IMPORTANT SAFETY PRECAUTIONS CAUTION: TO REDUCE THE RISK OF ELECTRIC SHOCK, DO NOT REMOVE COVER (OR BACK). NO USER-SERVICEABLE PARTS INSIDE. REFER SERVICING TO QUALIFIED SERVICE PERSONNEL. The lightning flash with arrowhead symbol, within equilateral triangle, is intended to alert the user to the presence of uninsulated “dangerous voltage” within the product’s enclosure that may be of sufficient magnitude to constitute a risk of electric shock to persons.
IMPORTANT SAFETY INSTRUCTIONS 1 2 3 4 5 6 7 Read these instructions. Keep these instructions. Heed all warnings. Follow all instructions. Do not use this apparatus near water. Clean only with dry cloth. Do not block any ventilation openings. Install in accordance with the manufacturer's instructions. 8 Do not install near any heat sources such as radiators, heat registers, stoves, or other apparatus (including amplifiers) that produce heat.
Contents 1 – Introduction...............................................5 Features................................................................................... 5 Included items...................................................................... 5 Conventions used in this manual................................... 5 Trademarks............................................................................. 6 Precautions for placement and use............................... 6 Power supply...................
1 – Introduction Thank you for purchasing the TASCAM UH-7000 HDIA Mic Preamp/USB Audio Interface. Before connecting and using this unit, please take time to read this manual thoroughly to ensure you understand how to properly set it up and connect it, as well as the operation of its many useful and convenient functions. After you have finished reading this manual, please keep it in a safe place for future reference. You can also download the Owner's Manual from the TEAC Global Site (http://teac-global.
1 – Introduction Trademarks • TASCAM is a trademark of TEAC Corporation, registered in the U.S. and other countries. • Microsoft, Windows, Windows XP, Windows 7, Windows 8 and Windows Media are either registered trademarks or trademarks of Microsoft Corporation in the United States and/or other countries. • Apple, Macintosh, Mac OS, Mac OS X and iTunes are trademarks of Apple Inc. • SONAR is a trademark of Cakewalk, Inc. • ASIO is a trademark of Steinberg Media Technologies GmbH.
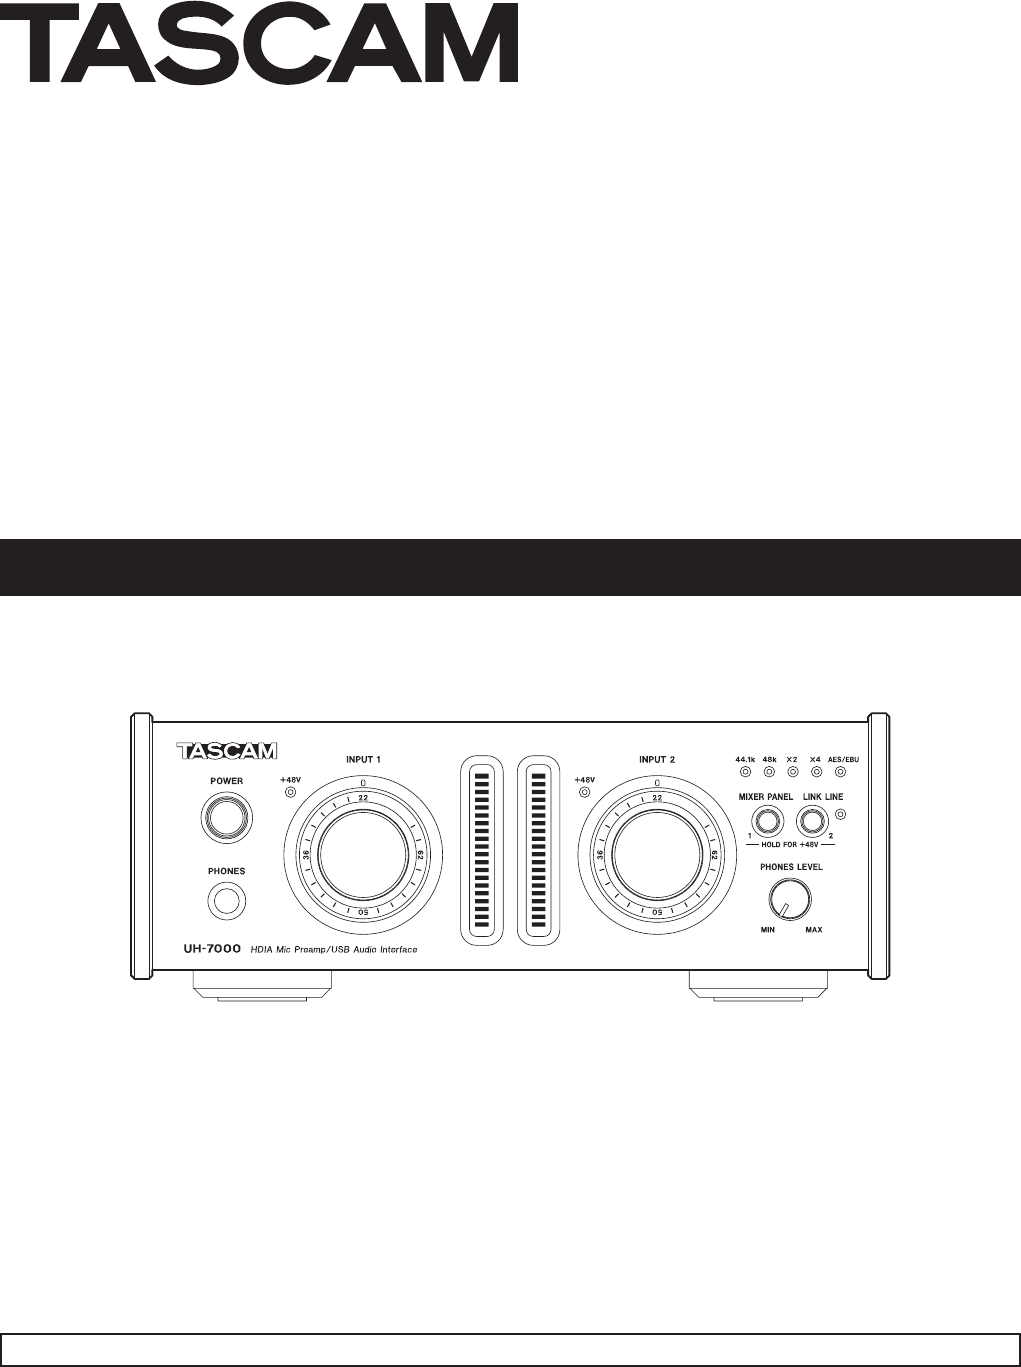
2 – Names and Functions of Parts Front panel 1 POWER switch/indicator Press to turn the unit on/off. The indicator lights when the unit is on. 2 +48V indicators (INPUT 1/2) These indicators light when +48V phantom power is being provided to the ANALOG (BALANCED) MIC IN 1/2 jacks. CAUTION Do not connect or disconnect a mic when a +48V indicator is lit. 3 INPUT 1 knob Use to adjust the analog input level from the ANALOG (BALANCED) MIC IN 1 jack and the ANALOG (BALANCED) LINE IN 1 jack.
2 – Names and Functions of Parts Rear panel w ANALOG (BALANCED) LINE IN 1/2 jacks These analog line inputs are standard TRS jacks. (Tip: HOT, Ring: COLD, Sleeve: GND) e ANALOG (BALANCED) MIC IN 1/2 jacks These analog mic inputs are balanced XLR jacks. (1: GND, 2: HOT, 3: COLD) r ANALOG (BALANCED) OUTPUT L/R jacks These analog outputs are balanced XLR jacks. (1: GND, 2: HOT, 3: COLD) t USB port Use the included USB cable to connect the unit to a computer (supports USB 2.0). CAUTION • USB 1.
3 – Installation System requirements For the latest information about supported operating systems, visit the TEAC Global Site (http://teac-global.com/). Windows 88 Supported operating systems Windows 8 (including 8.1) 32-bit Windows 8 (including 8.1) 64-bit Windows 7 32-bit SP1 or later Windows 7 64-bit SP1 or later Windows XP 32-bit SP3 or later (Windows Vista and Windows XP 64-bit are not supported.) 88 Computer hardware requirements Windows computer with a USB 2.
3 – Installation 6. Read the contents of the License Agreement, and select “I accept the agreement” if you agree to the terms. Next, click the Install button to start installation. Installing the driver for Mac OS X NOTE • Install the driver on the computer before connecting the unit to it with the USB cable. If the USB cable is connected, cancel driver installation and disconnect it before starting driver installation again. • During driver installation a warning message such as “'TASCAM UH-7000 X.
3 – Installation When the Gatekeeper setting is “Allow applications downloaded from: the Mac App Store” “'TASCAM UH-7000 X.XX' can't be opened because it was not downloaded from the Mac App Store.” might appear as a security warning message. In this case, click the OK button to close the message. Then, control-click (or right-click) the file and click “Open”. When the “'TASCAM UH-7000 X.XX' can't be opened because it was not downloaded from the Mac App Store.
3 – Installation Uninstalling the driver 88 Windows There are two ways to uninstall the driver. 88 Mac OS X 1. Double-click the “TASCAM_UH-7000_driver_X.XX.dmg” disk image file that was used during installation, and doubleclick “TASCAM UH-7000 remover” inside the folder. Uninstalling from the “setup.cmd” file used during installation 1. Follow the procedures in steps 2 to 4 of “Installing the driver for Windows” on page 9. 2. In step 5, click the “Remove the driver” button. 3.
4 – Connections Headphones Guitar through an effect, etc. Digital recorder, etc. Computer Powered monitor speakers or amplifier and speaker system with balanced connections, etc. Vocal mics, etc.
4 – Connections USB connection Use the included USB cable to connect the unit to a computer as shown in the illustration. CAUTION Some USB devices access the USB bus frequently. In order to avoid audio signal dropouts, clicking and other noises, we strongly recommend that you do not connect other USB devices to the same bus that this unit is using. Connecting USB keyboards and mice, however, to the same bus should not be a problem.
5 – Mixer Panel Settings You can use the Mixer Panel to change and save settings for the various functions of the unit. Opening the Mixer Panel Push the MIXER PANEL button on the front of the unit to open the Mixer Panel on the computer display. Notes about the Mixer Panel The Mixer Panel has three tabbed pages. Click a tab at the top of the Mixer Panel to open that page. INTERFACE: This page shows the current status of the driver and information about connections.
5 – Mixer Panel Settings Stereo Mix Use this setting if you want to broadcast or record a stereo mix, for example when transmitting a live broadcast over the Internet or recording audio for video. You can also use it when you want to record a mixed stereo track using the functions of the DSP mixer. The signals input from all the input connectors and the signals sent from the computer by USB will be mixed and sent to all the output connectors and the computer.
5 – Mixer Panel Settings MIXER page To change the dynamics effect being used, click the button of the desired effect. The previously used effect will automatically be turned off, and the newly selected effect will be turned on. NOTE • Selection will not be possible when an effect cannot be used because of sampling frequency conditions. • Turning the dynamics effect on/off using these buttons is linked to the dynamics effect on/off setting on the EFFECT page. • When the sampling frequency is 44.
5 – Mixer Panel Settings 8 SOLO button Click a SOLO button to solo that channel. SOLO buttons light on channels that are soloed. When a channel is soloed, channels that have not been soloed will automatically be muted and their MUTE buttons will light. (Default: off ) Multiple channels can be soloed at the same time. NOTE • When all the SOLO buttons are off, clicking the SOLO button of one channel will put the unit into solo mode and automatically mute the other channels, lighting their MUTE buttons.
5 – Mixer Panel Settings Computer 1 and 2 button: Signals from the Computer 1 and Computer 2 outputs are output directly. Computer 3 and 4 button: Signals from the Computer 3 and Computer 4 outputs are output directly. NOTE NOTE The buttons that can be selected depend on the Mixer Mode setting on the INTERFACE page. LINE OUTPUTS SELECT buttons Computer 1 and 2 button: Signals from the Computer 1 and Computer 2 outputs are output directly.
5 – Mixer Panel Settings EFFECTS page NOTE • Turning the send effect on/off on this page is linked to the send effect on/off setting on the MIXER page. • Turning it on will not be possible when an effect cannot be used because of sampling frequency conditions. Note about restrictions on the use of built-in effects Make built-in effects settings on this page. NOTE The EFFECTS page settings are retained even when the unit is turned off.
5 – Mixer Panel Settings RELEASE knob Sets the amount of time until the compression stops and the sound returns to its uncompressed level after the input sound goes below the threshold. Range: 10 ms–1000 ms (default: 420 ms) GAIN knob Sets the gain of the output signal. When the volume is compressed, the output level becomes lower than the input level. Use the GAIN knob to increase the output level so that it is close to the input level.
5 – Mixer Panel Settings 88 EQ (3-band parametric Equalizer) Use this to increase or decrease the levels of specific frequency ranges. This can be used, for example, to enhance the sound of individual instruments, to adjust the balance of a wide frequency range and to cut specific unwanted frequencies. FREQUENCY knob Sets the cutoff frequency of the low-cut filter.
5 – Mixer Panel Settings Mixer Panel menu To reset the mixer settings to their original values, use the Windows File menu or the Mac TASCAM UH-7000 Mixer Panel menu. Resetting the effect settings Follow these procedures to reset all the settings on the EFFECTS page. CAUTION After resetting, you cannot restore the previous settings. 1. In the menu bar, Click “File” on a Windows PC or click “TASCAM UH-7000 Mixer Panel” on a Mac to open a pulldown menu, and click “Effect Reset...
5 – Mixer Panel Settings Resetting the mixer settings Follow these procedures to reset the settings on the MIXER page. CAUTION After resetting, you cannot restore the previous settings. 1. In the menu bar, Click “File” on a Windows PC or click “TASCAM UH-7000 Mixer Panel” on a Mac to open a pulldown menu, and click “Mixer Reset...” The following confirmation message will appear.
5 – Mixer Panel Settings Using the unit as an A/D and D/A converter You can set the parameter values on the Mixer Panel pages to values that are useful when using this unit as an A/D and D/A converter. 1. In the menu bar, Click “File” on a Windows PC or click “TASCAM UH-7000 Mixer Panel” on a Mac to open a pulldown menu, and click “ADC/DAC Preset”. The following confirmation message will appear.
6 – Standalone Mode oo DIGITAL OUTPUTS SELECT button: Master L and R Overview oo DIGITAL OUTPUTS FORMAT button: AES/EBU If you turn this unit on when it is not connected to a computer by USB, it will operate in standalone mode. You can use this unit's A/D and D/A converters even when it is not connected to a computer. Settings in standalone mode When in standalone mode, the unit recalls and uses the Mixer Panel settings that have been saved in its memory.
7 – Application Guide In this chapter, we explain how to set some audio applications for use with this unit. 88 DAW software The ways that settings are made differ among DAWs. When using a DAW, consult its operation manual. Windows XP and Windows Media Player 1. Quit all applications and open Control Panel from the Start menu. 2. Open the “Sounds and Audio devices Properties” screen. NOTE If you do not see this item, click Sounds, Speech and Audio Services to make it appear.
7 – Application Guide Windows 8 and Windows Media Player 1. Quit all applications and right-click the Start screen and then click the All apps button that is at the bottom right of the screen to open the Apps screen. NOTE In Windows 8.1, click the x icon that appears at the bottom right of the start screen. 2. Click Control Panel. 3. Click “Hardware and Sound”, and then open the “Sound” window. 4.
8 – Troubleshooting Please read this chapter if you are unable to use the unit properly even after setting it up following the procedures in this manual. If you are still unable to resolve your problems please contact TASCAM customer support with the following information about the operating environment and details about the trouble.
8 – Troubleshooting 88 Sound breaks up or there is noise. 88 Something is wrong with the volume. e The processing load on the computer causes sound to break up and noise to occur. Here are some methods to reduce the load on the computer. 1) A wireless LAN and antivirus software or other software running in the background regularly put processing loads on the computer that can cause sound to break up and noise.
9 – Specifications Audio resolution 88 Sampling frequencies 44.1, 48, 88.2, 96, 176.4, 192 kHz 88 Quantization bit depth 24-bit Analog audio input and output ratings Analog inputs 88 Line inputs (ANALOG (BALANCED) LINE IN 1/2) Connectors: 6.3mm (1/4") standard TRS jacks (Tip: HOT, Ring: COLD, Sleeve: GND) Input impedance: 15 kΩ Maximum input level : +26.
9 – Specifications Computer system requirements Check the TEAC Global Site (http://teac-global.com/) for the latest information about supported operating systems. 88 Power AC 100-240V, 50/60Hz 88 Power consumption Windows 88 Supported operating systems Windows 8 (including 8.1) 32-bit Windows 8 (including 8.1) 64-bit Windows 7 32-bit SP1 or later Windows 7 64-bit SP1 or later Windows XP 32-bit SP3 or later (Windows Vista and Windows XP 64-bit are not supported.
9 – Specifications 233mm Dimensional drawings 75mm 81.2mm 214mm • Illustrations in this manual might differ in part from the actual product. • Specifications and external appearance might be changed without notification to improve the product.
TASCAM UH-7000
UH-7000 TEAC CORPORATION Phone: +81-42-356-9143 1-47 Ochiai, Tama-shi, Tokyo 206-8530 Japan TEAC AMERICA, INC. http://tascam.jp/ http://tascam.com/ Phone: +1-323-726-0303 7733 Telegraph Road, Montebello, California 90640 USA TEAC MEXICO, S.A. de C.V. http://teacmexico.net/ Phone: +52-55-5010-6000 Río Churubusco 364, Colonia Del Carmen, Delegación Coyoacán, CP 04100, México DF, México TEAC UK LIMITED http://tascam.eu/ TEAC EUROPE GmbH http://tascam.