Trail Camera Instruction Manual Model #: 119256CW 03-13
Page Index Introduction 5 Parts & Controls Guide 6-7 Battery and SD Card Installation 8 About the Setup Menu 9 Using the Setup Menu 9 SETUP MENU REFERENCE TABLE 10-11 Camera Operation 12 Mount the Camera 12 Power on the Camera 12 Test the Coverage Area 13 Secure the Camera 13 Viewing the Photos and Videos 14 Glossary 15 Technical Specifications 16 Troubleshooting/FAQ 17-20 3
IMPORTANT NOTE Congratulations on your purchase of one of the best trail cameras on the market! Tasco is very proud of these cameras and we are sure you will be pleased with yours as well. We appreciate your business and want to earn your trust. Please refer to the notes below and the instructions in this manual to ensure that you are completely satisfied with this product.
INTRODUCTION Congratulations on your purchase of a Tasco Digital Trail Camera. This camera is designed to record animal activity in the outdoors with its still image and movie modes and weatherproof, rugged construction. Your trail cam features a compact, portable size and an extra long battery life. Main Features: • 1.3 MP digital sensor • Compact Size (120mm*94mm*46mm) • Long Battery Life (Up to 6 months) • Trigger Time=1.
Parts and Controls Guide PIR Motion Sensor Camera Lens Padlock Hole Infrared LED Array Front of Camera PIR Indicator (Setup Mode Only Light Sensor IR LED Array Detail 6 Tripod Socket
Parts and Controls Guide USB Port LCD Display Power Switch SD Card Slot Battery Compartment Control Panel (Front Unlatched & Opened) Control Panel Detail 7
BATTERY and SD CARD INSTALLATION Your Tasco Digital Trail Camera is designed to operate using 4 AA batteries. We recommend using Lithium (for longest life) or Alkaline batteries. NOTE: Always set the power switch to the OFF position when installing or removing batteries. Please make sure the batteries are inserted correctly, as indicated inside the battery compartment. Incorrect voltage or polarity (+/-) will damage the camera. Do not mix old and new batteries.
ABOUT THE SETUP MENU Slide the power switch to the On position. You’ll see “WAIT” on the display, then the setup menu screen. Before you start using the camera, you’ll no doubt want to set the date/time so they are imprinted correctly on your photos, and maybe change the trigger delay time and image resolution to your preferences. This is done by editing the settings of an item listed in the Setup Menu. To enter the Setup Menu at any time, press the SETUP button (to left of the power switch).
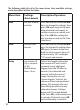
The following table lists all of the menu items, their available settings, and a description of their functions: Menu Item Settings Description/Operation Date set year, month, and day Press OK and use the UP/DOWN keys (to change the setting), then press OK again to go to the next date parameter and repeat, to set the current year, month, and day.
Menu Item Settings Description/Operation Mode 1.3M/3M (with Mode set to 1P or 3P for photos), 5-60 Sec (in Movie (video) mode Select “Mode” and press OK. Use UP/DOWN to select 1P (single photo), 3P (burst of 3 photos), or Movie (video mode). Press OK. Use UP/DOWN to set LO (1.3 MP) or HI (3 MP) still photo resolution (High resolution provides better quality photos, low resolution allows you to store more photos on the SD card), or video length from 5-60 sec. (if video mode was selected).
When you’ve finished using the Setup Menu, and are ready to return the camera to normal operating mode, so it will begin to capture photos or videos for you, simply press the Setup button. After you exit the Setup Menu, the display will go blank and the camera is in “sleep” mode. About 30 seconds later, the camera will begin taking photos or videos when triggered, at intervals determined by the trigger delay time setting.
Camera OPERATION (continued) 3. Test the Coverage Area One of the Trail Camera’s most useful features is the ability to test the coverage area. • After mounting the camera, open the front housing and slide the Power switch to the “ON” position. Press the SETUP button if necessary to enter the Setup Menu. • The PIR indicator light below the lens will blink when you have entered the coverage area. • Adjust the camera position as needed and repeat the test until the desired coverage area is achieved.
VIEWING THE PHOTOS and VIDEOS After your camera has been operating for awhile, you will of course want to review the photos and/or videos it has been capturing. This can be done by either of two methods, according to your preference or the availability of accessory equipment: Using an SD Card Reader 1. Push the SD card in slightly to release it then pull it out gently. 2.
GLOSSARY PIR (Passive Infrared Sensor): Senses motion like a typical security motion detector. Requires infrared energy (heat) in addition to motion to trigger the sensor to help limit detection to live subjects (rather than leaves, etc). Camera Delay: Time elapsed between photos while events are sensed and recorded. You should set this based on wildlife activity in the area. Moon Phase: The trail cams have a feature which imprints a moon phase stamp on each photo for reference.
Technical Specifications Model Number 119256CW Image Sensor Type 1/4 Inch CMOS Sensor Resolution 1.3 Megapixels Effective Focal Length 7.6 mm Lens Aperture IR Filter Display f/2.0 Automatic IR Filter LCD (menu screen) PIR Sensor Yes Trigger Speed Number of IR LED 1.
Troubleshooting / FAQ Battery life is shorter than expected 1. Battery life will vary with operating temperature and the number of images taken over time. Typically, the trail cam will be able to capture several thousand images before the batteries die. 2. Check to make sure you have used new alkaline or lithium batteries. Tasco recommends using 4 Energizer® Lithium AA batteries in this Trail Cam to obtain maximum battery life. 3.
Troubleshooting / FAQ Camera won’t power up 1. Make sure that you have installed all 4 batteries in the battery compartment. Tasco recommends using 4 Energizer® Lithium AA batteries in this trail cam . 2. Make sure that the batteries are installed correctly, observing proper polarity. Always place the negative (flat) end of each battery in contact with the spring tab side of its slot inside the camera. Do not mix old and new batteries. Do not mix battery types-use ALL lithium or ALL alkaline.
Troubleshooting / FAQ 5. Photos with streaked subject a. In some cases with low lighting conditions and fast moving subjects, the 3 MP resolution setting (“HI”) may not perform as well as the 1.3 MP setting (“LO”). b. If you have multiple images where fast moving subjects produce streaks on the photo, try the “LO” resolution setting instead. 6. Red , green or blue color cast a. Under certain lighting conditions, the sensor can become confused resulting in poor color images. b.
Troubleshooting / FAQ Camera won’t retain settings 1. Make sure that you have been saving the changes to any parameter settings that you made while in Setup mode, by pressing “OK” after changing the setting. If you don’t save your new setting after changing it, the camera will continue to use the original default setting for that parameter. Do not mix old and new batteries. Do not mix battery types-use ALL lithium or ALL alkaline. Rechargeable batteries are not recommended.
TWO-YEAR LIMITED WARRANTY Your Tasco® product is warranted to be free of defects in materials and workmanship for two years after the date of purchase. In the event of a defect under this warranty, we will, at our option, repair or replace the product, provided that you return the product postage prepaid. This warranty does not cover damages caused by misuse, improper handling, installation, or maintenance provided by someone other than a Tasco Authorized Service Department.
FCC Compliance Statement: This equipment has been tested and found to comply with the limits for a Class B digital device, pursuant to part 15 of the FCC Rules. These limits are designed to provide reasonable protection against harmful interference in a residential installation. Operation is subject to the following two conditions: (1) This device may not cause harmful interference, and (2) this device must accept any interference received, including interference that may cause undesired operation.
For further questions or additional information please contact: Tasco 9200 Cody, Overland Park, Kansas 66214 (800) 423-3537 • www.tasco.com ©2013 B.O.P.