Trampoline with Basketball Hoop Assembly, Installation, Care, Maintenance, and User Instructions 8FT and 10FT The instructions are important for your safety. Please read them thoroughly before you assemble or use the trampoline. Retain this manual for future reference. DO NOT attempt somersaults or flips. Paralysis or death can result if you land on your head or neck! No more than one person on the trampoline at a time. Multiple users increase the risk of injury.
PLEASE DO NOT RETURN TO STORE STOP Please do not return this product to the retailer!! We are able to assist you in ANY way If you find that you have any trouble with assembly or missing or damaged parts please contact the seller.
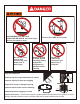
NO SOMERSAULTS OR FLIPS PARALYSIS OR DEATH can result if you land on your head or neck! Do not use if in a cast or have previous leg, arm, head, neck or back injury. No more than ONE user at a time Remove all hard or sharp objects including jewelry, eyeglasses, sunglasses or hairclips before jumping. Do not use without the consent of your physician, if pregnant.
BEFORE STARTING… Use trampoline only with mature, knowledgeable adult supervision. Do not attempt or allow somersaults. Landing on the head or neck can cause serious injury, paralysis, or death, even when landing in the middle of the mat. Do not allow more than one person on the trampoline. Use by more than one person at the same time increases the chance of injury. Carefully read and understand all of the instructions and warnings in this manual before assembling and using this product.
IMPORTANT WARNINGS Carefully read these warnings before using this product. Failure to follow these warnings can result in serious injury or death. Only one user at any one time! Multiple users can cause loss of control, collision or falls on the trampoline. This could result in serious injury to legs, arms, back, neck or head. Always use the product in a well-lit area.
IMPORTANT WARNINGS Use trampoline only with mature, knowledgeable adult supervision. Do not attempt or allow somersaults. Landing on the head or neck can cause serious injury, paralysis, or death, even when landing in the middle of the mat. Do not allow more than one person on the trampoline. Use by more than one person at the same time increases the chance of injury. Carefully read these warnings before using this product.
IMPORTANT WARNINGS Use trampoline only with mature, knowledgeable adult supervision. Do not attempt or allow somersaults. Landing on the head or neck can cause serious injury, paralysis, or death, even when landing in the middle of the mat. Do not allow more than one person on the trampoline. Use by more than one person at the same time increases the chance of injury. Carefully read these warnings before using this product.
IMPORTANT INSTRUCTIONS FOR ENCLOSURE NETTING AND MAT Important Instructions for Enclosure Netting and Mat Failure to follow these instructions to ensure proper operational condition of your trampoline may lead to serious injury or death. 1. Maintenance of Trampoline Enclosure Net, Mat and Pad Enclosure nets and padding are prone to wear and tear like tires on a car.
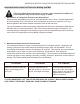
IMPORTANT INSTRUCTIONS FOR ENCLOSURE NETTING AND MAT How to Inspect the Trampoline Net for Proper Use Always check the enclosure netting for signs of UV damage, deterioration, brittleness, cracking, and tearing every time before using the trampoline and enclosure. Step 1 - Inspect the enclosure netting before EACH use for wear or tear by pinching and pulling a section of the netting between fingers and pulling downward. Please see diagram below.
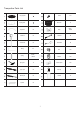
Trampoline Parts List Jumping Mat Screw 17x Spring Pad Enclosure 1x Top frame 6x Rope 8ft 5x 10ft 6x T Section 6x Hex Bolt 6x Vertical tube 6x Round Bolt 6x W leg 3x Nut 12x Spring 8ft 42x 10ft 54x Washer 12x Spring tool 1x Plastic spacer 12x Upper pole 6x Ball cap 5x Bottom pole 6x Manual 1x Spanner 2x 7
Basketboard Parts List A 1PC B 1PC C 1PC E 4PCS F 1PCS G 2PCS B D A E C 8 D 1PC
Ladder Parts List 2x Step 2x Pole STEP 4x Nut and Bolt 2 Slide the Steps into the Poles. Ensure that the hooks are on the same sides as the STEP 1 Position the nuts at each hole in each Step. nuts. Ensure that the plastic side of the nut faces outwards. 1、Put the nut in the steps's hole,make sure the plastic side of the nut face to the outside STEP 3 Position the Steps over the holes in the Poles, and secure them with bolts.
Assemble Frame of Trampoline Before you start: check all the steps before assembling and read all precautions before using the trampoline. It requires at least two adults to assemble the trampoline. Must use Protective Gloves to avoid injury during the assembly.
12 1.4 1.3 Step 2 - Leg Support Assembly • Connect the T Section(# 4) to the Top frame(# 3) as shown in Figure1.2 • Connect the Vertical tube(# 5) to the W leg(# 6) as shown in Figure1.3 with Screw(# 12) • Connect the completed sections in 1.2 and 1.3 as shown in Figure1.4 • Repeat this step for the other two sets as shown in Figure 1.5 • Connect three parts in Figure1.5 and complete the frame assembly 1.
Trampoline Mat(# 1) Assembly of the trampoline Mat Triangular Rings Spring(# 7) To assemble the trampoline Mat, use the Spring tool(#8) to load on the Spring(#7) and connect it to the Top frame(#3), as shown in Figure 2.1 ①Point Top fram e(# 3) Spring Tool (# 8) 2.1 Start ① point ⑤ ⑧ ③ ④ ⑥ ⑦ 2.2 ② • Place the trampoline Mat (#1) on the floor in the Interior of the frame assembled. • Select a starting point (point ①) in the frame and load on the first Spring(#7).
Important Notice • Never use the trampoline without the frame pad(#2), which reduces the risk of being injured by bumping into the metal structure. • Inspect the cushion frame and metal parts are completely covered by the frame pad before each use. • Place the Frame Pad(#2) on the trampoline and fully cover the springs and Top frame(#3). • Align the straps to Leg Sockets(#4) and tie the elastic straps to the connectors of the legs. First, tie a knot and then tie in a bow on one side, as shown in Figure 3.
• Attach the Bottom Pole(#10) to the frame, secure the upper hole with Eye Bolt(#16), Plastic Spacer(#19), Nut(#17) and Washer(#18), and secure the lower hole with Hex Bolt(#15), Nut(#17) and Washer(#18) by using Spanner(#11). • Connect the Upper Pole(#9) to Bottom Pole(#10) with Screw(#12). • Put on the Ball Cap(#20) and secure with screw(#12). • Repeat the above steps to finish assembling all 6 poles. 20 10 4 9 19 3 16 17 18 12 5 10 16 17 18 19 15 4.
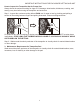
! WARNING:To avoid strangulation and entanglement, keep all cords out of the reach of young children. 7.1.1 7.1.2 F 9 Do not tight the straps until all straps are set up and then tight all straps at a time to adjust the length. 7.1.3 7.2 14 13 8 9 15 The basketball hoop is reversible. You can secure it facing inside or outside of the trampoline.
Assembly and Installation Instructions ASSEMBLY AND INSTALLATION INSTRUCTIONS Review all steps before assembly and read all precautions before using this product. Failure to do so can result in serious injury or death. During periods of non-use, this trampoline and trampoline enclosure can be easily disassembled and stored by reversing the order of installation. At least two people are required to assemble the trampoline and trampoline enclosure.
DISASSEMBLY OF THE TRAMPOLINE AND ENCLOSURE IMPORTANT Once you have finished the assembly of the trampoline, go back over all of the nuts and bolts and properly tighten all of them before using. Read this entire manual and make sure all jumpers completely understand all of the safety rules printed in the manual and on the various warning signs. Instruct all jumpers in the basic bounces described in the manual. CARE AND MAINTENANCE AND USE INSTRUCTIONS MUST BE READ CAREFULLY BEFORE USING THE TRAMPOLINE.
CARE AND MAINTENANCE Care and Maintenance Failure to follow these instructions to ensure proper operational condition of your trampoline may lead to serious injury or death. The springs, trampoline legs and enclosure netting must be inspected prior to every use. The legs should be locked securely into place, all the springs attached to the frame and there should be no tears in the enclosure netting.
PROPER USE INSTRUCTIONS Proper Use Instructions Read and understand the use instructions in this manual prior to using this product. Failure to do so can result in serious injury or death. Responsibilities of the user The key here is to stay in control of your jumps. DO NOT move onto more complicated, more difficult maneuvers until you have mastered the basic, fundamental bounce. Read, understand, and practice all precautions and warnings prior to using the trampoline.
PROPER USE INSTRUCTIONS Read and understand the use instructions in this manual prior to using this product. Failure to do so can result in serious injury or death. Read all instructions before using the trampoline. Warnings and instructions for the care, maintenance and use of this trampoline are included to promote proper and enjoyable use of this equipment. Inspect the trampoline before each use.
LEARNING THE FUNDAMENTAL TRAMPOLINE SKILLS Learning the fundamental trampoline skills The following lessons are suggested for you to learn basic steps and bounces. Before using the trampoline, you should read and understand all warnings. A complete discussion and demonstration of body mechanics and trampoline guidelines should occur between the supervisor and student as well. The bounces are diagrammed on the following page. Lesson 1 A. Mounting and Dismounting – Demonstration of proper techniques B.
LEARNING THE FUNDAMENTAL TRAMPOLINE SKILLS BASIC TRAMPOLINE BOUNCES THE BASIC BOUNCE 1. Start from the standing position, with your feet having shoulder width apart and with head up and eyes on mat 2. Swing arms forward and up in a circular motion 3. Bring feet together while in mid-air and point toes downwards. 4. Keep the feet shoulder width apart when landing on mat THE KNEE BOUNCE THE SEAT BOUNCE THE 180 DEGREE BOUNCE 1. Start with the basic bounce and keep it low 2.