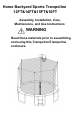
Home Backyard Sports Trampoline 12FT&14FT&15FT&16FT Assembly, Installation, Care, Maintenance, and Use Instructions WARNING Read these materials prior to assembling and using this Trampoline/Trampoline enclosure.
6 years of age. 120kg -Product dimensions: Jumper 366(12FT):φ366cm*(H)270cm Jumper 426(14FT):φ426cm*(H)270cm Jumper 457(15FT):φ457cm*(H)270cm Jumper 488(16FT):φ488cm*(H)270cm Dear Sir, Madam The manufacturer is constantly improving all types and models. Please understand that changes to the delivered product in terms of form, features and technology are thus possible at any time. Therefore no claims may be derived from the information, illustrations and descriptions in this manual.
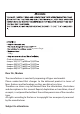
INTRODUCTION Before you use this trampoline, carefully read all information in these operating instructions and make sure you follow it. Just like any other leisure activity, there is a risk of injury. To avoid injuries, ensure that you observe the corresponding safety regulations and tips. Misuse of this trampoline is dangerous and can lead to serious injuries! • • Check the trampoline before every use for a worn mat or loose or missing parts.
• Do not jump if you are tired. eep the exercise times short. • Properly secure the trampoline hen it is not in use. Secure it against unauthorized usage. If a ladder is being used, the spotter should remove this from the trampoline if they leave the area in order to prevent unauthorized access by children under the age of si . • Trampolines are not suitable for children under the age of 6 • eep objects faraway that could get in the way of the trampolinist. eep the space around the trampoline free.
WIND In the event of strong wind, the trampoline can be blown away. If you are expecting strong wind, the trampoline must be placed in a sheltered position or dismantled. Another option is to secure the round outer part (top frame) of the trampoline in the ground with the help of ropes and stakes. Make sure that the connection at the bottom reaches to the middle of a frame part. For a secure positioning, at least three connections must be placed in the ground.
• Other objects: Do NOT use the trampoline if animals, other people or any objects are under the trampoline. This can other ise increase the risk of injury. Don’t hold ANY objects and do NOT put anything on the trampoline while someone is jumping on it. Pay attention to what is over your head when you are jumping on the trampoline. Branches, cables and other objects above the trampoline increase the risk of injury.
LESSON PLAN plicated jumps. Read and understand all safety information before actually getting on the trampoline and using it. In addition, the spotter and pupil should fully discuss body movements and trampoline safety information and the spotter should perform a demonstration. Lesson 1 B. Performing and practicing the basic jumps C. Stopping (see jump demonstrations) with exercise. Learning to stop on command. D. Hand and knee demonstration and practice.
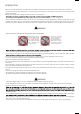
BASIC TRAMPOLINE JUMPS BASIC JUMP KNEE DROP 1. Start out standing with your feet a shoulder’s width apart, your head held up high and your eyes focused on the mat. 2. Swing your arms to the front and up in a circular shape. 3. Put your feet together in mid air and point your toes down. 4. When you land on the mat, position your feet a shoulder’s width apart. 1. Start with the basic jump and perform a low jump. 2.
PARTS LIST Please select your trampoline size. REMEMBER TO USE GLOVES DURING ASSEMBLY TO AVOID PINCHING and IT WILL TAKE AT LEAST TWO PEOPLE TO ASSEMBLE THE TRAMPOLINE STEP 1 – Frame Layout Please select your OWN tubing parts’ quantity according to the products in your hand from following illustrations.
STEP2 - Support Assembly Slide all vertical leg extender (#4) onto the Foot (#3) as shown STEP3 - Top Rail Assembly 2 # #4A •• 厂二= 勹 Two people will be necessary at this point to assemble the trampoline. Connect two of the Ring elements with leg support (#2) with one of the Ring elements (#1). Then connect it with the "Vertical leg extender+ Foot" assembled in Step 2, forming a bridge.
IMPORTANT NOTICE Make sure the holes on the Ring Element with Leg Support (#2) and the vertical leg extender B (#4B) are aligned. If the holes are not aligned,please rotate the vertical leg extender B (#4B) so that the 2 holes match each other. • These holes needs to be aligned so that you can assemble the safety net. STEP 5- Trampoline Mat Assembly When Attaching springs to the trampoline mat, Please be ca『eful. You will need another pe『son to help you with this portion of the assembly.
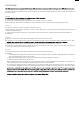
C. Select your trampoline size. Select your spring quantity.
15FT 16FT
v maintain the count of springs. and or STEP 6-Frame Pad A. Attaching the frame pads securely to the frame and in the proper prior to use the trampoline. B. Lay the Frame Pad (5) over the trampoline so that the Tie the straps on the pad tightly to the ring elements as the following photo shows. .
CARE AND MAINTENANCE This trampoline was designed and manufactured with quality materials and craftsmanship. If proper care and maintenance is provided, it will provide all jumpers with years of exercise, fun, and enjoyment as well as reduce the risk of in丿ury. Please follow the guidelines listed below: This trampoline is designed to withhold a certain amount of weight and use. Please make sure that only one person at any one time uses the trampoline.
Assembly Instruction for Safety Enclosure 1. Parts List Reference Number Description Quantity(12FT&14FT&15FT&16FT) 1 Upper pole A/B 1/5PCS 2 Lower pole C/D 1/5PCS 3 Bar Spacers 12PCS 4 12PCS 5 Washers Eye bolt screw/screw 6 Nuts 12PCS 7 Pole Cover and its PE sleeve 8 Cap/Open-ended cap 6/6PCS 6sets( 1set=2pcs pole cover+1pc PE sleeve) 5/1PCS 9 Safety Net 1PC 10 Wrench 1PC Upper pole A and Lower pole C are only for putting up basketball board purpose! 2. Diagram for Parts 1.
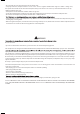
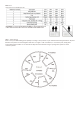
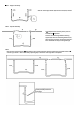
3. Assembly Instruction STEP 1: Slide upper pole (#1) onto lower pole(#2); wrap them with pole cover and its PE sleeve(#7); slide cap(#8) onto the top of upper pole(#1). Please make sure that open-ended cap is connected with upper pole A and upper pole A connected with lower pole C, otherwise there is no chance to install the basketball board successfully. 1 8 2 7 FIGURE 1 FIGURE 2 FIGURE 3 STEP 2 : Repeat step 1 until all the poles are set up.
STEP 3: Spread the safety net (#9) over the trampoline and do as the following photos advise. STEP 4: Pull the safety net (#9) off and attach the bottom of it to the spring hooks. It is advised to use the ropes to connect the safety net and mat more closely as the following photo shows. This leaves less gap in order to protect the user better.
Trampoline Accessory: Ladder Ladder Accessories: Ladder Curved Tube x 2pcs Ladder Step Tube x 2pcs Cross Bolt x 4pcs(M6) Washer x 4pcs(M6) Nut x 4pcs(M6) L-Shape Cross Screwdriver (share with basketball board)x 1pc Wrench (share with trampoline) x 1pc
Trampoline Accessory: Basketball Board 1.U-Shape connecting tube*1PC 2.Black plastic basketball board*1PC 3.Black steel basketball hoop*1PC 4.Net*1PC 5.Rubber ball*1PC 6.Inflator*1PC 7.L-Shape cross screwdriver*1PC 8.Wrench(share with trampoline)*1PC 9.Molded iron plate*1PC 10.Hexagon bolt*4PCS(M8) 11.Washer*4PCS(M8) 12.Nut*4PCS(M8) NO DUNKING!!! Step 1: Connect part #3, #9, #2, and #1(photo as follows) with 4 sets of part #10, #11, #12. Tighten them firm with part #7 and #8.