Taurus S2 Dual-Bay Storage Enclosure for 3.5” Serial ATA Hard Drives User Manual (English) v1.
Table of Contents CHAPTER 1 - INTRODUCTION 1 CHAPTER 3 - SYSTEM SET UP 7 ICON KEY 1 CONNECTION TO YOUR COMPUTER 7 THE TAURUS S2 1 HARD DISK MODE 7 OTHER AVAILABLE INTERFACES 1 RAID SETUP 7 DETAILED VIEW 2 NON-RAID 7 FRONT VIEW 2 BIG 7 LED INDICATION 2 FAST 7 REAR VIEW 3 SAFE 8 RAID SELECTOR SWITCH 3 INSTALLATION ON A PC 9 SMART FAN 3 REMOVE PROCEDURE 9 SYSTEM REQUIREMENTS 4 INSTALLATION ON A MACINTOSH 10 PC REQUIREMENTS 4 REMOVE PROCEDURE 10 MAC REQUIREMENTS
Taurus S2 User Guide Chapter 1 - Introduction Icon Key Throughout this manual you will see icons on the left margin that denote either notes or special remarks as outlined below: General notes and tips. Important information. The Taurus S2 Features mentioned in this manual may vary between different models. When it comes to raw power there is nothing to beat the new dual-bay Taurus.
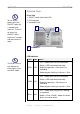
Taurus S2 User Guide Detailed View To turn on the power, press the ON/OFF switch for 3 seconds and release it. To turn it off, press the ON/OFF switch, hold it for 5 seconds and then release it again. Front View 1. ON/OFF switch (blue when ON) 2. LED indication 3. Ventilation holes 1 2 3 LED Indication LED The Error LED will only light up for errors when using the SAFE mode.
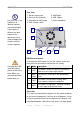
Taurus S2 For RAID 0 & 1, two hard drives of identical capacity are recommended. If the capacity is different, the total amount of the space that can be used will depend on the drive with the smallest capacity. User Guide Rear View 1. Slot for security lock 2. Smart fan for ventilation 3. Set button for RAID mode 4. RAID selector switch 5. eSATA port 6. USB 2.0 port 7.
Taurus S2 User Guide System Requirements PC Requirements • • • • Minimum Intel Pentium III CPU 500MHz, 128MB RAM eSATA equipped PC; Windows 2000/XP/Vista USB 2.0 (USB 1.1) equipped PC; Windows 2000/XP/Vista eSATA Plug and Play support required for host card driver Mac Requirements • • • • Minimum Apple G4 processor, 128MB RAM eSATA equipped Mac; Mac OS 10.3 or above USB 2.0 (USB 1.1) equipped Mac; Mac OS 10.
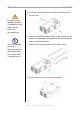
Taurus S2 User Guide Chapter 2 - Hard Drive Assembly 1. Remove the four screws at the bottom of the case. Your unit may come with a pre-installed hard drive. Before opening such an enclosure, please read the warranty from your vendor carefully, as this could void your warranty. 2. Push the inner enclosure out, and remove the outer chassis. The aluminium stand does not have to be removed for drive assembly. For RAID 0 and RAID 1, drives with identical capacities are recommended.
Taurus S2 User Guide 5. Install the second hard drive and mount it with two screws on each side. Be careful not to damage any cables or components, and make sure the cables are connected firmly. 6. Connect the SATA and power cables to your hard drives. Be careful not to damage any components and confirm that the cables are connected firmly. The LED indication for HDD1 is referring to the hard 7. Slide the inner enclosure back into the outer chassis.
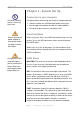
Taurus S2 User Guide Chapter 3 - System Set Up Connection to your Computer Only one interface can be used at any given time. A few precautions when using your external storage enclosure: • Check the cables for visible damage before turning it on • Do not expose the product to water or humid conditions • Do not cover the enclosure’s ventilation holes Hard Disk Mode Always connect the power adapter to your device before you plug it into the wall socket.
Taurus S2 The data can be accessed even during the rebuild process. The HDD LEDs will flash red during the rebuild process,. User Guide SAFE: This mode requires 2 identical drives to implement, otherwise the total amount of the space that can be used will depend on the drive with the smallest capacity. RAID 1 creates an exact copy or mirror of a set of data on the second drive. This is useful when reliability and backup are more important than data capacity.
Taurus S2 User Guide Installation on a PC Before connecting the device, setup the RAID mode using the selector switch at the back of the enclosure. If the system doesn’t recognise the drive, turn on the power first, before connecting the interface cable or connect the device before booting your Operating System. If the drives have been pre-installed and setup already, you do not need to change anything, unless you prefer a different setup. • • • • Turn on your Computer and start Windows.
Taurus S2 User Guide Installation on a Macintosh Before connecting the device, setup the RAID mode using the selector switch at the back of the enclosure. If the system doesn’t recognise the drive, turn on the power first, before connecting the interface cable or connect the device before booting your Operating System. If the drives have been pre-installed and setup already, you do not need to change anything, unless you prefer a different setup. • • • • Turn on your computer and start Mac OS.
Taurus S2 User Guide Partitioning & Formatting If the drive does not appear, make sure the drivers are installed properly and the power is on. Be aware that this will destroy all your existing data on the drive, so make sure you have a backup! This step is usually only required the first time you install a factory new hard drive, if you change the RAID mode or want to erase all data on your drive.
Taurus S2 User Guide Mac OS For Mac OS X, use the disk utility to format and create partitions on your external disk. If the drive does not appear on the desktop, make sure there are no extension conflicts and the power is turned on! • Select “Disk Utility” in the utilities folder • Choose your external drive and format it according to your requirements When using the BIG, FAST or SAFE mode, only one volume will be visible instead of two separate drives.
Taurus S2 User Guide Chapter 4 - Appendix Technical Questions Please read your warranty carefully, as this may vary between different vendors! For RMA and other questions, please contact your vendor or check out their online support area! FAQ Q: What file system should I choose to format my drive? A: This will depend on how you want to use the drive but in general, here is what we recommend: • Windows 2000/XP/Vista Æ NTFS • Mac OS X Æ HFS+ (Mac OS Extended) • To use it on both PC and Mac Æ FAT32 About