
User Manual


19
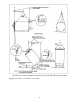
RE-EVACUATION PROCEDURE
After any required vacuum repairs have been completed, re-evacuate the insulation space as
follows:
1. Break the seal wire and remove the pipe plug from the evacuation valve. Use two
wrenches, one on the valve, the other on the plug.
2. Be sure that there is not positive pressure in the casing. If necessary, crack open the
evacuation valve to relieve the pressure.
3. Check that the inner container is empty, warm, and pressurized to at least 10 psig.
Refer to "Warming the Tank".
4. Attach vacuum pump to the evacuation valve.
5. With the evacuation valve open, evacuate the insulation space to at least 150
microns (0.15 mm Hg) absolute.
NOTE: Vacuum level will decrease to an acceptable level when the liquid container
is filled with product.
6. When proper vacuum has been obtained, close the evacuation valve and disconnect
the vacuum pump.
7. Thread the pipe plug into the valve port, engaging one thread. Apply Airserco high
vacuum sealant to the remaining threads. Tighten plug using two wrenches. Install
new seal wire to prevent tampering.
PAINTING
If repainting the tank is required, be sure to use materials that are compatible with the factory-applied
finish. The tank was painted with the following materials:
Primer: Gavlon 8198 High Build Epoxy Primer
2 – 3 mils thick
Finish Coat: Gavlon HS350 Polyurethane Enamel, Gloss White
2 – 3 mils thick
SAFETY PRECAUTIONS PERTAINING TO PAINTING OPERATIONS
All paint components contain volatile solvents, mainly petroleum distillates, alcohols, xylene. Normal
precautions for flammable materials should be observed including exclusion of heat, sparks, and open
flame. Containers should be grounded before pouring.
All the ingredients present physiological hazards both from inhalation and absorption through the
skin. Breathing of the vapor and spray mist must be avoided. Protective clothing including rubber
gloves must be worn. Allergy-prone individuals may be sensitized and should not be exposed to
isocyanates.