PERFORM-VE Revolutionary Vocal Manipulator with MIDI-Pitch-Controlled Sampling, Vocal Synth and One-Button Drum Looper User Manual Rev. 1.
PERFORM-VE User Manual Table of Contents Important Safety Instructions....................................... 3 Legal Disclaimer.............................................................. 3 Limited warranty............................................................. 3 1. Introduction................................................................ 4 2. Update your Device!................................................... 4 3. Connection Diagram.................................................. 5 4.
PERFORM-VE User Manual Important Safety Instructions Terminals marked with this symbol carry electrical current of sufficient magnitude to constitute risk of electric shock. Use only high-quality professional speaker cables with ¼" TS or twist-locking plugs pre-installed. All other installation or modification should be performed only by qualified personnel.
PERFORM-VE User Manual 1. Introduction 2. Update your Device! Thank you for purchasing Perform-VE! It is HIGHLY recommended that you update the firmware on your Perform-VE before first use. Your new mic stand-mounted vocal processor opens up a world of sound creation and performance opportunities. Starting with our Adaptive Tone (automatic EQ, De-Essing, Gating and Compression), your voice will punch through the mix and sound great in any environment.
PERFORM-VE User Manual 3. Connection Diagram Perform-VE has a lot of connectivity: • MIDI data is received via the mini-USB port or the 5-Pin MIDI socket. • MIDI data is transmitted via the mini-USB port. • The PEDAL input allows you to connect a Switch-3 or Switch-6 (sold separately) to change presets, toggle effects and control the LOOPER and SAMPLE features. • The AUX input lets you mix stereo audio tracks with Perform-VE’s output.
PERFORM-VE User Manual 4. The Set Button Mic Gain Setting Configures: Microphone Input Level, MIDI Channel Select, MIDI Split Point Select, & More… Once a microphone and a MIDI keyboard are connected to your Perform-VE, it’s time to ensure that the audio and MIDI settings are correct. You achieve this with the SET button. The SET button performs many functions in your Perform-VE.
PERFORM-VE User Manual 5. Front Panel Toggling the Effects Now that your Perform-VE is set up and connected to the devices of your choosing, we’re going to take a quick tour of the front panel, explaining what each of the buttons do without getting too deep in any details just yet. Don’t worry – we’ll go feature diving soon enough! Quickly pressing and releasing any one of the FX buttons will toggle the associated effect on and off.
PERFORM-VE User Manual 6. Effects Double Style 6.1 Double Applies to: LEAD Voice Double simulates the classic “double tracked” studio sound that’s common on recordings of all genres. Double Style selections can include Octave Up and Octave Down voices, for an even thicker effect. Double Level Double Level changes the amount of doubled voice, relative to your lead vocal. On the ring, Level is indicated by one up to all LEDs lit, in the color of the current style. Range: Off, -10 to 0 dB 6.
PERFORM-VE User Manual Synth Vocoder Perform-VE has a dual oscillator synth vocoder hidden inside. When Synth Vocoder styles are chosen, the synthesizer will generate up to eight articulated synth voices to render the MIDI notes you play, and will also generate a ninth Lead synth voice that follows the pitch of your voice. The graphic above assumes a sample hasn’t been recorded. In this case, your Lead vocal gets a dedicated synth voice and also acts as the modulator (shaping signal) for the vocoder.
PERFORM-VE User Manual Morph Mode Morph Mode controls the Mono/Poly setting of the Notes, Vocoder and Sample MIDI voices. Green LED selections set the MIDI voices to Poly mode, and adjust their release time (how long voices will take to fade out after you release their controlling key). Bear in mind you will need to keep singing (play a long enough sample) after the note release to hear the fade out. Red LED selections set the MIDI Voices to Mono mode and adjust the portamento time from 0 to long.
PERFORM-VE User Manual 6.3 HardTune Applies to: LEAD Voice HardTune provides pitch correction that varies from subtle all the way up to T-Pain™ style tuning. Generally speaking, pitch correction alters your Lead vocal pitch to fit within a selected Key and Scale. If all you care about is keeping your voice within the defined black and white notes on the piano keyboard, select the Chromatic scale, which is the same for all keys.
PERFORM-VE User Manual 6.4 XFX XFX stands for ‘EXTREME EFFECTS’… it lives up to the name, as we’ll now explain. Applies to: Lead Vocal MIDI Voices XFX Style There are seven different XFX styles: Stutter effect, Chopper effect, Ring Modulation, Flanging and even a SideChain Pumping Compressor. Each XFX Style has two dedicated mod parameters that you can apply to tailor the XFX in question to suit your current inspiration.
PERFORM-VE User Manual Recording a new Stutter Sample For even faster re-recording of the stutter sample, double-click the style corner button and this will instantly clear the sample and arm the Stutter effect to record a new sample. XFX Style: Chopper There are two Chopper styles: Mono Chopper and Stereo Chopper. At full depth, Mono will gate the level of the audio, while Stereo will alternate (ping-pong) the audio between Perform-VE’s left and right stereo outputs.
PERFORM-VE User Manual Ring Mod, Mod 1: Frequency Ring Mod, Mod 1 controls the frequency (pitch) of the modulating sine wave. Sweep it across its range to apply a vintage radio tuning sound on your fixed pitch signal, or keep the frequency fixed while singing a melody to hear that 1950’s UFO/Raygun sound. Range: 30 to 1000 Hz Ring Mod, Mod 2: Level Ring Mod, Mod 2 controls the level of the ring-modulated signal relative to the input audio signal.
PERFORM-VE User Manual XFX Style: SideChain Pumping The SideChain Pumping Compressor is meant to be used with the LOOPER’s built in drum sequencer. When you are playing a beat, the SideChain Compressor will momentarily throttle back (compress) the volume of your Lead, MIDI and audio loop mix whenever the drums hit a certain threshold volume. This ensures your drums will always stand out in the mix. This effect is also called ‘SideChain Pumping’.
PERFORM-VE User Manual Echo Div Echo Division controls both the Delay’s rhythmic division and its type. Blue LED selections are Ping-Pong delays in which echoes ‘bounce’ between left and right in the stereo field, while green LED selections are delays in which echoes are heard on both sides of the stereo field. The red LED selection is a short single-repeat echo called a Slapback delay, useful for dialing in a retro 50’s pop song vibe.
PERFORM-VE User Manual 6.6 Filter Applies to: LEAD Vocal MIDI Voices Anything that EQ’s (equalizes), filters or distorts your voice falls into the Filter category. You can sound like you’re on an old radio or distort your voice for an edgy attack. Be careful with Megaphone effects when you’ve got a loud PA. We need to adjust EQ a lot to create these sounds, so they’re a bit more prone to feedback than other effects.
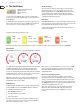
PERFORM-VE User Manual 7. Presets A preset is a “complete sound” created by a combination of effects. You’ll notice that the active effects change between Preset 1 and Preset 2 in the image above. Presets can be configured however you like. The state (on/off), style, level and other editable parameters for each effect in a preset can also be different from preset to preset. Saving Changes To save your current settings as one of the three presets, press and hold preset button 1, 2, or 3 for one second.
PERFORM-VE User Manual 8. Tap (Tempo) SET + Preset 3: Mic Control Holding down the SET button and pressing Preset 3 repeatedly will cycle through Mic Control settings, with the VU meter LED showing which mode you’re in. Applies to: Tempo The Tap button’s red LED flashes in time with the current tempo, with the down beat of each 4/4 measure flashing brighter than the remaining three beats. RED: Mic Control Off Use this when you have a condenser microphone.
PERFORM-VE User Manual 10. Performance Effects: Looper & Sample The performance effects – Looper and Sample – are not really effects for your voice, but are great tools to enhance your performance. Both give plenty of opportunity for creative experimentation and unorthodox songwriting. The loops and samples you create on Perform-VE are not stored with any preset. Loops and samples persist between preset changes, although they will not be saved when you turn off your Perform-VE.
PERFORM-VE User Manual Clocks, Loop Length & Tempo Pausing and Restarting Loop Playback Perform-VE’s tempo matching depends on whether external MIDI clock is driving Perform-VE or not. Loop playback is paused by double-tapping the loop corner button or by pressing the TAP button. Once you've paused the LOOPER, playback will resume at the very beginning of the loop. This means you always resume playback from the top of the loop when you press the loop corner button.
PERFORM-VE User Manual Quantizing applies to external and internal clock setups, even when you lay down the very first pass of a drum loop under internal clock control. Once drum events have been recorded as quantized, disabling quantize will not restore their original timing. If you find that the drum patterns you wish to record do not play back as intended, try erasing and re-recording them with the quantize set to the opposite value.
PERFORM-VE User Manual Backing Up Your Loops How to start with an audio loop (with no drum loop): The best way to preserve a loop is to record it with a DAW software package where it can be added to your clip library and used to build really complex arrangements. • Press loop to arm the recorder (flashes red). • Press loop again to begin recording (solid red). Vocalize the phrase that you want to loop.
PERFORM-VE User Manual 10.2 Sample The SAMPLE performance effect records a sample of your input audio signal and processes it with TC-Helicon’s VSS technology to create sample-based MIDI voices. VSS (Vocal Sampling Synthesis) allows you to record anything from bel canto to beatboxing, then play it back on the keyboard instantly at any pitch, with the tonal nuance of your performance well intact. • To record a sample, press and hold the rec corner button.
PERFORM-VE User Manual 11. AUX Input 12. Switch3/Switch6 (Pedal) In When a Switch3 or Switch6 is connected (using the TRS cable that came in the S3/S6 box) you can control various aspects of Perform-VE remotely. The default behavior for Switch3 is to change presets according to the numbers on Switch3.
PERFORM-VE User Manual Appendix A: How it Works: LPF/HPF Filter When the LPF/HPF Style is active, Filter Mod controls the cutoff frequency of either the LowPass or HighPass filter (LPF and HPF). The overlap of these two filters’ frequency response creates a sweeping BandPass filter (BPF) effect. Each filter has a passband, or band of frequencies it will pass at full gain.
PERFORM-VE User Manual Appendix B: MIDI Implementation Perform-VE responds to Control Change (CC), Program Change (PC) and MIDI Tempo (not MIDI Clock) information.
PERFORM-VE User Manual Appendix C: General RPN/NRPN Implementation RPN 0: Pitch Bend Sensitivity. This is a standard way to change pitch bend range. MIDI Tempo Perform-VE responds to incoming MIDI tempo and will adjust system Tap Tempo accordingly. Split Point and Transpose When controlling Morph Voices via MIDI notes, it is sometimes desirable to have one section of the keyboard designated to sending that control information. It could be the area that your left hand is, to play chords of harmonies.
PERFORM-VE User Manual
PERFORM-VE User Manual
PERFORM-VE User Manual