
Owner manual


5
How Do I Use This Thing?
6. Press Back to exit.
7. Pick a preset you like.
8. Press play on your mp3 player or computer.
9. Sing your heart out!
Looping Tips
When it comes to looping, practice is the key. You might notice that your loops have a small gap be-
tween the end of the phrase and when the loop restarts. This happens when you mis-time pressing the
PLAY/REC/O-DUB button. Pay careful attention to co-ordinating your button press to the down beat,
so that the loop beginning and end is seamless.
Experiment with exiting LOOP MODE and picking a different vocal sound for the next O-DUB layer.
You can get some great results by simply varying the sounds that are part of the loop.
When adding an O-DUB layer, you can record multiple passes of O-DUB parts without starting and
stopping the looper. This allows you to add numerous parts, which can all be removed with a single
UNDO action. (they can also be brought back by repeating the UNDO action)
Using a Switch3 will give you permanent access to looping without pressing the Up and Down foot-
switches. It frees up those switches to be assigned for Key/Scale selection, plus you don’t have to go in
and out of loop mode to change presets. It times out automatically, so you can choose a new sound.
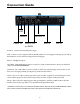
The Switch3 buttons are mapped as follows:
1. Rec/Play/O-Dub
2. Stop/Clear (Hold)
3. Undo
The benet of having undo on a separate button is the ability to perfectly time your undo, rather than
waiting a moment for a Hold to be registered.
Note: When a Switch3 is plugged in, Key/Scale selection is automatically assigned to UP/DN. When the
Switch3 is unplugged, UP/DN remains Key/Scale and will need to be changed in the setup menu if you
wish to assign UP/DN back to Looping.
For more info on Switch 3, check out:
www.tc-helicon.com/products/switch-3