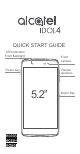
QUICK START GUIDE LED indicator/ Front flashlight Front camera Volume up/down Power key 5.
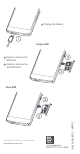
1 Charge the battery Single-SIM 2 Insert or remove the SIM card 3 Install or remove the microSD card Dual-SIM www.alcatel-mobile.
Boom Key If Boom Key is enabled, • From Home screen, press the key to show weather effect. • Press the key to instantly take a photo when your phone is locked. • Press and hold the key to take burst shot when your phone is locked. • Press the key to trigger audio effect when a song or movie is played. • Press the key to enhance voice quality during a call. • Press the key from Gallery Moments to create a photo collage. • Press the key to trigger special effect such as sequence change when a movie is played.
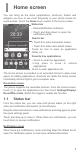
1 Home screen You can bring all the items (applications, shortcuts, folders and widgets) you love or use most frequently to your Home screen for quick access. Touch the Home key to switch to the Home screen. Status bar • Status/Notification indicators • Touch and drag down to open the notification panel. Search bar • Touch to enter text search screen. • Touch to enter voice search screen. Touch an icon to open an application, folder, etc. Favorite tray applications • Touch to enter the application.
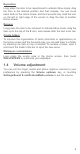
Touch to switch to the quick settings panel. Touch to clear all event–based notifications (other ongoing notifications will remain). Quick settings panel Touch and drag down the Notification panel or touch to open the Quick settings panel. You can enable or disable functions or change modes by touching the icons. Touch the icon to customize your Quick settings panel. Touch to enter user screen to edit and save owner's name, phone number, and other information. Touch to customize your Quick settings panel.
Reposition Long press the item to be repositioned to activate Move mode, drag the item to the desired position and then release. You can move items both on the Home screen and the Favourite tray. Hold the icon on the left or right edge of the screen to drag the item to another Home screen. Remove Long press the item to be removed to activate Move mode, drag the item up to the top of the X icon, and release after the item turns red.
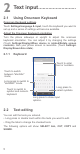
2 2.1 Text input �������������������������� Using Onscreen Keyboard Onscreen Keyboard settings Touch Settings\Language & input, touch the keyboard you want to set up and a series of settings will become available. Adjust the Onscreen Keyboard orientation Turn the phone sideways or upright to adjust the onscreen keyboard orientation. You can adjust it by changing the settings (Touch Settings\Display\When device is rotated\Rotate screen contents). Also your phone screen is reversible. (Touch Settings\ Displ
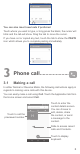
You can also insert new texts if preferred Touch where you want to type, or long press the blank, the cursor will blink and the tab will show. Drag the tab to move the cursor. If you have cut or copied any text, touch the tab to show the PASTE icon which allows you to complete pasting immediately. 3 3.1 Phone call �������������������� Making a call In either Normal or Reverse Mode, the following instructions apply in regards to making voice calls with this device. You can easily make a call using Call.
Display the suggested number(s). Long press to access voicemail. Enter the desired number from the keyboard and touch to place the call or select a contact from Contacts or Recent calls by sliding or touching tabs, then to make the call. The number you entered can be saved to Contacts by touching and then touching Create new contact. If you make a mistake, you can delete the incorrect digits by touching . To hang up a call, touch 3.2 .
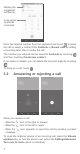
For your convenience, your phone features a unique Reversible UI, which ensures functionality, including normal call, even the phone is held in reverse (upside-down) position. 3.2.1 Reversible call functionality Your phone features a unique Reversible UI, which ensures complete functionality. When this feature is enabled through the Settings\ Display\Reversible rotate menu, it allows normal calls to be made or received even when the phone is held upside down.
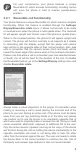
3.3 Consulting your call memory You can access your call memory from the Call screen to view Missed calls, Outgoing calls and Incoming calls. 4 Contacts ���������������������� 4.1 Adding a contact You can view and create contacts on your phone and synchronize these with your Gmail contacts or other applications on the web or on your phone. Touch on the Home screen, then touch the contacts list to create a new contact. 4.
5 Messaging ������������������� You can create, edit and receive SMS and MMS with this phone. To access this feature, touch the Application tab from the Home screen, then select Messaging. 5.1 Write message On the message list screen, touch the new message icon text/multimedia messages. to write • Touch to view the whole message thread. • Long press to activate delete mode. Touch to create a new message.
Sending a multimedia message MMS enables you to send video clips, images, photos, animations, slides and sounds to other compatible mobiles and e-mail addresses. An SMS will be converted to MMS automatically when media files (image, video, audio, slides, etc.) are attached or subject or email addresses are added. 6 Email ���������������������������� Besides your Gmail account, you can also set-up external POP3, IMAP or Exchange email accounts in your phone.
7 Getting connected ����������� 7.1 Connecting to the Internet 7.1.1 GPRS/EDGE/3G/4G To connect to the Internet with this phone, you can use GPRS/ EDGE/3G/4G networks or Wi-Fi, whichever is most convenient. The first time you turn on your phone with your SIM card inserted, it will automatically configure your network service: GPRS, EDGE, 3G or 4G. To check the network connection you are using, touch Settings\ More...\Mobile networks, and touch Access Point Names or Network operators. 7.1.
To connect your phone to the computer: • Use the USB cable that came with your phone to connect the phone to a USB port on your computer. You will receive a notification that the USB is connected. • If you use MTP or PTP, your phone will be automatically connected. Before using MTP, make sure that the driver (Windows Media Player 11 or higher version) has been installed. To locate data you have transferred or downloaded in your internal storage: • Touch to open the applications list. • Touch File Manager.
Use your phone’s GPS satellite receiver to pinpoint your location within an accuracy as close as several meters (“street level”). The process of accessing the GPS satellite and setting your phone's precise location for the first time will require up to 5 minutes. You will need to stand in a place with a clear view of the sky and avoid moving. After this, GPS will only need 20-40 seconds to identify your precise location.
10 Factory data reset To activate factory data reset: • Touch Settings\Backup & reset\Factory data reset. • Touch the RESET PHONE. Resetting the phone will erase all of your personal data from internal phone storage, including information about your Google account, any other accounts, your system and application settings, and any downloaded applications. If you reset the phone in this way, you’re prompted to re-enter the same kind of information as when you first started Android.
12 aking the most of M your phone ����������������� 12.1 Smart Suite Smart Suite includes: • Contacts Allows you to back up contact entries so that you don't have to worry about losing, breaking, switching phones or changing service providers. • Messages Frees you from painstakingly inputting text on the keypads. All of your messages are easily accessible and well-organized. • Calendar Allows you to sync events freely between your phone and Outlook and create and edit new events from a PC.
12.2.1 Mobile Upgrade Download Mobile Upgrade from the ALCATEL website (www.alcatelmobile.com) and install it on your PC. Launch the tool and update your phone by following the instructions (refer to the User Guide provided together with the tool). Your phone’s software will have the latest software. ll personal information will be permanently lost following A the update process. We recommend you back up your personal data using Smart Suite before upgrading. 12.2.