8050G 8050E Quick Start Guide Thank you for buying the ALCATEL ONETOUCH 8050G/8050E. We hope you will enjoy your high-quality mobile communication experience. For more information about how to use your phone, please visit www.alcatelonetouch.com to download the complete user manual. From the website, you can consult the FAQ, perform software upgrades, etc.
Table of contents 1 Your device.................................................................. 4 1.1 Appearance............................................................................4 1.2 Getting started......................................................................6 1.3 Home screen.........................................................................9 2 Text input.................................................................. 12 2.1 Using Onscreen Keyboard..............................
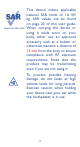
www.sar-tick.com This device meets applicable national SAR limits of 1.6 W/ kg. SAR values can be found on page 23 of this user guide. When carrying the device or using it while worn on your body, either use an approved accessory such as a holster or otherwise maintain a distance of 15 mm from the body to ensure compliance with RF exposure requirements. Note that the product may be transmitting even if you are not using it.
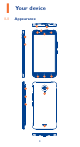
1 Your device 1.
Number 1 2 3 4 5 6 7 8 9 10 11 12 13 14 15 16 17 Function Headset connector Micro-USB connector/Battery charge port Light/Proximity sensor Front flash Receiver Front camera SIM 1 SIM 2 Back key Home key Recents key microSD card Volume Up/Down Power key Rear camera Rear flash Speaker 8050E has SIM 1 and SIM 2. 8050G has only SIM 1.
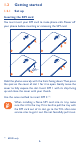
1.2 Getting started 1.2.1 Set up Inserting the SIM card You must insert your SIM card to make phone calls. Power off your phone before inserting or removing the SIM card. 1 2 SIM 1 SIM 2 3 4 Hold the phone securely with the front facing down.Then press the spot on the cover of slot 1 for it to open. Gently move the cover to fully expose the slot. Insert SIM 1 with its chip facing up and close the cover with your thumb. Use the same method to insert SIM 2 (1).
Inserting the microSD card 1 2 3 4 Hold the phone securely with the front facing down.Then press the spot on the microSD slot for it to open. Gently move the cover to fully expose the slot. Insert the microSD with its chip facing up and close the cover with your thumb.
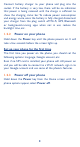
Connect battery charger to your phone and plug into the socket. If the battery is very low, there will be no indication that power is being received until the charge is sufficient to show the charging status bar. To reduce power consumption and energy waste, once the battery is fully charged, disconnect your charger from the plug; switch off Wi-Fi, GPS, Bluetooth or background-running apps when not in use; reduce the backlight time, etc. 1.2.
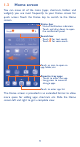
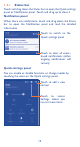
1.3 Home screen You can move all of the items (apps, shortcuts, folders and widgets) you use most frequently to your Home screen for quick access. Touch the Home key to switch to the Home screen. Status bar • Status/Notification indicators • Touch and drag down to open the notification panel. Search bar • Touch for text search. • Touch for voice search. Touch an icon to open an app, folder, etc. Favorite tray apps • Touch to enter the app. • Long press to move or change apps. Touch to enter app list.
1.3.1 Status bar Touch and drag down the Status bar to open the Quick settings panel or Notification panel. Touch and drag up to close it. Notification panel When there are notifications, touch and drag down the Status bar to open the Notification panel and read the detailed information.
1.3.2 Lock/Unlock your screen To protect your phone and privacy, you can lock the phone screen by creating a variety of patterns, PIN or password etc. 1.3.3 Personalize your Home screen Add You can long press a folder, an app, or a widget to activate the Move mode and drag the item to any Home screen you prefer. Reposition Long press the item to be repositioned to activate the Move mode, drag the item to the desired position and then release.
2 Text input 2.1 Using Onscreen Keyboard Onscreen Keyboard settings Touch Settings > Language & input and touch the keyboard you want to set up. A series of settings will become available for your selection. Adjust the Onscreen Keyboard orientation Turn the phone sideways or upright to adjust the Onscreen Keyboard orientation. You can adjust it by changing the settings (Touch Auto-rotate in the Quick settings panel.) 2.1.
2.1.2 SwiftKey keyboard Slide through letters to input Touch to delete inputs Long press for voice input Touch to enter numbers and symbols, etc. 2.2 Touch to insert a space or a prediction as preferred Text editing You can edit the text you have entered. • Long press or double touch within the text you would like to edit. • Drag the sliders to change the highlighted selection. • The following options will show: Select all and Paste .
3 Phone call 3.1 Placing a call You can easily place a call using the Call app. Touch the Home screen and select Call. 3.1.1 from Main screen Select a contact from CONTACTS or RECENTS by sliding or touching tabs, then choose your target SIM card(1) to make the call. Touch to view contact details. Touch to call this contact. Slide to access RECENTS and CONTACTS. Touch to display the dial pad. (1) 8050E supports two SIM cards. 8050G supports only one SIM card.
3.1.2 Dial pad Enter the desired number from the dial pad and touch place the call. to The number you entered can be saved to Contacts by touching and then touching Create new contact. If you make a mistake, you can delete the incorrect digits by touching . Touch to hang up a call. Display the suggested numbers. Long press to access voicemail.
3.2 Answering or rejecting a call When you receive a call: • Slide the icon to the right to answer; • Slide the icon to the left to reject; • Slide the icon upwards to reject the call by sending a preset message. To mute the ringtone volume of an incoming call, press the Volume Up/Down key or turn the phone over (Settings > Gestures > Turn over to mute). 3.
4 Contacts 4.1 Adding a contact You can view and create contacts on your phone and synchronize these with your Gmail contacts or other apps on the web or on your phone. Touch on the Home screen, then touch the contacts list to create a new contact. 4.2 icon in the Synchronizing contacts in multiple accounts Contacts, data or other information can be synchronized from multiple accounts, depending on the apps installed on your phone.
5.1 Write message On the message list screen, touch the new message icon write text/multimedia messages. to Touch to create a new message. • Touch to view the whole message thread. • Long press to activate Delete mode. Sending a text message Enter the mobile phone number of the recipient or touch to select a contact and touch the Type text message field to enter text.When you finish, touch to send the text message. An SMS message of more than 160 characters will be charged as several SMS messages.
6 Email In addition to your Gmail account, you can also set up external POP3 , IMAP, and EXCHANGE email accounts on your device. On the Home screen, touch > Email to access this function. An email wizard will guide you through the steps to set up an email account. • Enter the email address and password of the account you want to set up. • Touch NEXT.
7 Getting connected 7.1 Connecting to the Internet 7.1.1 GPRS/EDGE/3G To connect to the Internet with this phone, you can use GPRS/ EDGE/3G networks or Wi-Fi, whichever is most convenient. The first time you turn on your phone with your SIM card inserted, it will automatically configure your network service: GPRS, EDGE, 3G. To check the network connection you are using, touch Settings > More > Cellular networks, and touch Access Point Names or Network carriers. 7.1.
7.2 Connecting to a computer After connecting your phone to a computer by USB, you can transfer files between your phone and the computer. Files copied to your phone are not available until the USB data cable is disconnected from the PC completely. Use a USB 2.0 version or higher to connect them. 7.
8 Settings 8.1 Device 8.1.1 Gestures Touch Settings > Gestures to activate gestures as preferred. One-handed mode To use this mode, go to Settings > Gestures > One-handed mode and mark the checkbox. Touch the Back or Recents key for 3 seconds to shrink the screen to a smaller size. When you touch the blank area, the screen will restore to its original size.
8.1.2 Display Touch Settings > Display to view the following: • Wallpaper • Brightness level • Adaptive brightness • Sleep • Daydream Set your wallpaper. Adjust your screen to a comfortable brightness. Optimize brightness level for available light. Set a time before the Screensaver begins. Select an animation effect to display while in standby status. • Font size Select a suitable font size for your phone.
8.1.8 Apps Touch Setting > Apps to check the App status. 8.2 Personal 8.2.1 Location You can use GPS, Wi-Fi, or cellular network to determine your location. 8.2.2 Security Touch to set security settings. 8.2.3 Accounts Touch to add an email or social network account and manage account settings, such as sync frequency and notifications. 8.2.4 Language & input Touch Settings > Language & input to view or set system language and input methods. • Language Set the system language.
8.3 System 8.3.1 Date & time Touch Settings > Date & time to set date, time, and format. Note: When the Automatic option is deactivated, you can manually set the date and time. 8.3.2 Scheduled power on & off Set your phone to power it on/off in a scheduled manner. 8.3.3 Accessibility Get access to auxiliary functions of your device. 8.3.4 Printing Turn on to use the Cloud Print function. 8.3.
Safety and use We recommend that you read this chapter carefully before using your mobile phone. The manufacturer disclaims any liability for damage, which may result as a consequence of improper use or use contrary to the instructions contained herein. • TRAFFIC SAFETY: Given that studies show that using a mobile phone while driving a vehicle constitutes a real risk, even when the hands-free kit is used (car kit, headset...
Switch the mobile phone off when you are near gas or flammable liquids. Strictly obey all signs and instructions posted in a fuel depot, gas station, or chemical plant, or in any potentially explosive atmosphere. When the mobile phone is switched on, it should be kept at least 15 cm from any medical device such as a pacemaker, a hearing aid or insulin pump. In particular when using the mobile phone you should hold it against the ear on the opposite side to the device, if any.
Your mobile phone should not be disposed of in a municipal waste. Please check local regulations for disposal of electronic products. Remember to make back-up copies or keep a written record of all important information stored in your mobile phone. Some people may suffer epileptic seizures or blackouts when exposed to flashing lights, or when playing video games. These seizures or blackouts may occur even if a person never had a previous seizure or blackout.
• PRIVACY: Please note that you must respect the laws and regulations in force in your jurisdiction or other jurisdiction(s) where you will use your mobile phone regarding taking photographs and recording sounds with your mobile phone. Pursuant to such laws and regulations, it may be strictly forbidden to take photographs and/or to record the voices of other people or any of their personal attributes, and reproduce or distribute them, as this may be considered to be an invasion of privacy.
In non European Union jurisdictions: Items of equipment with this symbol are not be thrown into ordinary bins if your jurisdiction or your region has suitable recycling and collection facilities; instead they are to be taken to collection points for them to be recycled. In the United States you may learn more about CTIA’s Recycling Program at http://www.gowirelessgogreen.org/ CAUTION: RISK OF EXPLOSION IF BATTERY IS REPLACED BY AN INCORRECT TYPE.
Although the SAR is determined at the highest certified power level, the actual SAR level of the mobile phone while operating can be well below the maximum value. This is because the mobile phone is designed to operate at multiple power levels so as to use only the power required to reach the network. In general, the closer you are to a wireless base station antenna, the lower the power output of the mobile phone.
- Reorient or relocate the receiving antenna. - Increase the separation between the equipment and receiver. - Connect the equipment into an outlet on a circuit different from that to which the receiver is connected. - Consult the dealer or an experienced radio/ TV technician for help. Changes or modifications not expressly approved by the party responsible for compliance could void the user’s authority to operate the equipment.
Note that any data shared with TCL Communication Ltd. is stored in accordance with applicable data protection legislation. For these purposes TCL Communication Ltd.
The Android robot is reproduced or modified from work created and shared by Google and used according to terms described in the Creative Commons 3.0 Attribution License (the text will show when you touch and hold Google legal in Settings\About phone\Legal information). (1) You have purchased a product which uses the open source (http:// opensource.
General information • Website: www.alcatelonetouch.us • Facebook: http://www.facebook.com/alcatelonetouchusa / www.facebook.com/alcatelonetouchcanada • Twitter: http://www.twitter.com/alcatel1touch • Hot Line Number: In the United States, call 855-368-0829 for technical support. In Canada, call 855-844-6058 for technical support. • Electronic labeling path: Touch Settings\Regulatory & Safety or press *#07#, you can find more information about labeling (1).
Warranty Your device is warranted against any defect or malfunctioning which may occur in conditions of normal use during the warranty period of twelve (12) months (1) from the date of purchase as shown on your original invoice. Batteries (2) and accessories sold with your device are also warranted against any defect which may occur during the first six (6) months (1) from the date of purchase as shown on your original invoice.
This warranty shall not apply to defects to your device and/or accessory due to (without any limitation): 1) Non-compliance with the instructions for use or installation, or with technical and safety standards applicable in the geographical area where your device is used; 2) Connection to any equipment not supplied or not recommended by TCL Communication Ltd.; 3) Modification or repair performed by individuals not authorised by TCL Communication Ltd.
Troubleshooting Before contacting the service centre, you are advised to follow the instructions below: • You are advised to fully charge ( ) the battery for optimal operation. • Avoid storing large amounts of data in your phone as this may affect its performance. • Use Factory data reset and the upgrade tool to perform phone formatting or software upgrading (to reset factory data, hold down the Power key and the Volume up key at the same time).
My phone cannot charge properly • Make sure you are using the ALCATEL ONETOUCH charger included in the box. • Make sure that your battery is not completely discharged; if the battery power is empty for a long time, it may take around 20 minutes to display the battery charger indicator on the screen. • Make sure charging is carried out under normal conditions (0°C to +40°C). • When abroad, check that the voltage input is compatible.
Unable to receive incoming calls • Make sure your phone is switched on and connected to a network (check for overloaded or unavailable network). • Check your subscription status with your operator (credit, SIM card valid, etc.). • Make sure you have not forwarded incoming calls. • Make sure that you have not barred certain calls. • Make sure that your phone is not in flight mode.
My callers are unable to leave messages on my voicemail • Contact your network operator to check service availability. I cannot access my voicemail • Make sure your operator’s voicemail number is correctly entered in "Voicemail number". • Try later if the network is busy. I am unable to send and receive MMS • Check your phone memory availability as it might be full. • Contact your network operator to check service availability and check MMS parameters.
How to make your battery last longer • Make sure you follow the complete charge time (minimum 3 hours). • After a partial charge, the battery level indicator may not be exact. Wait for at least 20 minutes after removing the charger to obtain an exact indication. • Adjust the brightness of screen as appropriate. • Extend the email auto-check interval for as long as possible. • Update news and weather information on manual demand, or increase their auto-check interval.
ALCATEL is a trademark of Alcatel-Lucent and is used under license by TCL Communication Ltd. © Copyright 2015 TCL Communication Ltd. All rights reserved TCL Communication Ltd. reserves the right to alter material or technical specification without prior notice.