USER GUIDE HH500V
Table of contents Table of contents 1.. Safety and use........................................................................................................................................................ 4 1.1 1.2 1.3 1.4 1.5 1.6 Conditions of use:...................................................................................................................................4 Adapters:....................................................................................................................
Table of contents 7.5.4 7.5.5 7.5.6 7.5.7 7.5.8 7.5.9 7.5.10 7.5.11 WAN ping............................................................................................................................... 21 LAN IP filter........................................................................................................................... 21 MAC filter............................................................................................................................... 21 DDNS...................
Safety and use 1. Safety and use We recommend that you read this chapter carefully before using your device. The manufacturer disclaims any liability for damage, which may result as a consequence of improper use or use contrary to the instructions contained herein. 1.1 Conditions of use: Switch the device off before boarding an aircraft. Switch the device off when you are in health care facilities, except in designated areas.
Safety and use Device as a unibody device must be disposed of in accordance with locally applicable environmental regulations. This symbol on your device and the accessories means that these products must be taken to collection points at the end of their life: - Municipal waste disposal centres with specific bins for these items of equipment; - Collection bins at points of sale. They will then be recycled, preventing substances being disposed of in the environment, so that their components can be reused.
Safety and use Licences The WiFi Logo is a certification mark of the WiFi Alliance. This equipment may be operated in all European countries. The 5150-5350 band is restricted to indoor use only. BE BG CZ DK DE EE IE EL ES FR HR IT CY LV NO IS LT LU HU MT NL AT PL PT RO SI SK FI SE LI CH TR UK(NI) We hereby point out that the end user warranty for infringement IPR is solely limited to the EU/ EEA/Switzerland.
Safety and use Any changes or modifications not expressly approved by the party responsible for compliance could void the user's authority to operate this equipment. 1.5 General information Internet address: www.tcl.com Hot Line Number: see «SERVICES» leaflet or go to our website.
Overview 2. Overview This device allows you to share a secure mobile broadband internet connection using WiFi or LAN. You can connect most WiFi enabled devices to it, e.g., PCs, mobile gaming devices, smartphones, and tablets, etc. To get the best signal, the ideal location for your device will be near a window. Try a few different locations until you find the one with the best signal. 2.1 System requirements This device is compatible with WiFi devices which support 2.4GHz (802.11b/g/n/ax) or 5GHz (802.
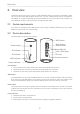
Overview WiFi indicator yy Solid blue: WiFi is enabled yy Flashing blue: WPS connection is available yy Off: WiFi is disabled 4G/5G indicator yy Solid Blue: 4G/5G signal is strong yy Solid yellow: 4G/5G signal is normal yy Solid red: 4G/5G signal is weak yy Off: 4G/5G network is not working 9
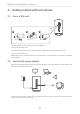
Getting started with your device 3. Getting started with your device Insert a SIM card RESET 3.1 TEL To insert a SIM card into your device, do the following: 1. Open the SIM slot cover. 2. Follow the SIM direction icon marked beside the SIM slot, insert the SIM into the slot. 3. Close the SIM slot cover. Note: Don’t remove the SIM card when your 5G CPE is in use, otherwise you may lose connectivity to the internet.
Getting started with your device 3.3 Connect in WiFi mode and WPS mode 3.3.1 Connect in WiFi mode Following are 3 steps to connect in WIFi mode. Step 1: Enable WiFi on your device. When the WiFi indicator is solid blue, WiFi is enabled. Step 2: Record the SSID and WiFi password. The default SSID and WiFi password are printed on the device label, situated on the underside of your device.
Home page 5) Your personal device should then be connected to your device wirelessly. Option 3: enter PIN code 1) Open the WPS page on your Web UI. 2) Go to Settings > WiFi > WPS. 3) Switch on Router's PIN. 4) Enter the PIN code on your personal device. 4. Home page The Web User Interface is compatible with the following browsers: yy Mozilla Firefox yy Safari 13 or later yy Internet Explorer 11 or later yy Microsoft Edge yy Google Chrome 4.1 How to log in to the Home page 1.
Home page 4.2 Web UI status bar icons Description Network technology Icon displayed or will be displayed, depending on the network available. Signal indicator From no signal to excellent. WiFi status WiFi is enabled. WiFi is disabled. Language Connection status SMS Click to select language Disconnected, New message / Unread message(s) in inbox SMS inbox is full.
Status 5. Status You can click on Status to view basic information about your device or check various statistics. 5.1 Status Status allows you to view your device information including internet, LAN, WiFi, WAN and Diagnostics. You can connect, disconnect, or change the SSID of the device here. 5.2 Connected devices Default for new connections: you can toggle the default setting for internet access for new connections.
Settings 7. Settings You can go to Settings page and make changes to the following: yy Quick setup yy Setup yy WiFi yy Security yy Advanced settings 7.1 Quick setup SIM settings You can change basic connection settings here and enable/disable data roaming. WiFi settings You can change the 2.4 and 5GHz Wireless network name (SSID), SSID broadcast function or disable the WiFi. WiFi security You can setup your WiFi security settings, and change the WiFi password here.
Settings 7.2 Setup Network connection Mobile Connection lets you configure connection mode, Data roaming and connect IP mode. Profile management Profile Management allows you to set up a new APN profile or edit/delete existing profiles that have been created. yy How to add a new profile: 1) Click New. 2) Input the correct parameters for your Network Operator. Profile Name / Dial number / APN are required as a minimum. 3) Click Save.
Settings Network Selection: You can set the Network search mode to either Auto (5G/4G) or 4G only. Ensure that you click Apply after making any changes. 7.3 WiFi 7.3.1 Basic yy Wireless network name (SSID): This is the name of the wireless network and is used to identify your wireless network. The SSID can be between 1 and 32 characters long. yy SSID Broadcast: This is enabled by default. Note: If you do choose to disable this, the SSID will no longer be displayed and will need to be entered manually.
Settings 7.3.2 Advanced yy Max. connected devices: you can set the maximum number of devices that can be connected to your device from the drop-down menu. This is set to 128 by default. yy WiFi mode: you can select from the available options via the drop-down menu. This is set to 802.11ax by default. yy AP isolation: you can enable or disable this function. When you enable it, connected devices cannot communicate with each other on the same SSID.
Settings yy Time remaining: this is the time remaining for the guest network to continue to transmit. Click Extend by 4 hours to add time to the guest network. 7.3.4 WPS WPS (Wi-Fi Protected Setup) allows you to connect WPS compatible clients to the your device via push-button or PIN modes. WPS is enabled by default, but can be disabled on this page. See section 3.4.2 for more information on connecting devices using WPS. 7.4 Security (SIM PIN management) yy Enabling SIM PIN: .
Settings 7.5 Advanced settings 7.5.1 WAN port Basic Set up the WAN connection mode and parameters here. You can set the connection mode to DHCP, PPPoE or Static IP. yy DHCP: Dynamic Host Configuration Protocol (DHCP) is a client /server protocol that automatically provides you with an internet Protocol (IP) host. The IP address and related configuration settings such as subnet mask and default gateway are all automatically assigned. Select DHCP and click Apply.
Settings 7.5.2 LAN Local area network (LAN) parameters are displayed here. The default Gateway address is 192.168.1.1. The default Subnet Mask is 255.255.255.0. DHCP Server will automatically assign IP addresses to devices in the network, it is enabled by default. 7.5.3 Bandwidth control Bandwidth control lets you limit the amount of bandwidth available to connected clients. You can enable Bandwidth control and set the Downlink bandwidth limit and Uplink bandwidth limit for the specified devices.
Settings 7.5.9 UPnP Universal Plug and Play (UPnP) is a set of networking protocols that allows devices connected to your device to detect each other and establish functional network services for data sharing, communications, and entertainment. 7.5.10 Port forwarding Port forwarding allows external users to connect to services inside the local network (LAN). Click to create a new Port forwarding rule, and specify the LAN IP address, LAN ports, WAN ports and Protocol types for traffic to be forwarded. 7.
System 8. System 8.1 Device information You can view information for your device here such as IMEI, software version and MAC address. 8.2 Log in password Click on Show to display the password and click on Hide to hide it. You can enter a new password and click Apply to apply. The length of your login password should be 8-32 characters, and must contain letters and numbers, including 0-9, a-z, A-Z, "-+!@$#^&*"%/:=;.
Warranty yy How to restore the configuration: 8.5 1) Click Browse to select a file. 2) Click Restore. Restart and reset Click Restart to reboot the device and click Reset to restore Factory default settings. You also can use the reset button on your device. 8.6 Firmware update Click Check for update. Your device will check if there is an update available. If one is found, you may click Download. Once the file has downloaded successfully you will be able to click Update.
Warranty - Modification, adjustment or alteration of software or hardware performed by individuals not authorised by TCL Communication Ltd.; - Inclement weather, lightning, fire, humidity, infiltration of liquids or foods, chemical products, download of files, crash, high voltage, corrosion, oxidation. Your device will not be repaired in case labels or serial numbers (IMEI) have been removed or altered.