.2 Getting started 1.2.1 Setting up Inserting or removing the SIM/microSD card ① U se the provided SIM pin to open the SIM tray. ② P lace the Nano SIM card into the tray slot labeled "SIM". ③ Place the microSDTM card into the tray slot labeled "SD". Note: microSDTM cards are sold separately. Only use Nano SIM cards with your phone.
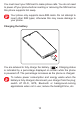
You must insert your SIM card to make phone calls. You do not need to power off your phone before inserting or removing the SIM card as this phone supports hot swap. Your phone only supports nano-SIM cards. Do not attempt to insert other SIM types; otherwise this may cause damage to your phone. Charging the battery You are advised to fully charge the battery ( ). Charging status is indicated by a percentage displayed on screen while the phone is powered off.
1.2.2 Reverse Charging with an OTG Cable On-The-Go (OTG) is a USB transmitting technology that allows a phone to connect to an external device with the help of an OTG cable. You can use your phone to charge other devices using an OTG cable. 1. C onnect your phone with the device to be charged using an OTG cable. 2. A fter connecting, a reminder box will pop up indicating that your phone can charge the other phone and that the battery will reduce quickly during the charging. 3.
1.3 Home screen You can bring all of the items that you use most frequently (applications, shortcuts, folders) to your Home screen for quick access. Tapping Home always takes you back to the main Home screen. Status bar • Status/Notification indicators • Touch and drag down to open the notification panel Search bar • Touch to enter text search screen • Touch to enter voice search screen Touch an icon to open an application, folder, etc.
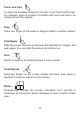
Touch and hold To enter the available options for an item, touch and hold the item. For example. Select a contact in Contacts and touch and hold it. An options list will then appear. Drag Place your finger on the screen to drag an object to another location. Slide/Swipe Slide the screen to scroll up and down the applications, images, and web pages. You can slide the screen horizontally too. Flick Similar to swiping, but flicking makes it move quicker.
1.3.2 Status bar From the status bar, you can view both phone status (on the right side) and notification information (on the left side). Drag down the status bar to view notifications and drag again to enter the quick settings panel. Touch and drag up to close it. When there are notifications, they can be accessed by touching them. Notification panel When there are notifications, touch and drag down the Status bar to open the Notification panel to read more detailed information.
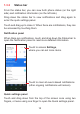
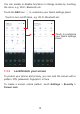
You can enable or disable functions or change modes by touching the icons, e.g. Wi-Fi, Bluetooth etc. Touch the Edit icon to customize your Quick settings panel. Touch to turn on/off items, e.g. Wi-Fi, Bluetooth etc. Touch to customize your Quick settings panel. 1.3.3 Lock/Unlock your screen To protect your phone and privacy, you can lock the screen with a pattern, PIN, password, fingerprint, or face. To create a screen unlock pattern, touch Settings > Security > Screen lock.
To lock phone screen • If your phone remains inactive for a period of time, it will automatically lock the screen and enter sleep mode to save power. Go to Settings > Display > Sleep and select a screen timeout period. • You can also manually lock the screen by pressing the Power key once. To unlock the phone screen Press the Power key once to light up the screen, swipe up and unlock the screen with the method you have set.
Enter a password to unlock the screen Once the screen is turned on, swipe up from any position on the screen to display the password input panel. Then enter your lock screen password. Use pattern unlock Draw the same pattern you have set to unlock the screen. Use Face unlock • From the app list, touch Settings > Security > Face key. Before using the face key, you need to set a pattern/PIN/password. • Hold your phone 20-50 cm from your face. Position your face in the square shown on the screen.
Reposition Touch and hold an item and drag it to the desired position and then release. You can move items both on the Home screen and the Favorite tray. Hold the icon on the left or right edge of the screen to drag the item to another Home screen. Remove Touch and hold the item and drag it up to the top of the icon, and release after it turns red.
Consult recently used applications To consult recently used applications, touch the Recent apps key. Touch a thumbnail in the window to open the application. Touch one thumbnail and slide it up to close the application, slide it right/left to switch the applications. Touch Clear all at the bottom of the screen to close all the running applications.
1.3.6 Volume adjustment Press the Volume key to adjust the Media volume. Touch the icon to adjust Alarm, Ring and Notification volume.
2 2.1 Text input............................... Using the Onscreen Keyboard Onscreen Keyboard settings Touch Settings > System > Language & input, touch the Virtual keyboard you want to set up and a series of settings will become available. Adjust the Onscreen Keyboard orientation Turn the phone sideways or upright to adjust the onscreen keyboard orientation. You can adjust it by changing the settings (Touch on/off Settings > Display > Auto-rotate screen).
2.1.1 Android keyboard Enter numbers or select from contacts. Touch to switch between "abc/ Abc" mode; Touch and hold to switch to "abc/ ABC" mode. Switch between symbol and ABC keyboard. 2.2 Touch and hold to change keyboards. Touch and hold to select symbols. Touch to switch input method. Touch and hold to show more options. Text editing You can edit text which you have entered. • Touch and hold or double touch within the text you want to edit. • Drag the tabs to change the amount of text to edit.
You can also insert new texts if preferred • Touch where you want to type, or touch and hold a blank area. The cursor will blink and the tab will appear. Drag the tab to move the cursor. • If you have cut or copied any text, touch the tab to show the Paste option which allows you to complete pasting immediately.
3 Call, Call log and Contacts.. 3.1 Phone........................................................ 3.1.1 Making a call From the Phone app, use the keypad to enter the phone number, or keyboard to enter the contact name. Then tap to place the call.
Touch and hold to access voicemail Enter the desired number from the dial pad and touch to place the call or select a contact from Favorites, Recents, or Contacts by sliding or touching tabs, then make the call. The number you entered can be saved to Contacts by touching Create new contact or Add to a contact. If you make a mistake, you can delete the incorrect digits by touching . To hang up a call, touch .
Emergency call If your phone has network coverage, dial the emergency number and touch to make an emergency call. Depending on your network and country this could even work without a SIM card and without typing in the SIM PIN code. 3.1.2 Answering or rejecting a call When you receive a call: • Tap ANSWER, or swipe up the icon • Tap DECLINE, or swipe down the icon • Tap to answer; to reject; to reject the call by sending a preset message.
3.1.3 Calling your voicemail Your voicemail is provided by your network to avoid missing calls. It works like an answering machine that you can consult at any time. To access your voicemail, touch and hold . If you receive a voicemail, appears on the Status bar. Open the Notification panel and touch New voicemail. 3.1.4 During a call To adjust the volume during a call, press the Volume up/down key.
End the current call. Touch to mute the current call. Touch this icon again to unmute the call. Display the dial pad. Touch to activate the speaker during the current call. Touch this icon again to deactivate the speaker. Make another call. Put a call on hold. Merge calls to start a conference call. Split a conference call into multiple calls. Swap the calls.
Conference calls(1) You can set up a conference call as follows. • Place a call to the first participant of the conference call. • Touch to add another call. • Enter the phone number of the person you want to add to the conference and touch . You can also add participants from Call logs or Contacts. • Touch • Touch 3.1.6 to start the conference. to end the conference call and disconnect all callers. Call settings Touch from the Phone screen, then touch Settings to set phone and contact settings. 3.
3.3 Contacts............................................. Contacts enables quick and easy access to the contact you want to reach. Use Contacts to view your saved contacts or create a new contact. Synchronize your contacts from your email account(s) and other applications to your phone. 3.3.1 Consult your Contacts To see your contacts, touch from the App drawer. Tap to search for a contact. Tap to view all the contacts saved on your device.
3.3.2 Touch Adding a contact in the contact list to create a new contact. You are required to enter the contact's name and other contact information. By scrolling up and down the screen, you can move from one field to another. Touch to save Select a picture or take a photo for the Phone contact Touch to open available labels Add to/remove from Favorites (1) To add a contact to favorites, you can touch a contact to view details then touch to add the contact to favorites.
3.3.3 Editing your contacts To edit contact information, touch screen. in the contact details When finished, touch Save. 3.3.4 Using the Quick contact panel Touch a contact to open the Quick contact panel. • Touch or the number to make a call. • Touch to send a message. • Touch to make a video call (1) . The icons available on the Quick contact panel depend on the information you have for the contact and the applications and accounts on your phone. (1) Depending on your network carrier.
3.3.5 Sharing contacts You can share a single contact or contacts with others by sending the contact's vCard to them via Bluetooth, Gmail, etc. • From the Contacts screen, touch and hold a contact and touch . • Select the application to perform this action. 3.3.6 Accounts Contacts, data or other information can be synchronized from multiple accounts, depending on the applications installed on your phone.