OPERATION MANUAL For use with models: P6/P4/P65/E18 series Figures and illustrations in this User’s Guide are provided for reference only and may differ from actual product appearance. Product design and specifications may be changed without notice.
Table of Contents Chapter 1 - Introduction Precautions............................................................ 3 Warning.................................................................... 3 Product..................................................................... 3 Power and Plug........................................................ 3 Power Cord and Signal Cable.................................. 3 Use Environment...................................................... 3 Cleaning.....................
Chapter 1 Introduction Precautions Read all of the instructions before operating the set. Keep these instructions well for future use. and the cabinet has been damaged. • Where the mains plug or an appliance coupler is used as disconnect device, the disconnect device shall remain readily operable. Warning Power Cord and Signal Cable Never place a television set in an unstable location. A television set may fall, causing serious personal injury or death.
Chapter 1 Introduction Buttons on the TV If the batteries in your remote control are run down, you can use the buttons on your TV set.
Chapter 1 Introduction Sockets Note: The location and names of the sockets on the TV may vary according to TV model, and not all sockets available on all models. SPDIF socket (output) The SPDIF socket can be used to connect a compatible digital audio receiver. SPDIF HDD USB 2.0 or USB 2.
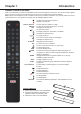
Chapter 1 Introduction Remote Control Functions Most of your television's functions are available via the menus that appear on the screen. The remote control supplied with your set can be used to navigate through the menus and to configure all the general settings. D5 are provided C0 Note: Figures and illustrations in this operation manual 2A only and may differ from actual 3F for reference product appearance. The remote control type may be changed without notice.
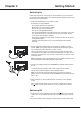
Chapter 2 Getting Started Switching On Follow the instructions on this page on how to switch on your TV set and the remote control before going on to following pages describing how to use the channel set-up procedure. 1. Insert two AAA batteries in the remote control. Precautions on using batteries: - Only use the battery types specified. - Make sure you use the correct polarity. - Do not mix new and used batteries. - Do not use rechargeable batteries.
Chapter 2 Getting Started Network Connection Your TV will require an internet connection to operate all functions. Data usage charges may apply. Please refer to your Internet Service Provider (ISP) for additional information. To access the internet, you must subscribe high speed broadband internet service from your internet service provider. Your TV can be connected to your home network in two ways: • Wired, using the RJ45 (LAN) connector on the back panel.
Chapter 2 Getting Started Network Settings You can set up your TV so that it can access the Internet through your local area network (LAN) using a wired or wireless connection. Connecting to a Wired Network 1. Press on the remote control, select Network > Wired settings and press OK/► to enter. 2. Check the network information or enter IP settings to set the IP address, Subnet mask, Default gateway and Primary DNS values manually. Then press ▲/▼/◄/► to select OK and press OK to confirm.
Chapter 2 Getting Started Initial Setup Initial setup involves selecting all the settings required to be able to search for and store all the analogue and digital channels you can receive. Make sure that the television is switched on and follow all the steps in turn specified hereafter. Note: If the channel search retrieved only the analogue channels it could be caused by poor broadcasting and therefore is not covered by manufacturer warranty.
Chapter 2 6. Name your TV as you like if neccesary. Getting Started 8. When the initial setup is completed, the Congratulations message appears. Press OK to confirm. 7. Channel Installation -- Press ▲/▼ to select Antenna and press OK to enter next item. -- Press ▲/▼ to select a channel type and then follow the guides on the screen and press the corresponding buttons on the remote control to proceed.
Chapter 3 Basic Operation Accessing Channels Selecting Menu Language Using the numeric buttons: press the corresponding numeric buttons on the remote control to access the channels. Using the P / buttons: press the P / buttons on the remote control or the corresponding buttons on the TV set to scroll through the channels. Using the LIST button: press the LIST button on the remote control to display the channel list and press ▲/▼/◄/► and OK to select channels.
Chapter 4 Homepage Operation Note: This manual is for common use. Figures and illustrations in this User Manual are provided for reference only and may differ from actual product appearance. And for some models, certain options are not available. You can select all the features from homepage. 1. Press to display homepage. 2. Press ▲/▼/◄/►to select icons from the screen list. 3. Press OK to enter each option. 4. To exit the menu, press EXIT or repeatedly.
Chapter 4 Homepage Operation Using Homepage - Videos Note: The information displayed will be updated periodically. Press on the remote control to display the homepage. Press ▲/▼/◄/► to enter the Videos page and select repeatedly. icons from the screen list. Press OK to enter each content To exit the menu, press EXIT or This interface enables you to search for videos by genre, such as movie, sport, music, popular, news, education, and game, etc. For details, refer to your local platform.
Chapter 4 Homepage Operation Using Homepage- Apps Note: The pre-installed apps or items can not be deleted. And the apps (regardless of order) listed in the below figure may differ from actual product. For some models, certain apps are not available. Press on the remote control to display the homepage. Press ▲/▼/◄/► to enter the Apps page and select icons repeatedly to return to the homepage. from the screen list. Press OK to enter each option.
Chapter 5 Using More of Your TV Setting up Your Favourite Channels Audio Description You can create a list of your favourite TV channels. Audio description refers to an additional narration track for blind and visually impaired viewers of visual media, including television programmes and movies. The description narrator talks through the presentation describing what is happening on the screen during the natural pauses in the audio (and during dialogue if deemed necessary).
Chapter 5 3. Press ▲/▼ to select Digital subtitle language 2nd and press OK/► to enter. 4. Press ▲/▼ to select a secondary subtitle language and press OK to confirm. 5. Press EXIT or to close the menu. Shortcut operation: Press SUBT. on the remote control to directly select a subtitle language available for the selected digital TV programme. Selecting a Subtitle Type on Digital TV Channels on the remote control, select Channel > 6. Press Subtitle > Subtitle type and press OK/► to enter. 7.
Chapter 5 Using Auto Power On Enables the TV to automatically power on when you power on a CEC device (e.g. DVD) with the device’s remote. Select On to enable this function. Using Auto Standby Enables all CEC devices to automatically go to the standby mode when you turn off the TV with the TV remote. Select On to enable this function. Note: The CEC functions depend on the devices connected and it is possible that some devices may not interoperate correctly when connected to this TV.
Chapter 5 5. In recording, the PVR mini pane will also show on the screen to indicate the recording progress. 6. To watch the recorded program, exit PVR mode first, Press and go to TV > Media > PVR, then select the related record file. Press OK to play. (It is the same if you record a digital radio program). Notes: - This feature is available only for digital non encrypted channels.
Chapter 5 Share&See application Select Media from the homepage and press OK to enter. Then you can view pictures, listen to music or watch videos, which are stored on your PC. Supported file formats: Picture JPEG, PNG, BMP Music MP3, WMA, LPCM Video FLV, TS, MP4 Notes: -- Share&See function is set to on by default, the TV will display the list of available DLNA servers which are available in local network.
Chapter 6 Other Information Problems & Solutions Note: Problems & solutions 1 to 2 are for the TV models which have network functions, so users of non-connected TV models can disregard them. 1. Fail to link to the network. 5. Some videos fail to play. - Check if your TV is connected with the network; - Reboot your TV; - Consult your internet service provider, to confirm if access of your router is supported. Refer to the operation manual of your router.
Chapter 6 Other Information Troubleshooting Note: Most problems you encounter with your TV can be corrected by consulting the following troubleshooting list. No picture, no sound 1. Check if the fuse or circuit breaker is working. 2. Plug another electrical device into the outlet to make sure it is working or turned on. 3. Power plug is in a bad contact with the outlet. 4. Check the signal source. Snowy dots and interference 1. Change the color system. 2. Adjust the saturation. 3. Try another channel.
Chapter 6 Other Information Legal statement [Legal Statement] of TCL - manufacturer of this TV set Due to the various capabilities of products featuring the SmartTV - Services, as well as limitations in the available content, certain features, applications, and services may not be available on all devices or in all territories. Some features on SmartTV may also require additional peripheral devices or membership fees that are sold separately.
Like us on Facebook TCL Electronics Australia Pty Ltd. ABN 83 111 032 896 Address: 797 Springvale Road, Mulgrave, VIC 3170, Australia Telephone: 1300 738 149 service.au@tcl.com www.tclelectronics.com.