FEATHERBEDDING gah! Hump names Com: GT], Hef mE; SSS $C |) 18s) (0) Eu—21 Coma a ORE 13— Cream) (romeo
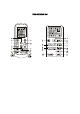
ALT] cd Nr. [Taste Funktion 1 UP) Drinstecken, um Temperatur hoher einzustellen/ Zeit vorzustellen 2 Drinstecken, um Temperatur niedriger einzustellen/ Zeit zurichte zu ¥ (TEMPO DN) stellen 3 2'oder OFFEN Drinstecken, zum Ein-/ und Ausschalten 4 FAN Einstellung der Ventilator stufe auf auto/schwach/mittel/hoch 5 EIMER Zur automatischen Abschaltprogrammierung 6 SPLEEN Zur Aktivierung der ,Schlaffunktion” ECO Drinstecken, um die EO-Funktion zu aktivieren/ deaktivieren.
Taste zur Aktivierung/Deaktivierung der 1 Die Klimaanlage steuert die Raumtemperatur je nach Temperatur 2 VFEEL an der Fernbedienung. Diese Funktion wird 2 Stunden nach Aktivierung beendet. {Falls vorhanden} 22 | SET Zum Ein-Ausschalten der | SET-Funktion Zum Ein-Ausschalten der Selbstreinigungsfunktion 23 CLEMENS Hinweis: Diese Taste nicht zu häufig betätigen, Funktion wird alle 3 Monate empfohlen. a Die Tasten und Funktionen der Fernbedienung kennen abweichen.
FERNBEDIENUNG DISPLAY Fernbedienung Bedeutung der Symbole auf dem Display Nr. Symbole Bedeutung 1 oder 18 Anzeige Automatik-Modus 2 8 Nibelungen Modus anzeige 3 & oder #' Entflechtung Funktionsanzeige 1 Nur Ventilator Funktionsanzeige 5 Heizen Funktionsanzeige + oder Empfangsqualität Anzeige 7 8 oder 1 oder ©.
FERNBEDIENUNG Austausch der Batterien Auf der Rockseite der Fernbedienung Abdeckung des Barttelefachs In Pfeilrichtung abziehen und entfernen. Beim Einlegen der Batterien Markierung auf der Fernbedienung zur korrekten Ausrichtung (+ und beachten. Deckel wieder einschieben und verschliefen. HINWEIS: 2 LRO 3 AAA (1,5V) Batterien verwenden. Keine aufladbaren Batterien/ Akkus verwenden. After Batterien durch neue ersetzen, wenn die Anzeige auf dem Display nicht mehr lesbar ist.
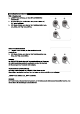
GEBRAUCHSANWEISUNGEN Ausrichtung der Luftstromrichtung SENKRECHTE AUSRICHTUNG DES LUFTSTROMS Konstanter Luftstrom 1. wann ~Taste fair eine gleichmäßigere Luftzirkulation Tiber die senkrechten Steuerung der Gebläserichtung, klicken. Dies aktiviert eine kontinuierliche Kreisbewegung der Lamellen. Wehrend der Kreisbewegung leuchtet das Swing-Symbol auf dem Display. Feste Ausrichtung 1.
GEBRAUCHSANWEISUNGEN Einstellung der Zeitvorwahl Drinstecken Sie die EIMER-Taste, um die Zeit zur automatischen Einbezog. Ausschaltung des Geräts einzustellen. MIME ON Einstellung der Standboy-Zeit, nach der sich das Gerd automatisch einschaltet. MIME OFF Einstellung der Betriebszeit, nach der sich das Gerät automatisch abschaltet. Einschaltfunktion 1. Wenn das Grat ausgeschaltet ist, , einmal betätigen. Die , MIME blinkt nun auf dem Display auf. 2.
GEBRAUCHSANWEISUNGEN EO-Betrieb In diesem Betriebsmodus nimmt das Grat automatische Einstellungen vor, um Energieeinsparungen zu erzielen. Im Einfügemodus wird die Temperatur gegenüber der angewählten Einstellung um 2 °C erholt. Im Heizmodus wird die Temperatur gegenüber der angewählten Einstellung um 2 °C gesenkt. 1. drinstecken, um das Gerd einzuschalten und einen auszuwählen. 2. drinstecken, um den Energiesparmodus zu aktivieren. 3.
GEBRAUCHSANWEISUNGEN Schlafmodus 1. drinstecken, um das Grat einzuschalten. 2. Mit den Blichen Bedienvorgengen gewünschte Modus und Temperatureinstellung vornehmen. 3. SPLEEN“ Taste drinstecken, um den Schlafmodus zu aktivieren: Im Druckereibetrieb: Ermöglicht die Erhöhung und Absenkung der Einstelltemperatur {ober einen 10-inständigen Zeitraum mit voreingestellten Zeitastbinden, um einen hohen Komfort aufrechtzuerhalten und gleichzeitig Energie zu sparen (sieche Grafik unten).
Selbstreinigungsfunktion 1. Mit dieser Funktion kann der Verdampfen von angesammeltem Schmutz, Bakterien usw. befreit werden. 2. Zum Start dieser Funktion, ausgehend von irgendeinem Modus drinstecken. Auf dem Display des Innengerätes erscheint ,AC”. 3. Die Funktion lauft etwa 30 Minuten lang. Danach kehrt das Grat zu der zuvor eingestellten Funktion zurichte. Drinstecken Sie oder ,Mode*, falls Sie die Funktion vorzeitig abbrechen machten. Nach Fertigstellung oder Abbruch werden 2 Piepten ausgegeben.
REMOTE CONTROLLER 1 A (ENP ug) Press it to increase temperature / time setting. 2 WV {TEMP DN} Press it to decrease temperature/ time setting. 8 © oxymoron Press it ta start or stop operation. 4 FAN To select the fan speed of autnflow/mid/high 5 TIMER Press It to set auto-off timer. 6 SLEET To activate the function “SLEEP” ECO Press this button to activate / deactivate the HCO function which enables the 7 unit automatically to sets the operation to achieve energy savings.
REMOTE CONTROLLER Remote controller DISPLAY Meaning of symbols on display 3 Hor (d Auto mode indicator 2 ES COOLING Indicator 3 é DEHUMIDIFYING indicator 4 #* FAN ONLY OPERATION indicator 5 # HEATING indicator 6 Ero kh SIGNAL RECEPTION indicator Jor i 7 ori TIMER OFF indicator 8 | Dory SB o® or (Guy | MESON indicator AUTO FAN indicator dacha LOW FAN SPEED Indicator emo MIDDLE FAN SPEED indicator n 8 o emi horsemanship | HIGH FAN SPEED indicator Ih 3 Coda SLEEP indicator 14 > COMFORTABLE SLEEP indicator {opt
REMOTE CONTROLLER Replacement of Batteries Remove the battery cover plats from the rear of the cremate controller; by sliding it in the direction of the arrow, Install the batteries according the direction {+and -} shown on the Remote Controller Reinstall the battery cover by sliding it into place, MOTE: Use 2 LRO 3 AAA {1.5Y) batteries. Do not use rechargeable batteries. Replace the old batteries with new ones of the same type when the display Is no longer legible.
OPERATING INSTRUCTIONS | System Operation i ON ‘When the appliance is off (standby): 1. Press the "ON / OFF" button to turn on appliance. The appliance will begin to operate. All current operational settings and modes status are shown on the display. NOTE: When the appliance is turned on via "ON / OFF" button it will return to operation using the last operational models and settings. When the appliance is running: 1. Press the "ON / OFF" button to turn off appliance.
OPERATING INSTRUCTIONS Cooling / Heating Operation 1. Press the MODE button to select COOLING/HEATING mode. 2. Press the TEMP UP / DN buttons to set the desired temperature. 3. Press the FAN button to select the fan speed in four steps Auto, Low; Med, or High. 1. Press the MODE button to select Fan mode. 2. Press the FAN button to select the fan speed in three steps Low, Med, or High.
OPERATING INSTRUCTIONS DISGUSTING VERTICAL AIR FLOW Continuous Circulation 1. To adjust the direction of the air flow vertically for more even air circulation, press the (switch) button, this activates a continuous cyclic movement of the louver ‘When cycling, the swing icon is shown on the display. Fixed Direction 1.
OPERATING INSTRUCTIONS | Timer Operation i Press the TIMER button to set the auto-on and auto-off time of the unit. TIME ON sets the amount of timer after which the unit will automatically turn on. TIME OFF sets the amount of timer after which the unit will automatically turn off. TIME ON function 1. With the appliance "OFF", press the "TIMER" button once, a blinking "TIME ON Indicator" Is shown on the display. 2. Press the MODE, FAN, TEMP or TEMP¥ buttons to set the desired mode, fan speed and temperature.
OPERATING INSTRUCTIONS [ ECO Operation I In this mode the appliance automatically sets the operation to achieve energy savings. In COOLING mode, the temperature setting will increase 2'C above the set temperature. In HEATING mode, the temperature setting will decrease 2'C below the set temperature. 1. Press the "ON / OFF” button to turn on appliance and select a COOLING / HEATING mode. 2. Press the "ECO" button, the appliance will run in ECO mode. 3.
8 aN E cede [ Sleep Mode i 1. Press the "ON / OFF" button to turn on appliance. 2. Set the desired mode and temperature setting as per basic operations. 3. Press the "SLEEP" button, the appliance will run in "SLEEP" mode: For Cooling: Allows the set temperature to increase and decrease over a 10 hour period at per-set time intervals to maintain your comfort while saving energy (see graph below).
OPERATING INSTRUCTIONS | self-Clean function 1. This function help carry away the accumulated dirt, bacteria, etc from the evaporator 2. Press "CLEAN" button to enter this function in any mode and it will show "AC" on the display of indoor unit. 3. This function will run about 30 minutes, and it will back to the mode set before this function You can press "ON/OFF" or "Mode" to cancel this function during the process. You will hear 2 beeps when it's finished or canceled. 4.
TELECOMMUTE gah! Hump names Com: GT], Hef mE; SSS $C |) 18s) (0) Eu—21 Coma a ORE 13— Cream) (romeo
Bouton Fonction appuyez sur ce bouton pour augmenter le réglage de la 1 Atemi UP) porter sur / heure, 3 appuyez sur ce bouton pour diminuer le réglage (emp DN) température / heure. 3 Hou marchette |Appuyez pour démarrer ou arrêter I'appareil. a4 FAN (VENTILATEUR}) : l’appuyez sur ce bouton pour sélectionner la vitesse du ventilateur entre auto / Low {lente} / Mid (moyenne) / High (rapide). 5 MINUTEUR l’appuyez sur ce bouton pour régler le départ différé du amarrage.
17 antimitotique [Pour activer la fonction "Anti moustiques”. {Si applicable) 18 Mute (Sourdine) [Pour activer la fonction de sourdine. {Si applicable} appuyez simultanément sur les boutons MODE et MITER 19 a8 {modernissime) pour activer la fonction de "Verrouillage sécurité enfant.
LET INT AFFICHAGE de la télécommande Explication des symboles affichés IN° Symboles signification 1 Bou oo Indicateur du mode automatique 2 = Indicateur de CLIMATISATION lB ous’ indicateur de déshumidification la Indicateur de fonctionnement du VENTILATEUR SEULEMENT 5 im Indicateur de CHAUFFAGE 6 a LA indicateur de RÉCEPTION DU SIGNAL 7 Bou vir Indicateur du MINUTEUR D’ARRÊT via Indicateur du MINUTEUR DE DÉMARRAGE lo 2 oud) [Indicateur du MODE DE VENTILATION Can ou ou Tn dictateur de VITESSE LENTE DE VENTIL
TIN moins 1 m du téléviseur ou d'autres appareils Remplacement des piles Électriques. Retirez le couvercle du compartiment des piles & Garrigue de la télécommande, en le faisant glisser dans le sens de la flache. Installez les piles en respectant le sens des polarités (+ et -} Indiquées sur la télécommande. Remettez le couvercle du compartiment des pelles en place en le faisant glisser. REMARQUE: Utilisez 2 piles de type LRO 3 AAA (1.5V) N'utilisez pas de piles rechargeables.
INSTRUCTIONS D'UTILISATION Fonctionnement du système Mise en marche Quand l'appareil est arrête {ou en mode de veille) 1. Appuyez sur le bouton "On/Off" (Marche / Arrêt) pour mettre appareiller en marche. L’appareil commencera a fonctionner. Tous les paramétrés opérationnels en cours et les modes sont affichés sur I'écran. REMARQUE : Lorsque l’appareil est mis en marche avec le bouton "On/Off" (Marche / Arriéré, il reprendra son fonctionnement en utilisant les dernières options et réglages opérationnels.
INSTRUCTIONS D'UTILISATION Fonctionnement des modes de climatisation / chauffage 1. Appuyez sur le bouton "MODE" pour sélectionner le mode requis entre climatisation et chauffage. 2. Appuyez sur les boutons TEMPE UP / DN pour régler la température désirée. 3. Appuyez sur le bouton FAN (VENTILATION) pour sélectionner la vitesse de ventilation entre Auto, Low {lente}, Mid (moyenne} ou High {rapide}. Fonctionnement du mode FAN (VENTILATION) 1.
INSTRUCTIONS D'UTILISATION Réglage de la direction du flux d AJUSTER LE FLUX D'AIR VERTICAL Circulation continue 1. Pour ajuster la direction du flux d'air verticalement pour une circulation d'air plus régulière, appuyez sur le bouton Eos) TE; cela activera un mouvement cyclique continu des ouïes. Lors du cycle, dicline d'oscillation apparaîtra sur |'affichage. Direction fixe 1.
INSTRUCTIONS D'UTILISATION Fonction du minuteur Appuyez sur le bouton MITER OFF (MINUTEUR d’arrêt} pour régler le minuteur différé de démarrage et le minuteur différé d’arrêt. MITER ON (MINUTEUR de mise en marche) permet de régler la durée du minuteur après laquelle l'appareil se mettra automatiquement en marche. MITER OFF {MINUTEUR d’arrêt) permet de régler le délai apeurés lequel l'appareil s'éteindra automatiquement. Fonctionnement du MINUTEUR de mise en marche (ITEM ON) 1.
INSTRUCTIONS D'UTILISATION Fonction ECO Dans ce mode, |'appareil réglé automatiquement les opérations pour réaliser des économies d'énergie. En mode CLIMATISATION, le réglage de température augmentera de 2°C au-dessus de la température réglée. En mode CHAUFFAGE, le réglage de température diminuera de 2°C au-dessous de la température réglée. 1. Appuyez sur le bouton "On/Off" (Marche / Arrêt) pour mettre I'appareil en marche et sélectionnez le mode CLIMATISATION / CHAUFFAGE. 2.
INSTRUCTIONS D'UTILISATION Mode sommeil 1. Appuyez sur le bouton "On/Off" (Marche / Arrêt) pour mettre I'appareil en marche. 2. Réglez le mode et le réglage de température désirés selon les opérations de base. 3. Appuyez sur le bouton "SLEEPING" (SOMMEIL) et I'appareil fonctionnera en mode sommeil.
INSTRUCTIONS D'UTILISATION Fonction auto-nettoyante 1. Cette fonction aide enlever les saletés accumulées, les bactéries, etc. de |'évaporateur 2. Appuyez sur le bouton "CLEAN" pour activer cette fonction dans n'importe quel mode et "AC" s'affichera sur I'écran de I'unité intérieure. 3. Cette fonction durera environ 30 minutes et reviendra au mode défini avant cette fonction. Vous pouvez appuyer sur "ON / OFF" (Marche / Arrêt) ou "sur Mode" pour annuler cette fonction pendant le processus.
TELECOMMUTE gah! Hump names Com: GT], Hef mE; SSS $C |) 18s) (0) Eu—21 Coma a ORE 13— Cream) (romeo
TELECOMANDO N. [Tasto Funzione TEMPRA UP) Premere questo tasto per aumentare I'impostazione della 1 temperatura / dell'ora. 3 Premere questo tasto per ridurre I'impostazione della ¥ (TEMO DN) temperatura / dell'ora. 3 Yo ONOFRIO Premere questo tasto per attivare o arrestare il funzionamento.| 4 FAN (VENTOLA): I Seleziona la velocità della ventola tra lautomatica/bassa/media/alta. 5 TIMER Premere questo tasto per impostare lo spegnimento automatico del timer. 6 SLEALE I Attiva la funzione “SLEALE.
18 Mute Premere questo tasto per per attivare la funzione di silenzi amento. (Se presente} 18 Bontempone) Premere contemporaneamente i tasti MODE e TIMER per attivare la funzione di blocco bambini. {Se presente} 20 AH Premere questo tasto per per attivare la funzione di riscaldamento presente} 21 {FEELING Attiva/disattiva la funzione “I FEELING.
TELECOMANDO DISPLAY del telecomando. Significato dei simboli a display. IN.
TELECOMANDO Sostituzione delle batterie rimuovere il coperchio dello scomparto batterie dalla parte posteriore del telecomando facendolo scorrere nella direzione della freccia. Inserire le batterie nel rispetto delle polarità (+e -} Illustrate sul telecomando. Riposizionare Il coperchio dello scomparto batterle facendolo scorrere in posizione. NOTA: Servirsi di 2 batterie LRO 3 AAA Non servirsi di batterie ricaricabili.
ISTRUZIONI PER L'USO Funzionamento del sistema ON Quando Apparecchio & spento (standista: 1. Premere il tasto "ON / OFF" per accendere P'applicazione. L'applicazione inizia a funzionare. Tutte le Impostazioni operative correnti ele modalità sono illustrate a display. NOTA: quando Applicazione viene accesa tramite il tasto "ON / OFF” torna in funzione con gli ultimi modelli operativi e le ultime Impostazioni utilizzata. OFF Quando P'applicazione & attiva: 1.
ISTRUZIONI PER L'USO Raffreddamento / riscaldamento 1. Premere il tasto “MODE” per selezionare la modalità operativa di RAFFREDDAMENTO/RISCALDAMENTO. 2. Premere i tasti TEMO UP / DN per impostare la temperatura desiderata. 3. Premere il tasto FAN per selezionare la velocità della ventola tra quattro livelli: Auto, bassa, media o alta. Funzione solo ventola 1. Premere il tasto “MODE” per selezionare la modalità ventola. 2.
ISTRUZIONI PER L'USO Regolazione della direzione del flusso darai REGOLAZIONE DEL FLUSSO D’ARIA VERTICALE Circolazione continua 1. Per regolare la direzione del flusso d’aria verticalmente per una circolazione lardellarla ancora pilla uniforme, premere il tasto 2 # ; questo attiva un movimento ciclico continuo del deflettore. Durante il ciclo, I'icona di oscillazione compare a display. Direzione fissa 1.
ISTRUZIONI PER L'USO Funzionamento del timer Premere il tasto TIMER per attivare I'ora di accensione automatica e di spegnimento automatico dell'apparecchio TIME ON imposta la quantità di tempo in seguito al quale I"apparecchio si accenderà automaticamente. TIME OFF imposta la quantità di tempo in seguito al quale I"apparecchio si spegnerà automaticamente. Funzione TIME ON 1. Ad apparecchio spento premere una volta il tasto "TIMER"; una spia "TIME ON" lampeggiante compare a display. 2.
FUNZIONAMENTO Funzione ECO In questa modalità I'apparecchio imposta automaticamente il funzionamento per garantire il risparmio energetico. In modalità di RAFFREDDAMENTO, I'impostazione della temperatura aumenterà di 2°C rispetto alla temperatura impostata. In modalità di RISCALDAMENTO, I'impostazione della temperatura diminuirà di 2°C rispetto alla temperatura impostata. 1. Premere il tasto "ON / OFF" per accendere I'apparecchio e selezionare una modalità tra RAFFREDDAMENTO e RISCALDAMENTO. 2.
FUNZIONAMENTO Modalità Sleale 1. Premere il tasto "ON / OFF" per accendere I'applicazione. 2. Impostare la modalità desiderata e la temperatura come per il funzionamento base. 3. Premendo il tasto "SLEALE, Applicazione funzionerà in modalità "SLEALE: Per il raffreddamento: Fa in modo che la temperatura impostata aumenti e diminuisca in un periodo di 10 ore a intervalli di tempo prestabiliti per mantenere il livello di comfort risparmiando al tempo stesso energia (si veda il grafico sottostante).
ISTRUZIONI PER L'USO Funzione pulizia automatica 1. Questa funzione aiuta a eliminare lo sporco accumulato, i batteri, ecc. dall'evaporatore 2, Premere il tasto “CLAN” per attivare questa funzione in qualsiasi modalità; sul display dell'unita indoor compare “AC”. 3. Questa funzione sarà attiva per circa 30 minuti e al termine I"apparecchio tornerà alla modalità impostata in precedenza. Premere "ONOFRIO" o "Mode” per annullare la funzione mentre & attiva.
MISUNDERSTANDING gah! Hump names Com: GT], Hef mE; SSS $C |) 18s) (0) Eu—21 Coma a ORE 13— Cream) (romeo
|[Knop Functie Arm APERTUUR OMHOOG) Drukken om de temperatuur te verhogen/instellen van 1 de timer. 3 Drukken om de temperatuur te verlagen/instellen van W (TEMPERATUUR OMLAAG) [de timer. 3 [ AAN/UIT Drukken om een operatie te starten of te stoppen. 4 VENTILATOR Om de snelheid van de ventilator te selecteren lauto/laag/medium/high 5 TIMER Drukken om de timer voor de automatische uitschakeling in te stellen.
toepassing) 17 ANTI-MUGGEN Om de ANTI-MUGGEN-functie te activeren. (Indien van toepassing) 18 Munte Om de muts-functie te activeren. {Indien van toepassing} 19 i (MODUS+TIMER] Om de kinderzekering te activeren door MODUS en [TIMER tegelijkertijd te drukken. {Indien van toepassing) functie van 8 °C verwarming te activeren. {Indien van toepassing) 21 IK VOEL Om de 1K VOEL' functie te activeren/deactiveren.
AFSTANDSBEDIENING Vervangen van de batterijen Verwijder het batterijvakdeksel aan de achterkant van de afstandsbediening, door deze in de richting van de pijl te schuiven. Plaats de batterljen In overeenstemming met de polen (+ en -} zoals weergegeven In de afstandsheilening. Plaats het batterljvakdeksel weer terug door hem op de plaats te schuiven. OPMERKING: Gebruik 2 LRO 3 AAA (1,5 V) batterijen. Gebruik geen oplaadbare batterijen.
Systeembesturing AAN Als het apparaat uit is {standby}: 1. Druk op de ‘ON/OFF’ knop om het apparaat in te schakelen. De applicatie begint te werken. Alle huidige operationele instellingen en modi-statussen worden op het display getoond. OPMERKING: Als het apparaat via de ‘ON/OFF’ knop wordt aangeschakeld, gaat hij aan in de laatst gebruikte modi en instellingen. um Als het apparaat in gebruik is: 1. Druk op de ‘ON/OFF’ knop om het apparaat uit te schakelen. Het apparaat gaat naar de stand-by-modus.
Koelen/verwarmen 1. Druk op de MODUS knop om de KOELEN/VERWARMEN modus te selecteren. 2. Druk op TEMPERATUUR OMHOOG/OMLAAG om de gewenste temperatuur in te stellen. 3. Druk op de VENTILATOR knop om de ventilatorsnelheid in vier stappen in te stellen: auto, laag, medium of hoog. Alleen ventilatormodus 1. Druk op de MODUS knop om de ventilatormodus te activeren. 2. Druk op de VENTILATOR knop om de ventilatorsnelheid in drie stappen in te stellen: laag, medium of hoog.
Aanpassen van de richting van de luchtstroom AANPASSEN VAN DE VERTICALE LUCHTSTROOM Voortdurende circulatie 1. Om de richting van de luchtstroom verticaal aan te passen voor een gelijkmatigere luchtcirculatie, drukt u op de [smc 2 8 knop. Dit activeert een continue cyclische beweging van de kleppen. Tijdens de cyclische beweging wordt het zwaai-icoon weergegeven op het display. Vaste richting 1.
Werking van de timer Druk op de TIMER knop om de auto-aan en auto-uit tijd van de eenheid in te stellen. TID AAN stelt de tijd in waarna de eenheid automatisch wordt ingeschakeld. TID UIT stelt de tijd in waarna de eenheid automatisch wordt uitgeschakeld. TUD AAN functie 1. Als het apparaat ‘UIT’ is, drukt u een keer op de ‘TIMER’ knop, waarna een knipperende ‘TIMER AAN-indicator’ op het display verschijnt. 2.
CO-gebruik In deze modus stelt het apparaat automatisch het gebruik in om energie te besparen. In de KOELEN-modus neemt de temperatuur 2 °C toe boven de ingestelde temperatuur, In de VERWARMEN-modus neemt de temperatuur 2 °C af onder de ingestelde temperatuur. 1. Druk op de ‘AAN/UIT’ knop om het apparaat aan te zetten en kies de KOELEN / VERWARMEN modus. 2. Druk op de ‘ECO’ knop om het apparaat in de CO-modus te gebruiken. 3. Druk nogmaals op de ‘ECO’ knop waardoor de modus wordt geannuleerd.
Slaapmodus 1. Druk op de ‘ON/OFF’ knop om het apparaat in te schakelen. 2 2. Stel de gewenste modus en temperatuur in J se zoals beschreven in het basisgebruik. bl 3.
Zelfreinigende functie 1. Deze functie helpt u, bij het verwijderen van opgehoopte verontreinigingen, bacteriën etc. uit de verdamper 2. Druk op de ‘CLEAN’ knop om haar deze functie te gaan vanuit iedere modus. Hierna verschijnt ‘AC’ op het display van de eenheid binnenshuis. 3. Deze functie loopt ongeveer 30 minuten lang en gaat vervolgens terug naar de modus die voor deze functie actief was. U kunt op de ‘AAN/UIT’ knop of ‘modus’ knop drukken om de functie tijdens het gebruik te annuleren.
TAVIRANY(TO gah! Hump names Com: GT], Hef mE; SSS $C |) 18s) (0) Eu—21 Coma a ORE 13— Cream) (romeo