OWNER'S MANUAL PORTABLE AIR CONDITIONER Thank you for selecting our quality appliance. Please be sure to read this user manual carefully before using. For any questions, pleads contact the TCL Service for assistance.
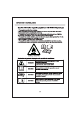
IMPORTANT SAFEGUARDS » Disconnect the appliance from its power source during service and when replacing parts and cleaning. » At the end of its useful life, deliver the appliance to a special waste collection center for disposal. + The maintenance and disposal operations must be carried out by qualified personnel only. © Do not use this unit for functions other than those described in this instruction manual.
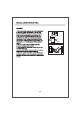
IMPORTANT SAFEGUARDS Specific Information regarding appliances with R290 refrigerant gas » Thoroughly read all of the wakings. » When defrosting and cleaning the appliance, do not use any tools other than those recommended by the manufacturing company. » The appliance must be placed in an area without any continuous sources of ignition (for example: open flames, gas or electrical appliances in operation).
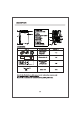
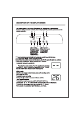
DESCRIPTION 1. Control anal 2. Handle {both sides} 3. Castors 7. Air outlet grille 8. Intake girls 9. Power cable 10. Plug fixer 11. Middle drainage 12. Condenser drain PARTS NAME QUANTITY Exhaust hose Hose outlet 1 set Hose inlet Window slider kit 1st Remote Control Batteries 1st sol Drain Hose 1 set Note: All the illustrations in this manual ara for explanatory purposes only. Your appliance may be slightly different. Bo sure all accessories are removed from the packing before use.
INSTALLATION INSTRUCTIONS EXHAUSTING HOT AIR In the Cool Mode the appliance must be placed close to a window or opening so that the warm exhaust alr can be dusted outside. First position unit on a fiat floor and make sure there's minimum of 45cm clearance around the unit,and Is within the vicinity of a single circuit loutish power source. 1. Extend either side of the hose (Fig.1) and screw the hose inlet (Fig.2). 2. Extend the other side of the hose and screw it to the hose outlet (Fig.3). 3.
INSTALLATION INSTRUCTIONS Ascetically Window $ ¥ r¥ Window slider Window slider Fig.5 Flag WINDOW SLIDER KIT INSTALLATION 1: Parts: A) Panel B) Panel with one hole C) Screw to lock window kit in place 2: Assembly: Slide Panel B into Panel A and size to widow width. Windows sizes vary. When sizing the window width, be sure that the window kit assembly is free from gaps from gaps and/or air pockets when taking measurements. 3.
INSTALLATION INSTRUCTIONS LOCATION # The ult should be placed on a firm foundation to minimize nose and vibration. Fer safe and secure positioning. Place the unit on a smooth, level floor strong enough to support the unit. # The unit has casters to aid placement, but it should only be rolled on smooth, flat surfaces. Use caution when rolling on carpeted surfaces. Use caution and Protect floors when rolling over wood floors. Do not attempt te roll the unit over objects.
DESCRIPTION OF THE DISPLAY SCREEN The control panel Is on the top of the appliance, enables you to manage part functions without remote controller, but to fully exploit its potential, you must use the remote controller. vey Com Om wo! rio om nO Cor =D Oe YlRlv[oIQ(Q BEE 1 2 345 6 7 1.Timer button A Mode symbol * 2.Fan speed button B Fan sped symbol 3.Decrease button C Sleep symbol 4.Display screen D Timer symbol S.Increase button E WiFi symbol ** 6.MODE button 7.
DESCRIPTION OF THE DISPLAY SCREEN The most suitable temperature for the recon during the summer varies from 24°C to 27°C (75°F to 81°F). You are recommended, however, not to set a temperature much below the outdoor temperature. The fan speed difference is more noticeable when the appliance is under Fan mode but may not be noticeable under Cool mode. HEAT mode * means only the heat pump model have this function. To set this mode correctly: ! *Press the Button a number of times until the Heat symbol appears.
DESCRIPTION OF THE DISPLAY SCREEN FAN mode When using the appliance in this mods, the air hose does not need to be attached. # Press the a button a number of times until the “Fan” symbol appears. # Select the required fan speed by pressing the * button. Three speeds are available: High / Medium / Low. The screen display = as high speed, “= = "as medium speed, “~ "as low speed. DRY mode Ideal to reduce room humidity (spring and autumn, damp dd h rooms rainy periods, etc.).
DESCRIPTION OF THE DISPLAY SCREEN * Select the required fan spade by pressing the J button. Four speeds are available: High / Medium / Low / Auto.
DESCRIPTION OF THE DISPLAY SCREEN Switch the unit of temperature When the appliance is running, press and hold * ¥ "and" & "buttons together for 3 seconds at the same time, then you can change the unit of temperature. For example: Before change, in cool mode, the screen display like fig. After change, in cool mode, the screen display like fig. 24] (15 Fig.1 Fig.2 The following functions below ara optional and not available on all models.
DESCRIPTION OF THE DISPLAY SCREEN SELF-DIAGNOSIS The appliance has a self-diagnosis system to identify a number of malfunctions. Error messages are displayed on the appliance display. IF IS DISPLAYED WHAT SHOULD 1 D0? If this is displayed, contact your local authorized service center. PROBE FAILURE (sensor damaged) Empty the Internal safety tank, following the instructions in the “End of season FULL TANK operations’paragraph.
REMOTE CONTROL MANUAL Remote controller buttons en ob To tum on/off the air conditioner. FOB MODE | To salacity the operation mods: SMART, COOL, DRY, FAN, HEAT. Lh /\ | Tolerances the setting temperature, lengthen the time In TIMER LCE Touchscreen the stinging temperature, reduce the time in TIMER o=eon | eating. = To adjust the air flow direction vertically (No available for the modal). E Ta adjust the air flow direction horizontally. FAN | To adjust the fan sped: auto, low, mid, high.
REMOTE CONTROL MANUAL Remote controller DISPLAY, meaning of symbols on the liquid crystal display O SMART MODE Indicator :] COOLING MODE Indicator EN DRY MODE Indicator &% FAN MODE Indicator HEATING MODE Indicator FOB AH ED) BATTERY Indicator FLAP SWING (Al flow) Windstorm ime re @ 8 TEMPERATURE! CLOCK indicator FAN SPEED Windstorm MEH | 570 FAN indicator (8 | TIMER distortion «f} | SLEEP MODE Indicator @ TURBO indicate ow MUTE Indicator (No available for the model).
REMOTE CONTROL MANUAL + Point tha remote control at the receiver on the appliance. + The remote control must be no more than 7 meters away from the appliance {without obstacles between the remote control and the receiver). mmm + The remote control must ba handled with extreme care. Do not drop it or expose it to direct sunlight or sources of heat. If the remote control does not work, please try to take out the battery, and put it back.
REMOTE CONTROL MANUAL TURN ON/ TURN OFF THE AIR CONDITIONER Crass the button) to tum on or turn off the air conditioner. SWITCH THE UNIT OF TEMPERATURE Press the TURBO button hold it, then you can change the unit of temperature. COOLING MODE The cooling function allows the air conditioner to cool the room and at the same time reduces Air humidity. #To activate the cooling function ( COOL ) press the MODE button until the symbol o appears on the display. s With the button ~~ or ~\ temperature than that of th
REMOTE CONTROL MANUAL NOTE: In HEATING operation, the appliance can automatically activate a defrost cycle, which is essential to clean the frost on the condenser so as to recover its heat exchange function. This procedure usually lasts for 2-10 minutes. During defrosting, the unit fan stop operation. After defrosting, It resumes to HEATING mode automatically. #In this mode, you may have to wait for a few minutes before the appliance starts giving out hot air.
REMOTE CONTROL MANUAL SMART MODE #To set the SMART mode, press MODE until 0 appears © = on the display. X In SMART mode the run mode will be sst automatically 2 according to the room temperature.
REMOTE CONTROL MANUAL AIR FLOW CONTROL #To set this function correctly: Select the operating mode (cool, dry, fan, heat) as described above. Press the [E button, the deflector well start or stop swing. The m= button function Is optional. NOTE: Never poke fingers, sticks or other objects in the air inlet or outlet vents. Such accidental contact with live parts might cause unforeseeable damage or injury. SLEEP MODE P re-sefting automatic operating program.
REMOTE CONTROL MANUAL TIMER TIMER OFF To set the switching-off auto magically. alr conditioner With the AC on, press the TIMER button and then use the “and ~\ buttons to set the length of time before the AC will tum off. Press the timer button again to start the countdown. Naote:To cancel the tested function, press the TIMER button again. Note:In case of power off it is necessary to set TIMER OFF again.
REMOTE CONTROL MANUAL Turbo function (Optional) To activate turbo function, press the TURBO button, and 4g» will appear on the display. In COOL mods, when you select TURBO features, the appliance well operate the fast cooling with the highest fan speed. ECO MODE (Optional) (No available for this model) In this mode the appliance automatically sets the operation to save synergy. Press the ECO button, the @ appears on the display, and the appliance will run in ECO moda. Prass again to cancel it.
TIPS FOR CORRECT USE To get the bast from your appliance, follow these recommendations: # Close the windows and doors in the room to be air conditioned (Flg. 11). When Installing the appliance semi-permanently, you should leave a door slightly open {as little guarantee correct ventilation; + Protect the room from direct exposure to the sun by partially closing curtains and/or blinds to make the appliance much moral economical to run (Fig. 12); * Never rest objects of any kind on the appliance; (Fig.
WATER DRAINAGE METHOD Continuous Draining (flg.15) While using the unit in dehumidifier mode, continuous drainage Is recommended. 1. Unplug the unit from the power source. 2. Remove the drain plug. While doing this operation some residual water may spill so please have a pan to collect the water. 3. Connect the drain hose (1/2" or 12.7mm, maybe not supplied). See diagram. 4. The water can be continuously drained through the hose into a floor drain or bucket. 5.
WATER DRAINAGE METHOD Middle drainage When unit running In Dry mods, you can choose the way below to drain. 1. Unplug the unit from the power source. 2. Remove the drain plug (fig A). While doing this operation some residual water may spill so please have a pan to collect the water. 3. Connect the drain hose (1/2" or 12.7mm, maybe not supplied). {fig B} 4. The water can be continuously drained through the hose into a floor drain or bucket. 5. Tum on the unit.
CLEANING Be fora cleaning or maintenance, tum the appliance off by pressing the © button an the control panel or remote control, wait for a few minutes then unplug from the mains socket. CLEANING THE CABINET You should clean the appliance with a slightly damp cloth then dry with a dry cloth. Never wash the appliance with water. It could be dangerous. + Never use petrol, alcohol or solvents to clean the appliance. « Never spray insecticide liquids or similar.
START-END OF SEASON OPERATIONS START OF SEASON CHECKS Make sure the power cable and plug are undamaged and the earth system is efficient. Follow the Installation Instructions precisely. END OF SEASON OPERATIONS To empty the Intestinal circuit completely of water, remove the cap. Run off all water left into a basin. When all the water has been drained, put the cap back in place. Clean the fitter and dry thoroughly before putting back.
TROUBLESHOOTING PROBLEM CAUSE SOLUTION The appliance ® There is no current * Wait does not come on It Is not plugged Into the mains | ® Plug Into the mains * The internal safety device has © Wait 30 minutes, if the problem tripped persists, contact your service center The appliance ® There are bends in the air exhaust | ® Position the air exhaust hose works for a short hose compactly, keeping It as short time only * Something is preventing the ba free x curves as possible ir from being discharged avoid bott
{ke us on Facebook TCL Electronics Australia Pty Lid, ABN BT 141032080 Telephone; 1300 738 148 service suitor nosy wave fol poring