
Instructions


7.9 SERIAL COMMUNICATION TEST SET-UP
Use the following instructions as basic set-up to test the serial communication operation.
1.Equipment:
2.PC set-up:
3.Power supply set-up:
4.Communication Test:
PC with Windows Hyper Terminal, private edition, software installed, Genesys
power supply, RS232 cable.
TM
2.1 Open Hyper Terminal.......................New Connection.
2.2 Enter a name
2.3 Connect to.......................................Direct to Com1 or Com 2
2.4 Configure port properties:
2.5 Open Properties in the program File...........................Properties
2.6 Setting: ASCII Set Up
Select Echo characters locally, select send line ends with line feed.
On some PC systems, pressing the number keypad "Enter" will
distort displayed messages. Use the alphabetic "Enter" instead.
Bits per second .......9600
Data bits ..................8
Parity .......................None
Stop bits....................1
Flow control..............None
3.1 Connect the power supply to the PC using the RS232 cable.
3.2 Set via the front panel: Baud Rate: 9600, Address: 06.
3.3 Set via the rear panel: RS232/485 to RS232 (refer to section: 4-4).
4.1 Model identification:
PC:write: ADR 06
Power supply response: "OK"
4.2 Command test:
PC write: OUT 1
Power supply response: "OK"
PC write: PV n
Power supply response: "OK"
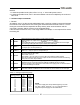
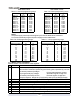
PC write: PC n (for n values see Tables 7-3, 7-4 and 7-5 )
Power supply response: "OK"
The power supply should turn on and the display will indicate the output voltage
and the actual output current.
61