
Information


A STEP AHEAD
141
Deutsch Tooling
Step 1:
Cycle the tool to release ratchet and open tool. Lift the
locator gate, and place the contact into the correct die nest.
Adjust alignment of crimp wings to ensure capture by crimp
jaws.
Crimping with DTT-12-00 Hand Tool
Step 2:
Partially close the tool until
the contact is held in place.
Step 3:
Insert the prestripped wire
into the crimp area of the
contact.
Step 4:
Close the tool until the
ratchet releases. The ratchet
is released when a loud
click is heard and crimp is
complete.
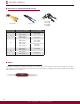
Crimping with DTT-12-01 Hand Tool
Step 1:
Cycle handles to release
ratchet and fully open crimp
jaws. Pull out insulation
selector and push into
proper diameter using the
chart below.
Step 2:
1. Insert contact into locator. Adjust alignment and width of
crimp wings if necessary to ensure capture by crimp jaws.
2. Insert stripped wire into the contact. Close crimp tool until
full-cycle ratchet control releases.
Wire Type Insulation Selector
10 TXL .150-.170
10 GXL .160-.180
10 SXL .170-.205
5.0 mm
2
.160-.180
6.0 mm
2
.170-.205
Insulation diameters
Insulation
selector
Proper
contact
position,
front view
Proper
contact
position,
side view