» CD-RW901 CD Rewritable Recorder Professional OWNER'S MANUAL D00910920A
1IMPORTANT − Introduction SAFETY PRECAUTIONS CAUTION: TO REDUCE THE RISK OF ELECTRIC SHOCK, DO NOT REMOVE COVER (OR BACK). NO USER-SERVICEABLE PARTS INSIDE. REFER SERVICING TO QUALIFIED SERVICE PERSONNEL. The lightning flash with arrowhead symbol, within equilateral triangle, is intended to alert the user to the presence of uninsulated “dangerous voltage” within the product’s enclosure that may be of sufficient magnitude to constitute a risk of electric shock to persons.
IMPORTANT SAFETY1 INSTRUCTIONS − Introduction 1 Read these instructions. • Do not expose this apparatus to drips or splashes. 2 Keep these instructions. • Do not place any objects filled with liquids, such as vases, on the apparatus. 3 Heed all warnings. 4 Follow all instructions. 5 Do not use this apparatus near water. 6 Clean only with dry cloth. 7 Do not block any ventilation openings. Install in accordance with the manufacturer's instructions.
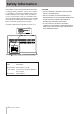
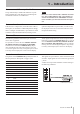
1 − Introduction Safety Information This product has been designed and manufactured according to FDA regulations "title 21, CFR, chapter 1, subchapter J, based on the Radiation Control for Health and Safety Act of 1968", and is classified as a class 1 laser product. There is no hazardous invisible laser radiation during operation because invisible laser radiation emitted inside of this product is completely confined in the protective housings. CAUTION The label required in this regulation is shown at 1.
1 − Introduction Contents 1 − Introduction.......................................... 6 5 − Recording............................................ 25 Supplied accessories........................................ 6 Rack-mounting the unit................................... 6 About this manual........................................... 6 About CD-R and CD-RW discs......................... 7 About finalizing............................................... 7 Input selection........................................
1 − Introduction Thank you for your purchase of the TASCAM CD-RW901 CD rewritable recorder. Before connecting and using the unit, please take time to read this manual thoroughly to ensure you understand how to properly set up and connect the CD-RW901, as well as the operation of its many useful and convenient functions. After you have finished reading this manual, please keep it in a safe place for future reference.
1 − Introduction About CD-R and CD-RW discs CD-R discs can be recorded once only. Once they have been used for recording, they cannot be erased or re-recorded. However, if space is available on the disc, additional material can be recorded. The pack-aging of CD-R discs will include one of the following logos: • CD-R and CD-RW discs are sensitive to the effects of heat and ultraviolet rays.
1 − Introduction Environmental considerations The CD-RW901 may be used in most areas, but to maintain top performance, and prolong operating life, observe the following environmental conditions: • The nominal temperature should be between 5°C and 35°C (41°F and 95°F). • Relative humidity should be 30 to 90 percent. • As the unit may become hot during operation, always leave sufficient space above the unit for ventilation.
1 − Introduction Never use a stabilizer or printable discs Using commercially available CD stabilizers or printable recordable discs with this player will damage the mechanism and cause it to malfunction. NOTE Never use a disc that has had a stabilizer mounted to it. The residual adhesive may cause the disc to stick to the turntable of the CD-RW901. If it sticks to the turntable, you will need a technician to get it out.
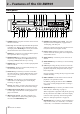
2 − Features of the CD-RW901 Front panel 1 w 2 e r t y 34 56 7 8 u i o p a 1 POWER switch The power switch is used to switch the unit on and off. 2 Disc tray Discs should be placed label side upwards in the disc tray. When a disc is loaded into the unit, the display shows TOC Reading for a short period while the unit determines the contents of the disc. 3 MENU key Use this key to call up the menu options (see “Operation basics” on page 16).
2 − Features of 1− the Introduction CD-RW901 “Erasing” on page 32 for details). s STOP key Use this key to stop playback or recording. When in playback or playback ready mode, pressing this key shows the disc’s RID code on the display. d PLAY key Use this key to start or resume playback or recording. It also acts like a delete key when entering TEXT data (see “Title input operation” on page 33). f READY key Use this key to standby for playback or recording.
2 − Features of the CD-RW901 b ATT control right and left Use a small Phillips screwdriver with these attenuators to reduce the output level from either the right or left balanced analog output. The adjustable level is up to -10 dB. , CONTROL I/O (RS-232C) terminal RS-232C compatible serial control from an external PC can be performed. . REMOTE IN terminal Connects the supplied RC-RW901 remote control unit.
2 − Features of the CD-RW901 T OPTICAL The OPTICAL indicator lights when the input source is set to optical. S ¥ This lights during playback, and also blinks during Auto Cue point search. Y COAXIAL The COAXIAL indicator lights when the input source is set to coaxial. D π This lights during playback or recording standby mode. U ANALOG The ANALOG indicator lights up when the input source is connected to unbalanced analog input.
2 − Features of the CD-RW901 q AUTO TRACK key Use this key to switch Auto Track mode on and off. w RECORD key Use this key to enter record ready mode. e SYNC REC key Use this key to turn synchronized recording on and off (see “Synchronized recording” on page 27 for details). r SEARCH keys (∆/˚) Use these keys to move the playback position inside a track. t SKIP (Â/¯) keys Use these keys to move between tracks when playing back (equivalent to rotating the MULTI JOG dial).
3−1 Menu − Introduction operation The various settings and editing operations possible with the CD-RW901 are performed through menu options shown on the display. Among the many menu setting options, some may be made directly using the keys on the remote control. Menu configuration The menus are configured as shown below. Please see the reference page for more details of each menu.
3 − Menu operation Operation basics 1. Select the desired menu option Press the MENU key on the front panel or remote control to call up the desired menu. The PLAY option in the PLAY sub-menu will be shown on the display at first. 3. Setting the desired menu item or value Front panel operation: Use the MULTI JOG dial to select the desired menu item or value. Pushing the dial enters and exits menu mode. Remote control operation: Use the MENU (+/-) key. Pressing the ENTER key confirms and exits menu mode.
4 − Playback operations The CD-RW901 can be used to play back CDs (including CD-R and CD-RW discs that have been recorded and finalized on other types of recorder), as well as CD-R discs and CD-RW discs that have been recorded on the unit. Audio files in MP3 format on CD-ROM, CD-R and CD-RW are also playable on the unit. Discs for playback The CD discs in the CD-RW901 can play back the types of discs listed below. • Commercial pre-recorded CDs recorded in CD-DA format.
4 − Playback operations Selecting by track number Using the number keys on the remote control, the number of the desired track can be entered directory. Even numbers with two or three digits can be entered easily. For example: You can also enter the track number and start playback by pushing the MULTI JOG dial or using the ENTER key. Track 9: press ‘9’ and 009 will be displayed. Track 12: press ‘1’ and ‘2’ and 012 will be displayed. Track 103: press ‘1’ and ‘0’ and ‘3’ and 103 will be displayed.
4 − Playback operations ª Operation variations Specifying to the minute Even if the final “seconds” time value is not input, playback will begin from the selected “minutes” time after pressing the ENTER or PLAY key. Or, if you press the READY key, the unit will enter the playback standby mode at the selected point.
4 − Playback operations Single-track playback This function enables playback of just a single track. 1. When stopped, set the mode to display Single or Mode>Single. 2. Use the SKIP keys or the number keys (0~9) on the remote control to select the desired track. The MULTI JOG dial can be used to select the track also. 3. Press the PLAY key to begin playback. After the selected track finishes, playback stops.
4 − Playback operations EXT SYNC playback In this mode, the unit will play back in synchronization with the clock selected as digital input source (OPTICAL, COAXIAL, AES/EBU). If the selected digital input source is at 48kHz, using the 48k Fs adjustment function allows the audio to be played back at the correct pitch. When stopped, use the EXT SYNC option in the PLAY sub-menu (see “Operation basics” on page 16) to set the external synch playback mode on.
4 − Playback operations A to B repeat playback If a specific portion between two points on the disc is specified, that portion can be played back repeatedly. 1. During playback, press the A-B key on the remote control at the beginning of the desired portion on the disc. The REPEAT indicator lights up in the display and the A- indicator will flash. 2. At the end of the desired portion on the disc, press the A-B key again.
4 − Playback operations Auto Cue function When the auto cue function is on, when a track is selected, the point where sound begins (not where the track begins) on that track is located, and the unit enters playback ready mode. Then, when the PLAY key is pressed, playback begins at exactly that point. Press AUTO CUE key on the front panel or remote control to set the function on. The A.CUE indicator will light up. Use the A_CUE LEVEL option to set the sound start position detection level.
4 − Playback operations Playing back MP3 files MP3 files recorded onto a CD are handled the same way as files are handled in an ordinary PC, with some MP3 files held within a directory. In addition, several directories can be combined into one directory. This results in multiple layers of directories and files. MP3 files are played in the following order Disc Directory A When the Directory mode is on, only those files within a selected directory are available for playback.
5 − Recording Before you start recording using the CD-RW901, make sure that you understand the following key points: • Once you have recorded on a CD-R disc, the data cannot be erased from it. • You can add tracks to an unfinalized recordable disc. Once finalized, a CD-R disc is “fixed” and behaves in the same way as a pre-recorded disc. Finalized CD-RW discs, however, can be erased, refreshed and re-recorded. Input selection To select the input to be recorded, press the INPUT SELECT key on the main unit.
5 − Recording Basic recording 1. Load a recordable disc into the unit. As the disc loaded, the display shows TOC Reading, with the period flashing. 2. Press the INPUT SELECT key to select a recording source (see “Input selection” on page 25). If a digital source is selected, and the connection or the signal are improper, the error message D-IN UNLOCK! will appear on the display. 3. Press the RECORD key. The unit enters record ready mode, as shown by the REC and READY indicators on the display.
5 − Recording Advanced recording Fade-in and fade-out recording At the beginning and end of recording, fade-in and fade-out effects can be performed. 1. When stopped or when in recording standby mode, set the operation using the following menu options on the REC sub-menu (see “Operation basics” on page 16). FADE IN? The length of the fade in to the normal level can be set between 1 and 30 seconds in 1-second increments (default setting: 3 seconds).
5 − Recording When audio signal is not detected for more than five seconds, the CD-RW901 automatically will stop recording and enter record standby mode. level NOTE If you set the value so that only high-level signals trigger recording, remember that the start of a piece may not be record as in the diagram.
5 − Recording • Time (Time track increment) The track will be incremented when the time set prior to recording using the menu item “A_TRK_TIME?” has passed (see “Operation basics” on page 16). The time can be set between one minute and ten minutes in one minute increments. The A.TRACK indicator blinks during recording or when in record ready mode. This function can be turned on by pressing the AUTO TRACK key on the remote control.
5 − Recording Rec mute function The Rec mute function allows instant cut-off of the input signal, and records four seconds of silence on the disc. After about four seconds, the unit enters record ready mode. While recording is in progress, press the REC MUTE key on the remote control. This function is only available from the remote control unit. NOTE The display shows the Rec Mute flashing, the meters stop displaying the current level and the monitored sound is cut.
6 − After recording This section deals with the actions taken after recording: finalizing for CD-R and CD-RW discs, and erase operations for CD-RW discs. Once finalized, CD-R discs are truly final—no more can be recorded on them. By contrast, CD-RW discs can be “unfinalized” using the CD-RW901, i.e. their TOC can be deleted, and if there is space, further material can be recorded on them. Even if the disc is full, tracks can be erased following the unfinalize process, and new material can be recorded.
6 − After recording Erasing Erasing tracks This operation erases the specified track and all subsequent tracks from a recorded CD-RW disc. NOTE Once this operation has started, the STOP key cannot be used to cancel it. Please check the track range to be deleted first. 1. While stopped, press the ERASE/DEL key on the front panel or the ERASE key on the remote control. Select the ERASE TRACK? rotating the MULTI JOG dial or pressing the MENU (+/-) keys on the remote control.
7 − Titling Titles can be given to the disc and the tracks on the disc, using the TEXT EDIT option on the TEXT submenu. NOTE After a new title is selected and entered on the disc, TOC will light up on the display. If the power is turned off, the TOC has not been recorded on the disc and the titles will not have be added. You must finalize the disc to save the titles. Title input operation Follow the guidelines below to input titles on the screen. Operate them when in the text edit mode.
7 − Titling Using a keyboard with the CD-RW901 A computer keyboard can be connected to the IBM PC compatible PS/2 interface on the front panel to operate certain functions of the CD-RW901. It is particularly efficient for title input. Keyboard type setting The CD-RW901 must be set for the type of keyboard being connected. Set the type using the sub-menu KEYBOARD option on the SYSTEM sub-menu. Select US for an Englishlanguage keyboard, or JP for a Japanese-language keyboard.
8 − Data settings Data communication setting By connecting a PC through its RS-232C terminal to the CD-RW901 through its CONTROL I/O (RS-232C) terminal, the two units can be linked for data exchange. Use the following options on the SYSTEM sub-menu to perform their respective setting. • BAUD RATE Sets the communication speed of the keyboard. 4800/9600/19200/38400 bps can be selected (default:19,200). • LENGTH Commnication word lengrh can be set to either 7 or 8 bits (default:8).
9 − Reference and specifications Error messages Message Details / response Can’t Rec! Cannot record. Either erase the contents of the disc (for a CD-RW), or use a different recordable disc. Disc Error! The disc has malfunctioned. Please replace with a new disc. Disc Full! No recording time remaining, or no recordable track is left on the disc. Text Full! No space to input the letters. Sure? Text! The text data is not written on the disc yet.
9 − Reference and specifications Troublshooting Symptom Possible cause and remedy There is no power to the unit. Please check the power cord is properly plugged in. “Disc Error!” is displayed. The disc may be dirty. Please replace the disc. Playback is not possible. This may be due to condensation. In this case, remove the disc, turn the power on and wait a few hours, then try again. No sound is output. • Confirm the connections with the audio system.
9 − Reference and specifications Specifications Recordable discs CD-R, CD-R-DA, CD-RW, CD-RW-DA (High speed CD-RW is supported) Quantization bit depth 16 bit Sampling frequency 44.1 kHz Frequency response 20 Hz~20 KHz ±0.8 dB (playback) ±1.0 dB (recording) S/N 95 dB (playback) 90 dB (recording) Dynamic range 95 dB (playback) 90 dB (recording) Distortion 0.006 % (playback) 0.008 % (recording) Channel separation 90 dB (playback) 80 dB (recording) Wow and flutter < 0.
9 − Reference and specifications Dimensions (d x w x h) 308.7 x 482.6 x 94 (mm) / 121.5 x 190.1 x 37.0 (in) Weight 5.4 kg (10.8 lb) Dimensional drawing 6.0mm(2.4") 76.2mm(30.0") 88.0mm(34.7") 94.0mm(37.0") 482.6mm(190.1") 465.6mm(183.3") 435.0mm(171.3") 17.7mm(7.0")� 308.7mm(121.5")� 284.6mm(112.1") 6.4mm(2.
» CD-RW901 TEAC CORPORATION Phone: +81-422-52-5082 3-7-3, Nakacho, Musashino-shi, Tokyo 180-8550, Japan www.tascam.com TEAC AMERICA, INC. Phone: +1-323-726-0303 7733 Telegraph Road, Montebello, California 90640 www.tascam.com TEAC CANADA LTD. Phone: +1905-890-8008 Facsimile: +1905-890-9888 5939 Wallace Street, Mississauga, Ontario L4Z 1Z8, Canada www.tascam.com TEAC MEXICO, S.A. De C.V Phone: +52-555-581-5500 Campesinos No.