9A10358001 Z GF-350 Multi music player / CD recorder OWNER’S MANUAL
IMPORTANT SAFETY INSTRUCTIONS 1) Read these instructions. 2) Keep these instructions. CAUTION: TO REDUCE THE RISK OF ELECTRIC SHOCK, DO NOT REMOVE COVER (OR BACK). NO USERSERVICEABLE PARTS INSIDE. REFER SERVICING TO QUALIFIED SERVICE PERSONNEL. 3) Heed all warnings. 4) Follow all instructions.
WARNING: TO PREVENT FIRE OR SHOCK HAZARD, DO NOT EXPOSE THIS APPLIANCE TO RAIN OR MOISTURE. Contents Thank you for choosing TEAC. Read this manual carefully to get the best performance from this unit. CAUTION < DO NOT REMOVE THE EXTERNAL CASES OR CABINETS TO EXPOSE THE ELECTRONICS. NO USER SERVICEABLE PARTS ARE WITHIN! < IF YOU ARE EXPERIENCING PROBLEMS WITH THIS PRODUCT, CONTACT TEAC FOR A SERVICE REFERRAL. DO NOT USE THE PRODUCT UNTIL IT HAS BEEN REPAIRED.
Before using the unit Read this before attempting any operations < The nominal temperature should be between 5°C and 35°C (41°F and 95°F). The CD-RW recorder is more sensitive to extremes of temperature than ordinary CD players. < Relative humidity should be 30 to 90 degrees noncondensing. < As the unit may become warm during operation, always leave sufficient space around the unit for ventilation. < The voltage supplied to the unit should match the voltage as printed on the rear panel.
Handling Records How to Replace the Stylus < Do not touch the record’s grooves. Only handle records, by the edges or the label, with clean hands. Skin oils from even clean hands can leave a residue on the record surface that will gradually deteriorate the quality of your record. The stylus should last about 50 hours under normal use. However, it is recommended that the stylus be replaced as soon as you notice a change in sound quality. Prolonged use of a worn-out stylus may damage the record.
Discs Please use CD, CD-R and CD-RW discs bearing the “DIGITAL AUDIO” mark. CD CD-R CD-RW This unit CANNOT RECORD CD-R and CD-RW discs designed for computer systems. < Should the disc become dirty, wipe the surface radially (from the center hole outward towards the outer edge) with a soft, dry cloth: < Never use such chemicals as record sprays, antistatic sprays or fluid, benzine or thinner to clean the discs. Such chemicals will do irreparable damage to the disc’s plastic surface.
Remote Control Unit About CD-R and CD-RW discs CD-R discs can be recorded once only. Once they have been used for recording, they cannot be erased or re-recorded. However, if space is available on the disc (and the disc has not been finalized), additional material can be recorded. By contrast, a CD-RW disc can be used in much the same way as a CD-R disc, but the last track or tracks recorded can be erased, and the space on the disc can be re- used for other recordings.
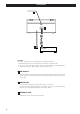
Connections A B C R L AUDIO OUT CD Player, Cassette Tape Deck, etc. CAUTION: < Switch off the power to all equipment before making connections. < Read the instructions of each component you intend to use with this unit. < Be sure to insert each plug securely. To prevent hum and noise, avoid bundling the signal interconnection cables together with the AC power cord. A FM antenna While in FM mode, tune in an FM station and extend the lead to find the best position for the reception.
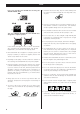
Parts of the Turntable B A C D E F G Before use, slide the stylus guard (grayish smoke colored plastic cover) up. A turntable How to open/close the turntable cover B screw fixing the turntable for transportation Before use, completely loosen the screw by turning it clockwise with a coin or screwdriver. When you transport the unit, turn the screw counterclockwise to secure the turntable. C cue-lever Use this lever to lift the tone arm.
Unit Functions and Remote Control A I B C D S E F G H R Q P O N M L K E A B C D E Q N F F P J B O 10 L J I
A POWER Press this button to turn the unit on or off. The equipment draws a nominal amount of power from the AC outlet even with its POWER switch in the OFF position. N MUSIC SKIP (.//) In CD mode, use these buttons to skip tracks. Hold down these buttons to search for a part of a track. O REC LEVEL In record pause mode, use this knob to adjust the recording level. B PHONO/AUX, FM/AM, CD Press the PHONO/AUX button and select PHONO to play a record.
Basic Operation 2 1 Listening to the Radio 1 3 2 1 Press the POWER switch to turn the unit on. 1 Select FM or AM using the FM/AM button. 2 Select a source by pressing the corresponding button. 2 Turn the TUNING knob to tune in a station. < To listen to an external source connected to AUX jacks, select AUX by pressing the PHONO/AUX button once or twice. < The TUNED indicator lights when a station is correctly tuned in. < The STEREO indicator lights when an FM stereo broadcast is tuned in.
Listening to a Record 1 transportation screw 3 1 2 6 5 4 adaptor Before use, completely loosen the transportation screw by turning it clockwise with a coin. 3 Put the record on the turntable. When playing a 45 RPM record, use the included adaptor. Slide the stylus guard (grayish smoke colored plastic cover) up. 4 Select the speed. 1 Press the PHONO/AUX button once or twice to select PHONO. 5 Gently push the clamper to the right to release the tone arm. 2 Gently open the dust cover.
Listening to a Record 2 When the playback has been finished, the tone arm automatically returns to the tone arm holder and the rotation stops. 8 To stop playback manually, slightly lift the tone arm using the cue lever and return it to the tone arm holder. tone arm 7 7 Move the tone arm gently to the edge of the record (or the starting point of a track). The turntable will begin to turn. 8 Gently lower the tone arm by slowly releasing the cue lever.
Listening to a CD 1 1 5 3 1 Press the CD button. “--” blinks for a few seconds. When no disc is set, “nOdISC” appears on the display. 2 Press the OPEN/CLOSE button (L). 2 4 4 Press the OPEN/CLOSE button (L) to close the tray. < It takes a few seconds for the unit to load the disc. No buttons will work during loading. Wait until the total number of the tracks and the total play time of the disc are displayed.
Listening to a CD 2 A Time Display B C D A To suspend playback temporarily (pause mode) Each time the DISPLAY button is pressed, the display changes as follows: CD/CD-R/CD-RW playback Press the PAUSE button (J) during playback. Playback stops at the current position. To resume playback, press the PLAY button (y) or the PAUSE button (J). B To stop playback Press the STOP button (H) to stop playback.
Repeat Playback Each time the REPEAT button is pressed, the repeat mode is changed as follows: REPEAT ALL REPEAT 1 (off) REPEAT ALL (Repeat All the Tracks) Press the REPEAT button once during playback. All the tracks of the disc will be played repeatedly. REPEAT 1 (Repeat one track) Press the REPEAT button twice during playback. The track being played will be played repeatedly. If you press the MUSIC SKIP button and select another track, the track you selected will be played repeatedly.
Programmed Playback Up to 32 tracks can be programmed in the desired order. 3 Press the PROGRAM button. < Insert a disc and select “CD” before beginning programming. < Shuffle playback does not work during programmed playback. < Programmed playback works with finalized discs only. 1 Press the PROGRAM button in the stop mode. The track is programmed, and “P-02” is displayed. Repeat step 2 and 3 to program more tracks. < You can program up to 32 tracks.
Before Recording To check the programmed order In the stop mode, press the MUSIC SKIP button repeatedly to show the track numbers that have been stored in memory. Before you start recording, make sure that you understand the following points: < The unit requires Digital Audio CD-R or CD-RW media for recording. Computer CD-R or CD-RW discs do not work with this unit. < Once you have recorded on a CD-R disc, the data cannot be erased from it.
Recording 1 1 4 5 Audio from the PHONO or AUX sources can be recorded on the CD recorder. 7 2 2 3 Select the mode of track number assignment using the MANUAL/AUTO REC button of the remote control unit. 1 Press the PHONO/AUX button once or twice to select the source to be recorded. To record a record, select PHONO. To record an external source connected to the AUX IN jacks, select AUX. 2 Load a recordable CD-R or CD-RW disc into the unit.
4 Press the RECORD button. 6 If PHONO is selected in step 1 , gently lower the tone arm onto the edge of the record (or the track to be recorded). The red indicator on the RECORD button lights. “REC” and J indicators on the display will light, and the unit enters record pause mode. < No button will work while “busy” is displayed. Wait a few seconds until “busy” disappears from the display. When the turntable is stopped, the PLAY or the PAUSE button will not work and you cannot start recording.
Recording 2 C A To stop recording A B C Manual track division It is possible to divide the recording into tracks while recording. While recording is taking place, press the TRACK INCREMENT button. The current track number will be incremented by one. Press the STOP button (H) to stop recording. B To suspend recording temporarily (pause mode) < The TRACK INCREMENT button works regardless of the MANUAL/AUTO REC setting. Press the PAUSE button (J).
Finalize 1 4 3 This section deals with the actions taken after recording. Once finalized, CD-R discs are truly final. No more tracks can be recorded on them. By contrast, CD-RW discs can be “unfinalized”, and if there is space, further material can be recorded on them. 2 2 4 Press the PLAY (y) button to start finalizing. Finalizing As has been explained earlier, in order for a disc to become a standard CD, it must have a Table of Contents (TOC) written to it. This process is known as finalizing.
Erase or Unfinalize a CD-RW 1 3 It is possible to erase the last recorded track. It is also possible to erase a whole disc. Erase procedures are possible only on an unfinallized CD-RW disc. If a CD-RW disc has been finalized, unfinalize it prior to erasure. Remember that it is not possible to perform any erase or unfinalize procedures on a CD-R disc. 1 Press the CD button to select “CD”. 4 2 2 3 Press the ERASE button in the stop mode. “Un FIn” (unfinalize) appears when a finalized disc is loaded.
Troubleshooting If you experience any problems with the unit, please take a moment to look through this chart and see if you can solve the problem yourself before you call your dealer or a TEAC service center. No power e Check the connection to the AC power source. Check and make sure the AC source is not a switched outlet and if it is, the switch is turned on. Make sure there is power to the AC outlet by plugging another item such as a lamp or fan. No sound. e Adjust the volume. The sound is noisy.
Messages 0TR 0:00 A blank CD-R/CD-RW disc is set on the tray. BUSY The unit is reading the disc. Wait a few seconds. CLOSE Close the disc tray. Er ** Erase the last track of the CD-RW disc. Er ALL Erase all the tracks of the CD-RW disc. FIN - - d Finalize the disc. -**db Increment level NODISC No readable disc has been loaded. OPEN Open the tray. - - - -:- The unit is reading the disc. P-** Program number UN FIN Unfinalize the CD-RW disc.
Specifications Amplifier Section Output power . . . . . . . . . . . . . . . . . . . . . . . . . 3.5 W + 3.5 W Frequency response . . . . . . . . . . . . . . . . . . . 60 Hz to 20 kHz Audio input sensitivity/Impedance . . AUX: –6dBV (0.5V) / 20kΩ Maximum iutput level . . . . . . . . . . . . . . . . AUX: +6dBV (2.0V) Standard Accessories Owner’s manual x 1 Warranty card x 1 45 RPM adaptor x 1 Remote control unit (RC-992) x 1 Battery (AA, R6, SUM-3) x 2 CD Recorder Section Media type . . . . . . . . . . . .
Z TEAC CORPORATION 3-7-3, Nakacho, Musashino-shi, Tokyo 180-8550, Japan Phone: (0422) 52-5081 TEAC AMERICA, INC. 7733 Telegraph Road, Montebello, California 90640 Phone: (323) 726-0303 TEAC CANADA LTD. 5939 Wallace Street, Mississauga, Ontario L4Z 1Z8, Canada Phone: (905) 890-8008 TEAC MEXICO, S.A. De C.