77-20SR45I00020 Z HD-1 OWNER’S MANUAL SLEEP ALARM 1 PRESET ALARM 2 MUTING EQ ENGLISH HD RadioTM Receiver HD Radio Receiver HD-1 HD-1.indd 21 2008.12.
IMPORTANT SAFETY INSTRUCTIONS 1) Read these instructions. 2) Keep these instructions. CAUTION: TO REDUCE THE RISK OF ELECTRIC SHOCK, DO NOT REMOVE COVER (OR BACK). NO USERSERVICEABLE PARTS INSIDE. REFER SERVICING TO QUALIFIED SERVICE PERSONNEL. 3) Heed all warnings. 4) Follow all instructions.
< Do not expose this apparatus to drips or splashes. Contents < Do not place any objects filled with liquids, such as vases, on the apparatus. < Do not install this apparatus in a confined space such as a book case or similar unit. Thank you for choosing TEAC. Read this manual carefully to get the best performance from this unit. < The apparatus draws nominal non-operating power from the AC outlet with its POWER switch in the off position. Important Safety Instructions . . . . . . . . . . . . . . . . .
Before Using the Unit Read this before operation Maintenance < As the unit may become warm during operation, always leave sufficient space around the unit for ventilation. • Place the unit on a level surface away from sources of direct sunlight or excessive heat. < The voltage supplied to the unit should match the voltage as printed on the rear panel. If you are in any doubt regarding this matter, consult an electrician.
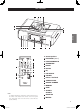
Connection CAUTION < Switch off (standby) the power before making connections. < Read the instructions of each component you intend to use with this unit. < Be sure to insert each plug securely. To prevent hum and noise, do not bundle the connection cords . B C D PHONES LINE OUT A E F AUX IN VIDEO OUT G AM-ANTENNA-FM 75Ω H A AC power cord B Phones jack C Line out jack D AUX IN jack E Video out jack F AM loop antenna connector G FM antenna jack H Battery compartment HD-1.indd 5 2008.12.
Connection A AC Power Cord Be sure to connect the power cord to an AC outlet which supplies the correct voltage. Hold the power plug when plugging or unplugging the power cord. Never pull or yank on the power cord. B Phones jack For private listening, first reduce the volume level to minimum. Then insert the plug from your headphones into the PHONES jack, and adjust the volume using the VOLUME knob. The sound from the speakers is cut off while the headphone jack is inserted.
Unit Functions D C M J VOLU ME I B F STAN DBY/ ON FUNC (WAK TION E TO ) MEM ORY CLO CK AD TUN ING /SE LEC T K P L J SLEE P ALAR MUT ING ALAR ENGLISH PRES ET M1 M2 EQ HD RADI O RE CE IVER A N E Q H HD-1 G O A A Stereo Speakers D C N O EQ E M G F Q B PLAY/PAUSE ( y/J ) C FUNCTION/WAKE TO D STANDBY/ON E PRESET F HD TAG G EQ HD TAG B K SNOOZE I I VOLUME L H LCD DISPLAY J iPhone / iPod Dock K TUNING /SELECT RC-1219 L SNOOZE / DIMMER M MEMORY N SLEEP O ALARM 1 N
Unit Functions A Speakers (Stereo) N SLEEP Use this button to set sleep timer. B PLAY/PAUSE (y/J) In iPod mode, use this button to start or pause playback. O ALARM 1, ALARM 2 Hold down these buttons for more than 2 seconds to enter the alarm setting mode. C FUNCTION Use these buttons to select the source you want to These buttons are also used to turn on or off the ALARM listen to. function. D STANDBY/ON ( P Clock ADJ ) Use this button to turn the unit on or standby.
Display A B Remote Control Unit The provided Remote Control Unit allows the unit to be operated from a distance. When operating the remote control unit, point it towards the remote sensor on the front panel of the unit. E F C G D H I < Even if the remote control unit is operated within the effective range (5m), remote control operation may be impossible if there are any obstacles between the unit and the remote control.
Getting started The HD-1comes mounted with an adapter for iPod with “iPod classic(160G)+iPhone 2G/3G”. To play your iPod through the HD-1, you have first to check if the factory mounted adapter fits your model of iPod. If it does not, you have to replace it with a correct one, as explained below. 1 Remove the adapter from the Dock of the HD-1. Hold the left and right sides of the adapter and gently pull it up. Power Source • This HD Radio Receiver operates from AC120V/60Hz line power supply.
Basic Operation EQ FUNCTION Press the EQ button to select ROCK, POP, CLASSIC, JAZZ, BASS or NORMAL for the desired sound effect. EQ MUTING EQ 3 1 2 Press the STANDBY/ON button to turn the unit on. < The unit turns on with the source that was last selected. If the iPod that is in playback mode is inserted into the Dock, the HD-1 will automatically turn on and start playback of the iPod. 2 SELECT SOURCE Press the FUNCTION/WAKE TO button to select a source.
Listening to the Radio Extend the FM wire antenna fully for best reception (do not strip, alter or attach to other antennas). The AM loop antenna should be placed up to 12" away from the unit for best reception. Rotate the AM loop antenna as required for best reception. Storing Preset Stations This unit allows you to program 20 stations on FM band and 10 stations on the AM band. 1 Turn the TUNING/SELECT knob on the HD-1 (or press . or/ on the remote control) to tune to the station you wish to store.
HD Radio stations To select FM or AM, press the FUNCTION/WAKE TO button. You can listen to your favorite radio stations on this unit by turning the TUNING/SELECT knob (or pressing . or/ on the remote control). HD TAG 1 While listening to broadcast music on an HD Radio Receiver, the user can hear a song and tag it for feature review or purchase from Apple iTunes store by pressing the HD TAG button.
Listening to your iPod or iPhone 1 iPod video output Docking an iPod to this system You can connect iPod video on TV through the VIDEO OUT in yellow jack at the back of the unit. 4 2 3 • Make the following settings on your iPod's menu to output video to a TV via this system's dock. In the [Video] menu, select [Video Settings]. Set [TV OUT] to [On] or [Ask]. If you have set [TV OUT] to [Ask], your iPod prompts you each time you play a video to specify whether to output it to a TV.
Listening to a non-docking iPod or other portable audio devices If you are using your iPod without a docking port, other MP3 player or other portable audio device, it can still be played on the HD-1. 3 Turn on and play your device. 1 Connect the PHONES jack (audio output jack) of a portable 4 Turn the VOLUME knob on the unit (or press Volume+/- audio player to the AUX IN jack of the HD-1 using the supplied stereo mini plug cable. buttons on the remote control) to adjust the system volume.
Setting the Clock Time and Calendar Setting the Alarm Time 1 The unit can set two Alarm Times. 2 Press and hold the ALARM 1 or ALARM 2 Button until the display blinks. Press the FUNCTION/WAKE TO Button to select mode of HD RADIO FM, HD RADIO AM, IPOD or BUZZER to wake to, then press ALARM 1 or ALARM 2 Button to confirm. 1 Clock ADJ 2 1 Press and hold the Clock ADJ Button located on the top of the unit until 12H or 24H appeared.
Using the Alarm Snooze/Dimmer Operation DIMMER function ALARM 1 ALARM 2 1 Set the alarm time per Setting Alarm time. To preview the alarm time, just press the ALARM 1 button or ALARM 2 button to turn on the Alarm function. ENGLISH 2 Press the ALARM 1 button or ALARM 2 button again to You can change the front panel’s display brightness. Use the DIMMER button to change the brightness among 4 levels. You can change display brightness by using DIMMEN botton. arm or disarm the alarm.
Sleep Operation Specifications TUNER Section Frequency Range . . . . FM: 87.5 MHz to 107.9 MHz ( 200 kHz step ) AM: 520 kHz to 1710 kHz ( 10 kHz step ) GENERAL SLEEP 1 When the HD-1 is OFF or while listening to your iPod or the radio, press the SLEEP button to enter sleep mode. 2 You can adjust the sleep timer from 120, 90, 75, 60, 45, 30, 15 minutes by pressing the SLEEP button again. Total Output Power . . . . . . . . . . . . . . . . . . . 6 W (L+R) Power Requirement . . . . . . . . . . .
Troubleshooting If you have problems with your system, look through this chart It does not recognize your iPod or Phone when docked. and see if you can solve the problem yourself before calling your Your iPod or iPhone may not be properly docked. Take your dealer or TEAC service center. iPod or iPhone out of the dock, and remove any obstructions on the connector from the dock and on your iPod or iPhone. General Place your iPod or iPhone back into the dock. The unit does not turn on.
Z iPod is a trademark of Apple Inc., registered in the U.S. and other countries. iPhone is a trademark of Apple Inc. iTunes is a trademark of Apple Inc., registered in the U.S. and other countries. All logos and brands are property of their respective owners. HD Radio ™ Technology manufactured under license from iBiquity Digital Corp. U.S. and foreign patents. HD Radio™ and the HD Radio logos are proprietary trademarks of iBiquity Digital Corp. iPod or iPhone are not included in this package.