
Owners Manual
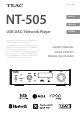
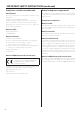

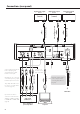
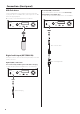
Table Of Contents
- ENGLISH
- IMPORTANT SAFETY INSTRUCTIONS
- Trademarks and copyrights
- Included accessories
- Before use
- Maintenance
- Using the TEAC Global Site
- Downloading the remote app
- Network connections
- Connections (rear panel)
- Connections (front panel)
- Connecting headphones
- Using the remote control
- Names and functions of parts (main unit)
- Upconversion
- Names and functions of parts (remote control)
- Display
- Basic operation
- Bluetooth® wireless technology
- Settings
- Playing back music on a computer
- MQA (Master Quality Authenticated)
- Troubleshooting
- Specifications
- FRANÇAIS
- INSTRUCTIONS DE SÉCURITÉ IMPORTANTES
- Marques déposées et copyrights
- Accessoires fournis
- Avant l’utilisation
- Entretien
- Utilisation du site mondial TEAC
- Téléchargement de l’appli de télécommande
- Connexions réseau
- Branchements (face arrière)
- Branchements (face avant)
- Branchement d’un casque
- Emploi de la télécommande
- Nomenclature et fonctions des parties (unité principale)
- Conversion ascendante
- Nomenclature et fonctions des parties (télécommande)
- Écran
- Fonctionnement de base
- Technologie sans fil Bluetooth®
- Réglages
- Lecture de musique sur un ordinateur
- MQA (Master Quality Authenticated)
- Guide de dépannage
- Caractéristiques techniques
- ESPAÑOL
- INSTRUCCIONES IMPORTANTES DE SEGURIDAD
- Marcas y derechos
- Accesorios incluidos
- Antes de su utilización
- Mantenimiento
- Web global de TEAC
- Descarga de la app de control remoto
- Conexiones de red
- Conexiones (panel posterior)
- Conexiones (panel frontal)
- Conexión de unos auriculares
- Uso del mando a distancia
- Nombres y funciones de las partes (unidad principal)
- Sobreconversión
- Nombres y funciones de las partes (mando a distancia)
- Pantalla
- Funcionamiento básico
- Tecnología inalámbrica Bluetooth®
- Ajustes de configuración
- Reproducción de música en un ordenador
- MQA (Master Quality Authenticated)
- Solución de problemas
- Especificaciones
- WARRANTY/GARANTIE/GARANTÍA

EN
9
A ETHERNET port
Connect a commercially-available LAN cable to this port
when you want to connect this unit to a wired network or the
Internet.
o When switching input sources, this port is labeled “NET”.
B OPTICAL digital audio input connector
Use this to input digital audio. Connect the optical digital audio
output connector of an audio device to it.
Use a commercially-available optical digital cable with a
square connector (TOSLINK) for connection.
C RCA COAXIAL digital audio input connector
Use this to input digital audio. Connect the coaxial digital audio
output connector of an audio device to it.
Use a commercially-available RCA coaxial digital cable
for connection.
D CLOCK SYNC input (10MHz IN) connector
Use this to input a synchronization signal (clock sync).
To input a 10MHz oscillator signal, connect the oscillator output
here (page29).
Use a commercially available BNC coaxial cable for
connection.
o Clock sync is only possible when the input source is USB or
NET (including USB flash drives).
E Analog audio output (LINE OUT) connectors
These output 2 channels of analog audio. Connect these XLR or
RCA connectors to a stereo amplifier or powered speakers.
Use commercially available cables for connections.
XLR: balanced XLR cables
RCA: RCA audio cables
Connect this unit’s R connector to the R connector of the
amplifier and its L connector to the L connector of the amplifier.
o See “Line output” on page23 for analog output settings.
F USB port (rear)
Use this to input digital audio from a computer. Connect it to a
computer’s USB port.
Use a commercially-available USB2.0 cable (A-B type) for
this connection.
ATTENTION
Before connecting a computer that is running a Windows
OS, you must install the dedicated driver on the computer
(page25).
Proper connection is not possible with a computer that does
not have this driver installed.
G Maintenance port
This is used for maintenance. Do not connect anything to this
port unless instructed to do so by our service department.
H Power inlet (~IN)
Connect the supplied power cord here.
After all other connections are complete, connect the power
cord’s plug to a wall outlet.
V
Do not use any power cord other than the one
included with this unit. Use of other power cords
could result in fire or electric shock.
V
Unplug the cord from the outlet when not using
the unit for a long time.
V
Complete all other connections before turn-
ing the unit on.
o Carefully read the manuals of the devices that you are
connecting and follow their instructions when making
connections.
o Do not bundle connecting cables with power cords.
Doing so could cause noise.
o Connect all plugs completely.