046-SD910010-R Z SL- D910 OWNER’S MANUAL ENGLISH CD Clock Radio MANUEL DU PROPRIÉTAIRE GEBRUIKSAANWIJZING FRANÇAIS BEDIENUNGSANLEITUNG DEUTSCH NEDERLANDS
IMPORTANT SAFETY INSTRUCTIONS CAUTION: TO REDUCE THE RISK OF ELECTRIC SHOCK, DO NOT REMOVE COVER (OR BACK). NO USER-SERVICEABLE PARTS INSIDE. REFER SERVICING TO QUALIFIED SERVICE PERSONNEL. The lightning flash with arrowhead symbol, within an equilateral triangle, is intended to alert the user to the presence of uninsulated “dangerous voltage” within the product’s enclosure that may be of sufficient magnitude to constitute a risk of electric shock to persons.
< Do not expose this apparatus to drips or splashes. < Do not place any objects filled with liquids, such as vases, on the apparatus. < Do not install this apparatus in a confined space such as a book case or similar unit. < The apparatus draws nominal non-operating power from the AC outlet with its STANDBY/ON switch in the standby position. < The apparatus should be located close enough to the AC outlet so that you can easily grasp the power cord plug at any time.
Contents Before Use Thank you for choosing TEAC. Read this manual carefully to get the best performance from this unit. Read this before operation < As the unit may become warm during operation, always leave sufficient space around the unit for ventilation. IMPORTANT SAFETY INSTRUCTIONS..............................2 < The voltage supplied to the unit should match the voltage as printed on the rear panel. If you are in any doubt regarding this matter, consult an electrician. Contents .................
Maintenance If the surface of the unit gets dirty, wipe with a soft cloth or use diluted neutral cleaning liquid. Be sure to remove any fluid completely. Do not use thinner, benzine or alcohol as they may damage the surface of the unit. Beware of condensation 1. When this crossed-out wheeled bin symbol is attached to a product it means the product is covered by the European Directive 2002/96/EC. 2.
Discs • Commercial audio CD’s bearing the “Compact Disc Digital Audio” logo: < Never use such chemicals as record sprays, antistatic sprays or fluid, benzene or thinner to clean the discs. Such chemicals will do irreparable damage to the disc’s plastic surface. • Properly finalized CD-R/CD-RW discs. < Discs should be returned to their cases after use to avoid dust and scratches that could cause the laser pickup to “skip”.
RESET Switch MP3 compatibility < This unit can play MP3 files recorded on a CD-R, CDRW or USB memory card. < File names of MP3 should be alphanumeric characters. This unit cannot display symbols and full-size or 2 bytes-wide characters (such as Japanese, Chinese, etc.) correctly. Also, be sure to use the file extension “.mp3”. < The disc must be finalized in order to play. < The CD-ROM must be ISO 9660 compatible. < Mono or stereo MPEG-1 Audio Layer 3 format, 44.1 or 48 kHz, fixed bit-rate.
Connection B A E D 1 CAUTION < Switch off the power before making connections. < Read the instructions of each component you intend to use with this unit. < Be sure to insert each plug securely. To prevent hum and noise, do not bundle the connection cords.
A PHONES For private listening, connect the headphones plug into this jack, and adjust the volume using the VOLUME knob. B USB connector This connector is for connecting your USB memory card containing MP3 music. F Battery compartment The battery supplies a backup power to the built-in clock and memory, when the unit is momentarily disconnected from the AC outlet. Battery installation 1. Loosen the fixing screw. 2. Push the other end of the compartment cover to open it. C AUX IN jack 3.
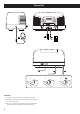
Names of Each Control 1 TOP A B C D E F G H I J K FRONT L L T S R Q P O N M D J K F M C H R 10 N O S T REMOTE CONTROL
A Disc compartment cover Push the L mark on the cover and the cover opens upwards. B SNOOZE After the TIMER ON time is reached, use this button to turn the unit off for 5 minutes. C INTRO/PTY In the CD or USB mode, use this button for intro playback. In the FM TUNER mode, use this button to select a programme type for RDS. M MEMORY/TIME SET In the CD or USB mode, use this button to program tracks. In the TUNER mode, use this button to store preset channels into memory.
Names of Each Control 2 REAR W REMOTE CONTROL U V U Numeric buttons W BASS CONTROL knob Use this knob to adjust the bass sound up or down. V MP3 FOLDER/PRESET In the TUNER mode, use this button to select preset stations. During playback of a MP3 disc or from a USB memory card, use this button to select a folder in the disc or USB memory card.
Remote Control Unit The provided remote control unit allows the unit to be operated from a distance. When operating the remote control unit, point it towards the remote sensor on the front panel of the unit. < Even if the remote control unit is operated within the effective range (5 m), remote control operation may be impossible if there are any obstacles between the unit and the remote control unit.
Basic Operation Headphones 2 For private listening, connect the headphones plug into the PHONES jack, and adjust the volume using the VOLUME knob. The sound from the speakers is cut off while the headphone is connected. 3 1 1 Press the STANDBY/ON switch to turn the unit on. 2 Press the FUNCTION button to select a source. Sleep timer 3 Play the source and adjust the volume using the VOLUME knob. Each press of the SLEEP button permits setting an interval (from 90 down to 10 minutes).
Listening to CD/MP3 (disc) 1 2 3 < It takes a few seconds for the unit to load the disc. No buttons will work during loading. Wait until the total number of the tracks and the total play time of the disc are displayed. < When no disc is loaded in the CD player, “NO DISC” is displayed. When a CD is loaded total tracks total playing time 4 1 Press the FUNCTION button to select “CD”.
Listening to MP3 (USB) < Do NOT use a high-capacity USB hard disc with this unit. Listening to CD/MP3 (disc/USB) INTRO/PTY MP3 1 Press the FUNCTION button to select “USB”. 2 Plug your USB memory card into the USB connector. < You can reverse steps 1 and 2 . To suspend playback temporarily (pause mode) Press the PLAY/PAUSE button (G/J) during playback. Playback stops at the current position. To resume playback, press the PLAY/PAUSE button (G/J) again.
Search for a part of a track During playback, hold down the SKIP button (.or/) and release it when the desired part is found. Direct playback While in the stop or playback mode, you can use the numeric buttons of the remote control unit to select a track. Press the numeric buttons to select a track. Playback starts from the selected track.
Programmed Playback 3 Press the numeric buttons (or press the SKIP 1 3 4 2 5 button (.//) repeatedly) to select a folder on a MP3 disc or USB memory card, then press the MEMORY button. < MP3 tracks recorded out of folders are in the “01” (ROOT) folder. < Skip this step when playing a CD. Up to 60 tracks can be programmed in the desired order. Shuffle and Repeat functions do not work during programmed playback. 1 Press the FUNCTION button to select “CD” or “USB”.
To add a track to the end of the programme 1, 2, 3.... MEMORY/TIME SET In the stop mode, press the MEMORY button repeatedly until “00” or “000” appears on the display. Select a track number using the numeric buttons or the SKIP button (.or/) and then press the MEMORY button. The track is added to the end of the programme. To overwrite the programme To check the programmed order In the stop mode, press the MEMORY button repeatedly. The track number and programme number will be shown on the display.
Repeat/Shuffle Playback Repeat all the tracks All the tracks will be played back repeatedly. Press the PLAY MODE button repeatedly until “REPEAT ALL” lights. During programmed playback, programmed tracks will be played back repeatedly. Repeat all the tracks in the folder (MP3) The tracks will be played back repeatedly or randomly. Select the play mode, during playback or press the PLAY/PAUSE button (G/J) to start playback.
Listening to the Radio FM MODE 1 FM MODE button 2 Each pressing this button alternates between STEREO mode and MONO mode. 3 STEREO FM stereo broadcasts are received in stereo and the “STEREO” indicator will light. 1 Press the FUNCTION button to select “TUNER”. 2 Press the BAND button to select a band. If the reception is poor 3 Select the station you want to listen to (auto selection). AM broadcast Turn around the unit to find the best position for AM stations.
Preset Tuning 1, 2, 3.... MEMORY/TIME SET MP3/PRESET ( / ) You can store 20 FM and 20 AM stations into preset channels. BAND 4 Within 10 seconds, press the MEMORY button. If the power supply is interrupted, the settings kept in memory (clock, preset stations, timer setting) will be erased. 1 Tune in a station you want to listen to (see steps 1 to 3 on page 21). The station is stored and the MEMORY indicator goes off. To store more stations, repeat steps 1 to 4 . 2 Press the MEMORY button.
RDS The Radio Data System (RDS) is a broadcasting service which allows stations to send additional information along with the regular radio programme signal. RDS (PTY Search) 2 1 RDS works on the FM waveband in Europe only. 1 Tune in an FM RDS station (see page 21). The RDS indicator lights and the Programme Service name (station’s name) appears on the display. 3 2 Press the RDS button. A station can be searched by this function. ENGLISH 1 Press the BAND button to select FM.
RDS (PTY Search) PTY (Programme Type) NEWS : brief announcements, events, public opinion, reports, actual situations. AFFAIRS : a kind of suggestion including practical announcements other than news, documents, discussion, analysis and so on. INFO : daily information or reference such as weather forecast, consumer guide, medical assistance and so on. SPORT : sports related programmes. EDUCATE : educational and cultural information. DRAMA : all kinds of radio concert and serial drama.
Setting the Clock CLOCK/TIMER 4 Press the SKIP button (. // ) to set the current hour. MEMORY/TIME SET 1 Press the CLOCK/TIMER button to display the 5 Press the TIME SET button. The “minute” value blinks. ENGLISH clock. (In AUX mode or standby mode, the clock is already displayed.) 2 Press the TIME SET button. “12 HR” or “24 HR” blinks on the display. If you want to change the hour mode, press the .or/ button. 6 Press the SKIP button (. // ) to set the current minute.
Setting the Timer 1 CLOCK/TIMER 4 Press the SKIP button (. // ) to set the minute, and then press the TIMER button. MEMORY/TIME SET Adjust the clock before setting the timer. This timer function can be set ON time, OFF time, source and volume independently. 5 Press the TIME SET button. ON time 1 Press the CLOCK/TIMER button to display “ON”. Now the ON time is set. Or when no button is pressed for 8 seconds, the time is set and the display will go back to normal mode. 2 Press the TIME SET button.
4 Press the SKIP button (. // ) to set the 4 Press the TIME SET button. minute, and then press the TIMER button. Now the Source is set. Or when no button is pressed for 8 seconds, the source is set and the display will go back to normal mode. 5 Press the TIME SET button. Or when no button is pressed for 8 seconds, the time is set and the display will go back to normal mode. Source VOLUME 1 Press the CLOCK/TIMER button to display source. 1 Press the CLOCK/TIMER button to display “VOL”.
Setting the Timer 2 To turn on or off the timer During the standby mode, press the TIMER ON button. Specifications TUNER Section Frequency Range (FM).......87.50 MHz to 108.00 MHz Frequency Range (AM)...............522 kHz to 1620 kHz CD PLAYER Section Frequency Response ...............20 Hz to 20 kHz (±1dB) Wow and Flutter ..................................Unmeasurable The timer indicator appears. The unit will turn on and off at the specified time every day.
Troubleshooting If you have problems with your system, look through this chart and see if you can solve the problem yourself before calling your dealer or TEAC service center. Sound skips. e Place the unit on a stable place to avoid vibration and shock. e If the disc is dirty, clean the surface of the disc. e Do not use scratched, damaged or warped discs. General No power. e Check the connection to the AC power supply. Check and make sure the AC source has not a switched outlet.
Sommaire Nous vous remercions pour l’achat d’un appareil TEAC. Lisez ce manuel avec attention pour obtenir les meilleures performances possibles de cet appareil. Sommaire....................................................................30 Avant utilisation ..........................................................30 Disque compact ..........................................................32 Interrupteur RESET ......................................................33 Raccordement ..........................
Entretien Si la surface de l’appareil devient sale, essuyez-la avec un chiffon doux ou utilisez un liquide de nettoyage neutre dilué. Assurez-vous de retirez complètement toute l’humidité. N’utilisez pas de diluant, de benzine ou d’alcool car ils risqueraient d’endommager la surface de l’appareil.
Disque compact Disques pouvant être lus avec ce lecteur: • CD audio classiques, portant le logo “Compact Disc Digital Audio” sur l’étiquette: • Disques CD-R/CD-RW correctement finalisés Remarque: < Selon la qualité du disque et/ou la qualité de l’enregistrement, certains disques CD-R risquent de ne pas pouvoir être lus. < Les disques protégés contre la reproduction, ainsi que les disques non-conformes à la norme CD risquent de ne pas pouvoir être lus correctement par ce lecteur.
Interrupteur RESET < N’utilisez pas de CD ayant une forme irrégulière (octogonale, en forme de coeur, etc.), ceux-ci risquant d'endommager l'appareil. < En cas de doute quant à la manipulation des CD-R/CD-RW, lisez les instructions fournies avec le disque ou contactez directement le fabricant du disque. Compatibilité MP3 < Cet appareil est en mesure de lire les fichiers MP3 qu'un disque CD-R ou CD-RW ou une clé USB comporte. < Quand le système est endommagé par un choc électrique.
Raccordement B A E D 1 PRÉCAUTION < Coupez l’alimentation avant d’effectuer les raccordements. < Lisez les instructions qui accompagnent chaque appareil que vous avez l’intention d’utiliser en association avec cet appareil-ci. < Assurez-vous d’insérer chaque prise jusqu’au fond. Afin d’éviter le bruit, ne liez pas les fils électriques.
A PHONES Pour votre écoute privée, branchez votre casque d'écoute sur cette prise et réglez le volume au moyen de la commande VOLUME. B Prise USB Branchez sur cette prise votre clé USB comportant des musiques MP3. F Logement de la pile La pile fournit du courant de secours à l’horloge intégrée et à la mémoire lorsque l’appareil est momentanément déconnecté de la prise de courant. Installation de la pile 1. Desserrez la vis de fixation. 2.
Nom des commandes respectives 1 DESSUS A B C D E F G H I J K DEVANT L L T S R Q P O N M TÉLÉCOMMANDE D J K F M C H R 36 N O S T
A Couvercle du compartiment à disque Appuyez sur la marque L située sur le couvercle et celui-ci s’ouvre. B SNOOZE Une fois l’heure TIMER ON atteinte, on peut éteindre l’appareil pour 5 minutes additionnelles en appuyant sur cette touche. K TIMER ON/SLEEP Utilisez cette touche pour régler la minuterie d’arrêt différé. En mode de veille, cette touche est utilisée pour activer ou désactiver la fonction de minuterie.
Nom des commandes respectives 2 DERRIÈRE W TÉLÉCOMMANDE U V U Touches numériques V MP3 FOLDER/PRESET En mode TUNER, utilisez cette touche pour sélectionner les stations mémorisées sur les canaux préréglés. Pendant la lecture d’un disque MP3 ou d’une clé USB, utilisez cette touche pour sélectionner un dossier sur le disque ou la clé USB. 38 W Commande BASS CONTROL Utilisez cette commande pour augmenter ou réduire le son des graves.
Boîtier de télécommande Le boîtier de télécommande fourni permet la commande à distance de l’appareil. Pour l’utilisation du boîtier de télécommande, dirigez-le vers le capteur de télécommande du panneau avant de l’appareil. < Même si le boîtier de télécommande est activé dans la zone de fonctionnement (5 m), la commande à distance peut être impossible s’il y a des obstacles entre le lecteur et le boîtier de télécommande.
Opération de base Casque 2 Pour l’écoute privée, insérez la fiche du casque dans la prise PHONES, et réglez le volume au moyen de la commande VOLUME. Le son des haut-parleurs est coupé lorsque la fiche du casque est insérée dans la prise PHONES. 3 1 1 Appuyez sur l’interrupteur STANDBY/ON pour mettre l’appareil sous tension. 2 Appuyez sur la touche FUNCTION pour sélectionner une source. 3 Lancez la lecture de la source et réglez le volume avec la commande VOLUME.
Lecture des CD/disques MP3 1 2 3 < L’appareil met quelques secondes à charger le disque. Pendant le chargement, aucune touche n’est opérante. Patientez jusqu’à ce que le nombre total de plages et le temps total de lecture du disque s’affichent. < Lorsque aucun disque n’est chargé dans le lecteur CD, “NO DISC” s’affiche. Lorsqu’un CD est chargé 4 nombre total de plages temps total de lecture 1 Appuyez sur la touche FUNCTION pour sélectionner “CD”.
Lecture d’une clé MP3 (USB) < N’employez PAS de disque dur USB à grande capacité avec cet appareil. 1 Appuyez sur la touche FUNCTION pour sélectionner “USB”. Lecture des CD/MP3 (disques/USB) INTRO/PTY MP3 2 Branchez votre clé USB sur la prise USB. < On peut inverser les étapes 1 et 2 . Pour interrompre la lecture temporairement (mode de pause) < L’appareil met quelques secondes à charger la clé USB. Pendant le chargement, aucune touche n’est opérante.
Recherche d’un passage sur une plage Pendant la lecture, maintenez enfoncée la touche SKIP (. ou / ) et relâchez-la lorsque vous trouvez le passage que vous désirez écouter. Accès direct à des plage spécifiques En mode d’arrêt ou de lecture, les touches numériques sur la télécommande servent à sélectionner des plages. Appuyez sur les touches numériques pour sélectionner une plage. La lecture de la plage sélectionnée se mettra en route.
Lecture programmée 1 3 4 2 5 Vous pouvez programmer jusqu’à 60 plages dans l’ordre désiré. Les fonctions de lecture aléatoire et de lecture répétée sont inopérantes pendant la lecture programmée. 1 Appuyez sur la touche FUNCTION pour sélectionner “CD” ou “USB”. 4 Appuyez sur les touches numériques sur la télécommande (ou appuyez de manière répétée sur la touche SKIP (. ou/ )) pour sélectionner une plage, puis appuyez sur la touche MEMORY. La plage est ajoutée au programme, et “P-02” s’affiche.
Pour ajouter une plage à la fin du programme 1, 2, 3.... MEMORY/TIME SET Pour vérifier l’ordre de programmation Pour écraser le programme En mode d’arrêt, appuyez de manière répétée sur la touche MEMORY, jusqu’à ce que le numéro du programme à modifier apparaisse sur l’afficheur. Sélectionnez un nouveau numéro de plage avec les touches numériques de la télécommande ou la touche SKIP (.ou/) puis appuyez sur la touche MEMORY. FRANÇAIS En mode d’arrêt, appuyez de manière répétée sur la touche MEMORY.
Lecture répétée/aléatoire Répétition d’une plage Appuyez une fois sur la touche PLAY MODE pendant la lecture. “REPEAT” s’allume. La plage en cours de lecture est lue de manière répétée. Si vous appuyez sur la touche SKIP (.ou/) et sélectionnez une autre plage, la plage sélectionnée est lue de manière répétée. Les plages seront lues de manière répétée ou aléatoire. Sélectionnez le mode de lecture pendant la lecture ou appuyez sur la touche PLAY/PAUSE (G/J) pour démarrer la lecture.
Écoute de la radio FM MODE 1 Touche FM MODE 2 Chaque pression sur cette touche fait commuter l’appareil entre le mode STEREO et le mode MONO. 3 1 Appuyez sur la touche FUNCTION pour sélectionner “TUNER”. STEREO Les émissions FM diffusées en stéréo sont captées en stéréo et l’indicateur “STEREO” s’allume. MONO Dans les zones où la réception stéréo est faible, sélectionnez ce mode. La réception s’effectue alors en mode monaural, réduisant le bruit indésirable.
Syntonisation préréglé 1, 2, 3.... MEMORY/TIME SET MP3/PRESET ( / ) Vous pouvez mettre en mémoire 20 stations FM et 20 stations AM sur des canaux prérégles. BAND 4 Dans les 10 secondes, appuyez sur la touche MEMORY. À la coupure de l’alimentation, les réglages mis en mémoire (horloge, stations mémorisées sur des canaux préréglés, réglage de minuterie) seront effacés. 1 Réglez la station que vous souhaitez écouter (voir étapes 1 à 3 de la page 47).
RDS RDS (recherche de type de programme PTY) Le Radio Data System (système de données radio RDS) est un service de diffusion qui permet aux stations d’émettre des informations supplémentaires en même temps que le signal normal du programme radio. 2 1 Le RDS ne fonctionne que sur la bande FM en Europe. 1 Réglez une station FM RDS (voir page 47). L’indicateur RDS s’allume et le nom du service de programme (nom de la station) s’affiche. 3 2 Appuyez sur le bouton RDS.
RDS (recherche de type de programme PTY) PTY (Type de programme) NEWS : annonces brèves, événements, opinion publique, enquêtes, situations réelles AFFAIRS : genre de conseils incluant des annonces pratiques autres que des actualités, des documents, discussions, analyses etc INFO : informations quotidiennes ou de référence telles que bulletin météo, guide de consommation, aide médicale etc SPORT : programme relatif aux sports EDUCATE : informations éducatives et culturelles DRAMA : tous types de concerts e
Réglage de l’horloge CLOCK/TIMER 4 Appuyez sur la touche SKIP (. ou /) pour spécifier l’heure actuelle. MEMORY/TIME SET 1 Appuyez sur la touche CLOCK/TIMER pour afficher l’horloge. (En mode AUX ou mode de veille, l’horloge est déjà affichée.) 5 Appuyez sur la touche TIME SET. La valeur des minutes clignote. FRANÇAIS 2 Appuyez sur la touche TIME SET. ”12 HR” ou ”24 HR” clignote sur l’afficheur. Si vous désirez changer le cycle de l’horloge, appuyez sur la touche .ou/.
Réglage de la minuterie 1 CLOCK/TIMER 4 Appuyez sur la touche SKIP (.//) pour régler les minutes, puis appuyez sur la touche TIMER. MEMORY/TIME SET Réglez l’horloge avant de régler la minuterie. La fonction de minuterie peut être réglée sur heure ON, heure OFF, source et volume respectivement. 5 Appuyez sur la touche TIME SET. Heure ON 1 Appuyez sur la touche CLOCK/TIME pour afficher “ON”. L’heure ON est maintenant réglée.
4 Appuyez sur la touche SKIP (.//) pour régler les minutes, puis appuyez sur la touche TIMER. 5 Appuyez sur la touche TIME SET. La source est maintenant réglée. Lorsqu'aucune touche n'est enfoncée pendant 8 secondes, la source est alors réglée et l'afficheur revient au mode normal. Quand la source est réglée sur “CD”, mettez un CD en place. Lors que la source est réglée sur “USB”, branchez la clé USB dans la prise USB. Quand la source est réglée sur “TUNER”, réglez l’appareil sur une station.
Réglage de la minuterie 2 Spécifications Pour mettre la minuterie en ou hors service Section SYNTONISEUR Gamme de fréquence (FM) .....................87,50 MHz à 108,00 MHz Gamme de fréquence (AM).........522 kHz à 1620 kHz En mode de veille, appuyez sur la touche TIMER ON. Section LECTEUR DISQUE COMPACT Réponse de fréquence .............20 Hz à 20 kHz (±1dB) Pleurage et scintillement .....................Non-mesurable L'indicateur de minuterie apparaît.
Dépannage Si vous avez des problèmes avec l’appareil, veuillez consulter cette charte et voir si vous pouvez résoudre le problême vous-même avant de consulter votre dépositaire ou un centre de service TEAC. Généralités Pas d’alimentation e Vérifiez que l’appareil est branché sur une prise de courant. Assurez-vous que la prise de courant n’a pas d’interrupteur. Si la prise a un interrupteur, assurez-vous qu’il est en position de marche. Assurez-vous que la prise de courant est reliée au secteur.
Inhaltsverzeichnis Vor der Inbetriebnahme Danke, dass Sie sich für TEAC entschieden haben. Lesen Sie diese Bedienungsanleitung bitte aufmerksam durch, damit Sie alle Leistungsmerkmale dieses Geräts voll ausschöpfen können. Beachten Sie bitte die folgenden Hinweise vor der Inbetriebnahme < Lassen Sie stets ausreichenden Platz zur Belüftung um das Gerät, da es sich während des Betriebs erwärmen kann. Inhaltsverzeichnis ........................................................
BEWEGEN DES GERÄTS Achten Sie vor jedem Bewegen des Geräts darauf, dass sich keine Disc im Laufwerk befindet, da anderenfalls Schäden verursacht werden können. Wenn sich noch eine Disc im Laufwerk befindet, entnehmen Sie diese und schließen Sie die Disc-Lade. Drücken Sie dann den Netzschalter, um das Gerät auszuschalten, und ziehen Sie den Netzstecker aus der Steckdose. Pflege Reinigen Sie das Gehäuse mit einem trockenen, weichen Tuch.
Discs Discs, die zur Wiedergabe auf dem SL-D910 geeignet sind: • Konventionelle Audio-CDs, die das Compact Disc Digital Audio-Logo tragen: < Verwenden Sie zur Reinigung einer CD niemals chemische Reinigungsmittel, wie Record-Sprays, Antistatic-Sprays oder Flüssigkeiten wie Benzin oder Verdünner, da diese Substanzen irreparable Schäden an einer CD anrichten.
RESET-Schalter < Falls Sie nicht sicher sind und weitere Fragen bezüglich der Handhabung und Umgang mit CDR/CD-RW Discs haben, lesen Sie bitte die Vorsichtsmaßnahmen, die meist auf der Innenseite der CD-Hülle abgedruckt sind oder wenden Sie sich an den Hersteller der entsprechenden CD. MP3-Kompatibilität < Dieser Apparat kann MP3-Dateien von CD-R, CD-RW oder USB Speicherkarten abspielen. < Bei der Namensgebung der MP3-Dateien dürfen ausschließlich alphanumerische Zeichen verwendet werden.
Anschlüsse B A E D 1 VORSICHT < Schalten Sie den SL-D910 stets aus, bevor Sie externe Komponenten daran anschließen. < Lesen Sie bitte die Bedienungsanleitungen aller Komponenten, die Sie am SL-D910 betreiben möchten. 60 C 2 F 3 < Achten Sie beim Anschließen auf korrekten Sitz der jeweiligen Stecker. Zur Vermeidung von Brummen und Rauschen sollten Sie einzelne Anschlusskabel nicht zu einem Kabelstrang zusammenbinden oder flechten.
A Kopfhörer (PHONES) Schließen Sie hier Ihren Kopfhörer an, um ungestört Musik hören zu können. Die Wiedergabelautstärke können Sie mittels VOLUME-Regler einstellen. B USB-Anschluss An diesem Anschluss können Sie Ihre USB Speicherkarte anschließen, die MP3 Musik enthält. F Batteriefach Die Batterie versorgt die eingebaute Uhr und den Speicher mit Reservestrom, wenn das Gerät für einen Moment von der Steckdose getrennt wird. Einlegen der Batterien 1. Lösen Sie die Befestigungsschraube. 2.
Bezeichnungen der Bedienelemente 1 OBEN A B C D E F G H I J L FRONTANSICHT L T S R Q P O N M D J K F M C H R 62 K N O S T FERNBEDIENUNG
A Disc-Fach-Klappe Zum Öffnen der Disc-Fach-Klappe drücken Sie bitte leicht auf die mit dem Öffnen-Symbol L bezeichnete Stelle. B SNOOZE Nachdem die TIMER ON-Zeit (Weckzeit) erreicht wurde, können Sie den SL-D910 mittels dieser Taste für weitere fünf Minuten in den Standby-Betrieb (Schlafmodus) versetzen. C INTRO/PTY Betätigen Sie diese Taste während des CD- oder USBModus, um die Intro-Funktion zu starten. Wählen Sie im FM TUNER-Modus mittels dieser Taste einen Programmtyp für RDS aus.
Bezeichnungen der Bedienelemente 2 RÜCKANSICHT W FERNBEDIENUNG U V U Zifferntasten V MP3 FOLDER/PRESET Im TUNER-Betrieb dient diese Taste zum Auswählen von Sender-Presets. Bei Wiedergabe einer MP3 Disc oder USB Speicherkarte dient diese Taste zur Auswahl eines auf der Disc befindlichen Ordners (Folder). 64 W BASS CONTROL-Drehregler Mittels dieses Drehreglers können Sie die Lautstärke des Tieftonanteils des Klangs einstellen.
Betrieb mit der Fernbedienung Die mitgelieferte Fernbedienungseinheit ermöglicht die Bedienung des Gerät bequem vom Sitzplatz aus. Richten Sie die Fernbedienung auf den Empfangssensor des Geräts. < Innerhalb des zulässigen Entfernungsbereichs kann der Signalempfang durch zwischen Fernbedienungseinheit und Empfangssensor befindliche Gegenstände behindert werden (5 m).
Grundlegende Bedienung Kopfhörer 2 3 1 Um ungestört Musik genießen zu können, schließen Sie Ihren Kopfhörer am PHONES-Anschluss an und stellen die Wiedergabelautstärke mittels VOLUMEDrehreglers wunschgemäß ein. Sofern ein Kopfhörer am SL-D910 angeschlossen ist, wird die Wiedergabe über die angeschlossenen Lautsprechersysteme stumm geschaltet. 1 Betätigen Sie den STANDBY/ON, um die Einheit einzuschalten. 2 Betätigen Sie die FUNCTION-Taste zur Auswahl der gewünschten Signalquelle.
Wiedergabe von CD/MP3 Disc < Es dauert möglicherweise einige Sekunden, bis der SL-D910 die Diskinformationen eingelesen hat. Während dieser Zeitspanne besitzen sämtliche Tasten keine Funktion. Warten Sie bitte, bis Gesamttitelanzahl sowie Gesamtwiedergabedauer der Disc angezeigt werden. < Sofern sich keine Disc im Laufwerk befindet, wird die Meldung „NO DISC“ angezeigt. 1 2 3 Wenn sich eine Audio-CD im Laufwerk befindet.
Wiedergabe auf USB Speicherkarte < Benutzen Sie keine USB-Hochleistungsspeichereinheit mit diesem Apparat. Wiedergabe von CD/MP3 Disc/USB Karte INTRO/PTY MP3 1 Betätigen Sie bitte die FUNCTION-Taste, um „USB“ als Audiosignalquelle auszuwählen. 2 Schließen Sie bitte Ihre USB Speicherkarte an der USB-Buchse an. < Sie können die Shritte 1 und 2 umkehren. Pause – zum kurzzeitigen Unterbrechen der Wiedergabe Betätigen Sie die PLAY/PAUSE-Taste (G/J) während der Wiedergabe.
< Während der Wiedergabe einer zuvor programmierten Titelfolge wird der entsprechend nächste oder vorhergehende Titel der Titelfolge aufgerufen. Schneller Vor-/Rücklauf Betätigen Sie während der Wiedergabe die jeweilige SKIP-Taste (. oder/ ). Lassen Sie die entsprechende Taste los, wenn die gewünschte Position erreicht ist. Direktwiedergabe Im Stopp- oder Wiedergabe-Modus können Sie die Zifferntasten verwenden, um einen Titel auszuwählen. Drücken Sie zur Auswahl eines Titels die Zifferntasten.
Wiedergabe programmierter Titelfolgen 1 3 4 2 5 Sie können die Reihenfolge der Wiedergabe von bis zu 60 Titeln programmieren. Während der Wiedergabe einer programmierten Titelfolge können Shuffle- und Repeat-Funktion nicht verwendet werden. 1 Betätigen Sie zur Auswahl von „CD“ oder „USB“ als Signalquelle die FUNCTION-Taste. 2 Betätigen Sie die MEMORY-Taste. 4 Drücken Sie die entsprechende(n) Zifferntaste(n) (oder die SKIP-Taste (.oder/) wiederholt), um den gewünschten Titel auszuwählen.
Am Ende einer programmierten Titelfolge weitere Titel hinzufügen 1, 2, 3.... MEMORY/TIME SET Überprüfen einer programmierten Titelfolge Betätigen Sie bitte wiederholt die MEMORY-Taste, während sich das Laufwerk im Stoppmodus befindet. Titel- und Programmnummer werden im Display angezeigt. Überschreiben einer programmierten Titelfolge Während sich das Gerät im Stoppmodus befindet, betätigen Sie wiederholt die MEMORY-Taste, bis die Nummer des Titels, den Sie ersetzen möchten, im Display angezeigt wird.
Wiedergabewiederholung in zufälliger Reihenfolge Wiederholung aller Titel Alle Titel werden wiederholt wiedergegeben. Drücken Sie die PLAY MODE-Taste mehrmals bis „REPEAT ALL“ aufleuchtet. Während der Wiedergabe einer programmierten Titelfolge werden die Titel in der programmierten Reihenfolge wiederholt wiedergegeben. Wiederholte Wiedergabe aller Titel eines Ordners (MP3) Die Titel werden wiederholt oder zufällig wiedergegeben.
Tuner FM MODE 1 Einstellen von Empfangsfrequenzen, die nicht mittels automatischer Sendersuche eingestellt werden können (manuelle Sendersuche). Tippen Sie den TUNING-Drehregler in der jeweiligen Richtung (UP oder Down) lediglich kurz an, so dass sich die Frequenzanzeige in kleinen Schritten ändert. < Bei Verwendung der Fernbedienung betätigen Sie bitte die TUNING-Taste. 2 3 FM MODE-Taste 1 Wählen Sie TUNER mit der FUNCTION-Taste.
Sender-Presets 1, 2, 3.... MEMORY/TIME SET MP3/PRESET ( / ) Sie können 20 UKW- und 20 MW-Empfangsfrequenzen in den Sender-Presets speichern. BAND 4 Betätigen Sie innerhalb von 10 Sekunden die MEMORY-Taste. Falls Sie die Spannungsversorgung unterbrechen, werden alle gespeicherten Einstellungen (Uhrzeit, Sender-Presets, Timer-Einstellungen) automatisch gelöscht. 1 Stellen Sie die Empfangsfrequenz des gewünschten Senders ein (siehe Bedienschritte 1 bis 3 auf Seite 73).
RDS RDS ist ein Service der Rundfunkanstalten, der neben dem normalen Radioprogramm die Ausstrahlung zusätzlicher Textinformationen ermöglicht. RDS (PTY Suche) 2 1 Der RDS-Dienst steht ausschließlich in Europa bei UKW-Empfang zur Verfügung. 1 Stellen Sie die Empfangsfrequenz eines Radiosenders ein, der ein RDS-Signal ausstrahlt (siehe Seite 73). Die RDS-Anzeige leuchtet und der Programmservicename (Sendername) erscheint im Display. 3 2 Betätigen Sie die RDS-Taste.
RDS (PTY Suche) PTY (Programmtyp) NEWS : kurze Ansagen, Ereignisse, öffentliche Meinungen, Reportagen, aktuelle Situationen. AFFAIRS : Stellungnahmen, Nachrichten, die nicht unter NEWS fallen, Anregungen, Dokumentationen, Diskussionen, Analysen, usw. INFO : tägliche Informationen oder Berichte, wie etwa Wetterbericht, VerbraucherEmpfehlungen, medizinische Hinweise, usw. SPORT : Sport-Programme. EDUCATE : Bildung und Kultur. DRAMA : alle Arten von Hörspiel, Konzert oder Hörserien.
Einstellen der Uhrzeit CLOCK/TIMER 4 Betätigen Sie zum Einstellen des aktuellen Stundenwertes bitte die . oder /-Taste. MEMORY/TIME SET 1 Drücken Sie zum Anzeigen der Uhr die CLOCK/TIMER-Taste. (Im AUX- oder StandbyBetrieb wird die Uhr schon angezeigt.) 5 Betätigen Sie die TIME SET-Taste. Der „Minutenwert“ blinkt. 2 Betätigen Sie die TIME SET-Taste. Die „12 HR“ oder die „24 HR“ blinken auf dem Display. Zum Wechseln des Zeitanzeigemodus betätigen Sie bitte die . oder /-Taste.
Einstellen des Timers 1 CLOCK/TIMER 4 Drücken Sie die SKIP-Taste (.//), um die Minuten einzustellen und anschließend die TIMER-Taste. MEMORY/TIME SET Bevor Sie mit der Timerprogrammierung beginnen, vergewissern Sie sich bitte, dass die korrekte Uhrzeit eingestellt ist. Die Startzeit, Endzeit, Audioquelle und Lautstärke der Timer-Funktion können unabhängig voneinander eingestellt werden. 5 Drücken Sie die TIME SET-Taste.
4 Drücken Sie die SKIP-Taste (.//), um die Minuten einzustellen und anschließend die TIMER-Taste. 5 Drücken Sie die TIME SET-Taste. Die Endzeit ist nun eingestellt. Wenn keine Taste innerhalb von 8 Sekunden gedrückt wird, wird die Signalguelle eingestellt und das Display wechselt wieder zum normalen Betrieb. Die Signalquelle ist nun eingestellt. Wenn keine Taste innerhalb von 8 Sekunden gedrückt wird, wird die Signalguelle eingestellt und das Display wechselt wieder zum normalen Betrieb.
Einstellen des Timers 2 Zum Ein- oder Ausschalten des Timers Betätigen Sie im Standby-Betrieb die TIMER ONTaste. Technische Daten TUNER-Teil Frequenzbereich (UKW) ...87,50 MHz bis 108,00 MHz Frequenzbereich (MW)..............522 kHz bis 1620 kHz CD-PLAYER -Teil Frequenzgang ......................20 Hz bis 20 kHz (±1 dB) Gleichlaufschwankung ........unterhalb der Meßgrenze Die Timeranzeige erscheint. Die Einheit schaltet jeden Tag zur festgelegten Zeit ein und aus.
Hilfe bei Funktionsstörungen Die folgende Tabelle dient als Hilfe bei der Fehlerbeseitigung, falls während des Betriebes des SL-D910 Störungen oder Fehlfunktionen auftreten sollten. Anhand der hier beschriebenen Problemlösungen lassen sich viele Fehlfunktionen beseitigen, ohne dass Sie Ihren HiFi-Händler oder ein TEAC-Servicecenter aufsuchen müssen. Allgemein Keine Strom-/spannungsversorgung. e Überprüfen Sie bitte die korrekte Netzverbindung zwischen dem SL-D910 und der Wandsteckdose.
Inhoud Voor gebruik Hartelijk dank dat u voor TEAC heeft gekozen. Lees deze handleiding zorgvuldig door zodat u verzekerd kunt zijn van de optimale prestaties van uw toestel. Lees dit voor gebruik < Omdat het toestel warm kan worden in het gebruik, dient u te allen tijde voldoende ventilatieruimte vrij te laten rondom het toestel. Inhoud ........................................................................
WANNEER U DIT TOESTEL GAAT VERPLAATSEN Wanneer u uw installatie verandert of het toestel in gaat pakken voor een verhuizing of zo, haal dan in ieder geval de disc eruit en doe de disclade weer netjes dicht. Druk vervolgens op de hoofdschakelaar om de stroom uit te schakelen en haal daarna de stekker uit het stopcontact. Verplaatsen van dit toestel terwijl er nog een disc in zit kan leiden tot schade aan dit toestel.
Discs Discs die op dit apparaat afgespeeld kunnen worden: • Conventionele audio CD‘s met het Compact Disc Digital Audio logo vermeld op het label: • Correct gefinaliseerde CD-R/CD-RW discs Opmerking: < Afhankelijk van de kwaliteit van de disc en/of de conditie van de opname kan het voorkomen dat bepaalde discs niet afgespeeld kunnen worden < De mogelijkheid bestaat dat tegen kopiëren beveiligde en andere CD’s die niet overeenkomen met de CD standaard niet correct weergegeven worden.
RESET-schakelaar Compatibiliteit met MP3 < Dit apparaat kan MP3-bestanden afspelen die op een CD-R, CD-RW of USB geheugenkaart zijn opgenomen. < Bestandsnamen van MP3-bestanden moeten uit alfanumerieke tekens bestaan. Deze speler kan symbolen en grote tekens of tekens van 2 bytes breed (bijvoorbeeld Japanse tekens, Chinese tekens enzovoort) niet juist weergeven. Gebruik ook altijd de bestandsextensie “.mp3”. < U kunt de disc pas afspelen als deze is afgerond. < De CD-ROM moet compatibel zijn met ISO 9660.
Aansluiting B A E D 1 LET OP < Schakel de netstroom uit voordat u de aansluitingen maakt. < Zorg ervoor dat alle kabels goed zijn aangesloten. < Zorg ervoor dat u de pluggen correct in de aansluitingen steekt. Bundel de aansluitkabels niet om brom en ruis te voorkomen.
A Hoofdtelefoon (PHONES) Sluit hier uw hoofdtelefoon aan om ongestoord naar muziek te luisteren. Regel de weergavegeluidssterkte met de VOLUME-knop. B USB-aansluiting Op deze aansluiting kunt u uw USB geheugenkaart aansluiten, waarin MP3 tracks voorkomen. F Batterijvak De batterij levert de reservevoeding voor de ingebouwde klok en het geheugen wanneer het apparaat even van het lichtnet is losgekoppeld. De batterij plaatsen 1. Draai de bevestigingsschroef los. 2.
Beschrijving van de bedieningselementen 1 BOVENKANT A B C D E F G H I J L VOORKANT L T S R Q P O N M D J K F M C H R 88 K N O S T AFSTANDSBEDIENING
A Disc-lader Druk op het L teken op het klepje van de disc-lader om het te openen. B SNOOZE Als het apparaat op de TIMER ON tijd aan gaat kunt u het apparaat vijf minuten uit zetten. C INTRO/PTY In de CD of USB stand kunt u met deze toets de intro-weergavefunctie inschakelen. In de FM TUNER stand kunt u met deze toets een programmatype voor RDS kiezen. L Luidsprekers (stereo) M MEMORY/TIME SET In de CD of USB stand kunt u deze toets gebruiken om tracks te programmeren.
Beschrijving van de bedieningselementen 2 ACHTERKANT W AFSTANDSBEDIENING U V U Nummertoetsen V MP3 FOLDER/PRESET In de TUNER stand gebruikt u deze toets om vooraf ingestelde radiozenders te selecteren. Tijdens weergave van een MP3 disc of USB geheugenkaart kunt u met deze toets een op de disc of USB geheugenkaart voorkomende map selecteren. 90 W BASS CONTROL knop Gebruik deze knop om het weergaveniveau van de lage tonen te regelen.
Afstandsbediening Via bijgeleverde afstandsbediening kan de speler op afstand worden bestuurd. Bij gebruik van de afstandsbediening moet deze op de sensor op de voorzijde van het apparaat richten. < Ondanks het feit dat de afstandsbediening binnen het effectieve bereik (5 m) wordt gebruikt, kan de aanwezigheid van obstakels ertoe leiden dat deze niet werkt.
Basisbediening Hoofdtelefoon 2 Als u een hoofdtelefoon wilt gebruiken sluit dan de plug van de hoofdtelefoon aan op de PHONES aansluiting en regel de geluidssterkte met de VOLUME knop. Als u een hoofdtelefoon op de SLD910 aansluit wordt de geluidsweergave via de aangesloten luidsprekers onderbroken. 3 1 1 Druk op de STANDBY/ON om het apparaat aan te schakelen. 2 Druk op de FUNCTION toets om een signaalbron te kiezen.
Weergave van CD’s en MP3 discs 1 2 3 4 < Het kan een paar seconden duren voordat de SLD910 de informatie op de disc gelezen heeft. De bedieningstoetsen werken tijdens het lezen van de disc niet. Wacht tot het totale aantal tracks en de totale weergavetijd van de disc in het display verschijnen. < Als geen disc geladen is wordt “NO DISC” in het display weergegeven. Als een CD geladen is totaal aantal tracks totale weergavetijd 1 Druk op de FUNCTION toets om “CD” als audiosignaalbron te selecteren.
Weergave van USB geheugenkaarten < Gebruik geen USB harde schijf met hoge capaciteit met dit apparaat. INTRO/PTY MP3 1 Druk op de FUNCTION toets om “USB” als audiosignaalbron te selecteren. 2 Steek uw USB geheugenkaart in de USB- aansluiting. < U kunt de stappen 1 en 2 omkeren. Weergave tijdelijk onderbreken (pauzestand) < Het kan een paar seconden duren voordat de SLD910 de informatie op de kaart gelezen heeft. De bedieningstoetsen werken tijdens het lezen van de kaart niet.
Weergave van CD’s, MP3 discs en USB geheugenkaarten Zoeken naar een bepaald gedeelte van een track Druk tijdens weergave op de SKIP-toets (.of/) en houd deze toets ingedrukt totdat u het gewenste gedeelte heeft gevonden. Directe weergave In de stop-stand of tijdens weergave kunt u de nummertoetsen van de afstandsbediening gebruiken om een track te selecteren. Druk op de nummertoetsen om een track te kiezen. Weergave van de geselecteerde track zal beginnen.
Geprogrammeerde weergave 1 3 4 2 5 Tot 60 nummers kunnen in de gewenste volgorde geprogrammeerd worden. Tijdens geprogrammeerde weergave werken de willekeurige weergavefunctie en de herhaalfunctie niet. 1 Druk op de FUNCTION toets om “CD” of “USB”als signaalbron te selecteren. 4 Druk op de nummertoetsen (of druk herhaald op een de SKIP toetsen (.of/) om een track te selecteren en druk daarna op de MEMORY toets. De geselecteerde track is nu geprogrammmeerd en “P-02” verschijnt in het display.
Een track toevoegen aan het einde van het programma 1, 2, 3.... MEMORY/TIME SET Controleren van de geprogrammeerde volgorde Druk als de SL-D910 in de stopstand staat meerdere keren op de MEMORY toets. Het track- en het programmanummer wordt in het display weergegeven. Druk in de stopstand enkele malen op de MEMORY toets totdat “00” of “000” in het display verschijnt. Selecteer een tracknummer door het indrukken van de nummertoetsen of van de SKIP toetsen (.of/), en daarna drukt u op de MEMORYtoets.
Herhaald afspelen/Willekeurige weergave Alle tracks herhalen Alle tracks op een disc worden herhaald weergegeven. Druk enkele malen op de PLAY MODE toets totdat “REPEAT ALL” oplicht. Tijdens geprogrammeerde weergave worden de geprogrammeerde tracks herhaald afgespeeld. Herhalen van alle tracks in een map (MP3) De tracks worden herhaaldelijk of in een willekeurige volgorde afgespeeld. Kies tijdens afspelen de afspeelfunctie of druk op de PLAY/PAUSE toets (G/J) om te beginnen met afspelen.
Luisteren naar de radio FM MODE 1 FM MODE-toets 2 Als u op deze toets drukt kunt u schakelen tussen STEREO en MONO weergavekwaliteit. 3 1 Druk op de FUNCTION toets om “TUNER” als signaalbron te selecteren. STEREO FM stereo-uitzendingen worden in stereokwaliteit ontvangen en de “STEREO” indicatie in het display brandt. MONO In een gebied met een (te) zwakke FM stereoontvangst kunt u MONO weergave selecteren. De ontvangen signalen worden nu omgezet naar mono waardoor ongewenste ruis gereduceerd wordt.
Voorkeurzenders instellen 1, 2, 3.... MEMORY/TIME SET MP3/PRESET ( / ) U kunt 20 FM en 20 AM radiozenders in preset-kanalen opslaan. Als de netstroomtoevoer onderbroken wordt dan worden de instellingen opgeslagen in het geheugen van de SL-D910 (klok, voorkeurzenders, timerinstellingen) automatisch gewist. 1 Selecteer de zender waar u naar wilt luisteren (zie stap 1 t/m 3 op pagina 99) BAND 4 Druk binnen 10 seconden op de MEMORY-toets.
RDS RDS (Radio Data Systeem) is een zenderservice waarbij u naast een normaal radioprogramma ook nog extra informatie kunt ontvangen. RDS (PTY Zoekfunctie) 2 1 De RDS-zenderservice is alleen in Europa en bij FMontvangst beschikbaar. 1 Stem af op de frequentie van een FM RDS- radiozender (zie pag. 99). De RDS-indicator brandt en de naam van de programmaservice (zendernaam) wordt in het display weergegeven. 3 2 Druk op de RDS-toets.
RDS (PTY Zoekfunctie) PTY Programmatype NEWS : korte berichten, evenementen, publieke opinie, verslagen, actualiteiten. AFFAIRS : algemene informatie, o.a. praktische mededelingen anders dan nieuws, documentaires, discussies, analyses, enz. INFO : alledaagse informatie of referentiemateriaal zoals weerberichten, consumenten informatie, medische assistentie, enz. SPORT : programma’s over sport EDUCATE : educatieve en culturele informatie DRAMA : allerlei soorten radioconcerten en dramaseries.
Instellen van de klok CLOCK/TIMER 4 Druk op de SKIP toets (.//) om het huidige uur in te stellen. MEMORY/TIME SET 1 Druk op de CLOCK/TIMER toets om de klok te tonen. (In de AUX gebruiksstand of tijdens standby wordt de klok reeds getoond.) 5 Druk op de TIME SET toets. De “minuten” aanduiding knippert. 2 Druk op de TIME SET toets en houd deze toets ingedrukt. De indicatie “12 HR” of “24 HR” knippert in het display. Als u de instelling van de uren wilt veranderen druk dan op de Skiptoets (.of/).
Instellen van de timer 1 CLOCK/TIMER 4 Druk op de SKIP toets (.//) om de minuten in te stellen en druk dan op de TIMER toets. MEMORY/TIME SET Zet voor het instellen van de timer de klok gelijk. Met deze timerfunctie kunnen de ON tijd, de OFF tijd, de bron en de geluidssterkte afzonderlijk worden ingesteld. 5 Druk op de TIME SET toets. ON tijd 1 Druk op de CLOCK/TIMER toets om “ON” te laten verschijnen. De ON tijd is nu ingesteld.
4 Druk op de SKIP toets (.//) om de minuten De bron is nu ingesteld. in te stellen en druk dan op de TIMER toets. Of, als er geen toets gedurende 8 seconden wordt ingedrukt, wordt de bron ingesteld en verschijnen weer de normale display-aanduidingen. 5 Druk op de TIME SET toets. De OFF tijd is nu ingesteld. Of, als er geen toets gedurende 8 seconden wordt ingedrukt, wordt de bron ingesteld en verschijnen weer de normale display-aanduidingen.
Instellen van de timer 2 Aan en uit zetten van de timerfunctie Druk tijdens standby op de TIMER ON toets. De timerindicator verschijnt. Het apparaat zal nu elke dag op de vastgestelde tijden aan en uit worden geschakeld. < Als de stoptijd hetzelfde is als de starttijd, verschijnt "ERROR" en kan de timer niet in de ON stand geschakeld worden. Vergeet na de instelling niet om het apparaat uit te schakelen (standby te zetten), anders zal de timer niet werken.
Foutmeldingen Neem bij problemen met de SL-D910 alstublieft de moeite aan de hand van de onderstaande lijst te kijken of u het probleem wellicht zelf op kunt lossen. Als het probleem blijft bestaan neem dan contact op met een HiFi vakman of het TEAC-Servicecenter. Algemeen Geen netspanning. e Controleer het stopcontact waarop u het apparaat heeft aangesloten. Controleer of het stopcontact schakelbaar is. Indien dit het geval is, zorg er dan voor dat deze schakelaar aan staat.
Z TEAC CORPORATION 1-47 Ochiai, Tama-shi, Tokyo 206-8530, Japan Phone: (042) 356-9156 TEAC AMERICA, INC. 7733 Telegraph Road, Montebello, California 90640 Phone: (323) 726-0303 TEAC CANADA LTD. 5939 Wallace Street, Mississauga, Ontario L4Z 1Z8, Canada Phone: (905) 890-8008 TEAC MEXICO, S.A. De C.