D01123120A SR-L280i OWNER’S MANUAL MANUEL DU PROPRIÉTAIRE MANUAL DEL USUARIO ENGLISH STEREO CD RADIO FRANÇAIS ESPAÑOL Includes adapters for: Comprend des adaptateurs pour: Incluye adaptadores para: iPhone 4 iPhone 3GS, iPhone 3G
CAUTION: TO REDUCE THE RISK OF ELECTRIC SHOCK, DO NOT REMOVE COVER (OR BACK). NO USERSERVICEABLE PARTS INSIDE. REFER SERVICING TO QUALIFIED SERVICE PERSONNEL. The lightning flash with arrowhead symbol, within an equilateral triangle, is intended to alert the user to the presence of uninsulated “dangerous voltage” within the product’s enclosure that may be of sufficient magnitude to constitute a risk of electric shock to persons.
For U.S.A. This equipment has been tested and found to comply with the limits for a Class B digital device, pursuant to Part 15 of the FCC Rules. These limits are designed to provide reasonable protection against harmful interference in a residential installation. This equipment generates, uses, and can radiate radio frequency energy and, if not installed and used in accordance with the instructions, may cause harmful interference to radio communications.
Contents Thank you for choosing TEAC. Read this manual carefully to get the best performance from this unit. Before Using the Unit Read this before attempting any operations. < As the unit may become warm during operation, always leave sufficient space around the unit for ventilation. Before Using the Unit . . . . . . . . . . . . . . . . . . . . . . . . . . . . . . . . . . 5 Discs . . . . . . . . . . . . . . . . . . . . . . . . . . . . . . . . . . . . . . . . . . . . . . . . . . 6 Emergency Switch . . . .
Maintenance If the surface of the unit gets dirty, wipe with a soft cloth or use diluted neutral cleaning liquid. Be sure to remove any fluid completely. Do not use thinner, benzine or alcohol as they may damage the surface of the unit.
Discs Discs that can be played on this unit: < Commercial audio CD’s bearing the “Compact Disc Digital Audio” logo: < Properly finalized CD-R/CD-RW discs. Note: < Do not use 8 cm discs with this unit < Depending on the quality of the disc and/or the condition of the recording, some CD-R discs may not be playable. < Copy-protected discs and other discs which do not conform to the CD standard may not play back correctly in this player.
Emergency Switch MP3/WMA compatibility This unit can play MP3/WMA files recorded on a CD-R, CD-RW disc, or USB memory. Refer the instruction manual of software when making an MP3 or a WMA file using a PC. File information display The display of this unit can only show single-byte letters and numbers. If the disc cannot be ejected, remove the disc by following procedure. 1 During the power on, push the emergency switch (in the hole) on the bottom of the unit. The disc comes out. 2 Remove the disc.
Connections CAUTION: < Switch off (standby) the power before making connections. < Read the instructions of each component you intend to use with this unit. < Be sure to insert each plug securely. To prevent hum and noise, do not bundle the connection cords.
A FM antenna Connect the supplied FM antenna. Extend fully and position for the best reception and attach it to a window frame or wall with thumbtacks or the like. B AM loop antenna Connect the supplied AM loop antenna to the AM ANTENNA terminal. Place the antenna in the direction which gives the best reception. You can connect a portable audio player to this jack. See page 27 for details.
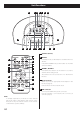
Unit Functions C D E F B G H A A R Q P O N M L K J I A Speakers (Stereo) e Q R C a F f g h b K G c B d I H i O j Note: To simplify explanations, instructions in this manual refer to the names of the buttons and controls on the front panel only. Associated controls on the remote control will also operate similarly. 10 B DISPLAY In standby mode, use this button to check the timer on/ off time. In CD, USB or TUNER mode, use this button to check the current clock time.
F FM/AM In TUNER mode, press this button to select FM or AM. a PRESET/SCROLL/FOLDER (‡/°) In TUNER mode, use these buttons to select a preset station. In iPod mode, use these buttons to scroll up and down the menu. b MENU In iPod mode, use this button to go back to the previous menu. H STOP (H) Use this button to stop playback. c BASS Use this button to enter bass level adjustment mode. I PLAY/PAUSE (y/J) Use this button to start or pause playback. d SLEEP Use this button to set sleep timer.
Display A B C D E F G L K G J I H A Lights in repeat, shuffle or intro mode. B Lights when the timer is on. C Lights during CD or USB playback. D When the unit is on, one of these indicators lights to show the current source. E Lights in programme mode or preset tuning mode. F Blinks during muting. G Lights when an FM stereo broadcast is tuned. H Lights when the sleep function is active. I Shows the digital clock, frequency, elapsed time, sleep time or preset channels, etc.
Getting Started When shipped, a cover is set on the iPod Dock of the unit. To use the iPod Dock, remove the cover and set an appropriate Dock adapter that matches your iPod or iPhone. iPhone The following two adapters are supplied with the unit. < For iPhone 4 < For iPhone 3GS, iPhone 3G iPod Use an adapter supplied with your iPod or available in the market.
Remote Control Unit The provided remote control unit allows the unit to be operated from a distance. When operating the remote control unit, point it towards the remote sensor on the front panel of the unit. < Even if the remote control unit is operated within the effective range (5 m), remote control operation may be impossible if there are any obstacles between the unit and the remote control unit.
Setting the Clock 5 Press the TIME button (. or /) to set the current minute. / MEMORY/CLOCK ADJ 1 In standby mode press the CLOCK ADJ button. “12 HR” or “24 HR” blinks on the display. If you want to change the hour mode, press the . or / button. 6 Press the CLOCK ADJ button. The clock starts. ENGLISH < When no button is pressed for 10 seconds, the timer setting mode will be cancelled. 2 Press the CLOCK ADJ button again. The “hour” value blinks. 3 Press the TIME button (.
Basic Operation Dimmer 2 1 3 1 Press the button to turn the unit on. You can change the front panel’s display brightness. Use the DIMMER button to change the brightness among three levels. < The unit turns on with the source that was last selected. If the iPod that is in playback mode is inserted into the Dock, the this unit will automatically turn on and start playback of the iPod. < This function will be cancelled when the pressed.
Adjusting the bass and treble sound You can change the bass and treble sound between “–5” to “+5”. Press the BASS or TREBLE button. And then press the VOLUME button (– or +) to adjust the sound level within 3 seconds. Sleep timer Each press of the SLEEP button permits setting an interval (from 15 up to 90 minutes). The unit will automatically turn off and then into Standby mode. Each press of the SLEEP button changes the time indication as follows.
Listening to CD/MP3/WMA (disc) < It takes a few seconds for the unit to load the disc. No buttons will work during loading. Wait until the total number of the tracks and the total playing time of the disc are displayed. < When no disc is loaded in the CD player, “NO DISC” is displayed. When a CD is loaded 1 2 3 total tracks total playing time 1 Press the FUNCTION button to select “CD”. When a MP3/WMA disc is loaded 2 Insert a disc with the printed label face up.
Listening to MP3/WMA (USB) 3 Press the PLAY/PAUSE button (y/J ) to start playback. Playback starts from the first file on the USB memory. 2 Plug your USB memory into the USB connector. < You can reverse steps 1 and 2 . < MP3/WMA files recorded out of folders are automatically put in the “001” folder, and playback starts from the first file of the 001 folder. < When the playback of all the files has finished, the unit stops automatically. < It takes a few seconds for the unit to load the USB memory.
Listening to CD/MP3/WMA (disc/USB) To skip to the next or a previous track/ file / To suspend playback temporarily (pause mode) During playback, press the SKIP button (.or/) repeatedly until the desired track/file is found. The selected track will be played from the beginning. In the stop mode, press the SKIP button (.or/) repeatedly until the desired track/file is found. Press the PLAY/PAUSE button (G/J) to start playback from the selected track/file. Press the PLAY/PAUSE button (G/J) during playback.
To display the MP3/WMA information Intro Playback You can listen to 10 seconds at the beginning of each track/file sequentially. While in stop mode, press the INTRO button. And then press the PLAY/PAUSE button (G/J). file name (scrolling) Press the INTRO button again to cancel the intro playback. TITLE (scrolling) ARTIST (scrolling) ALBUM (scrolling) folder number/file number (normal display) < File name and TITLE/ARTIST/ALBUM are displayed up to 30 characters from the head.
Programmed Playback 3 Press the FOLDER button (‡ or °) repeatedly to select a folder on a MP3/WMA disc or USB memory. < MP3/WMA files recorded out of folders are in the “001” folder. < Skip this step when playing a CD. 1 3 4 5 2 Up to 32 tracks/files can be programmed in the desired order. Shuffle function does not work during programmed playback. 1 Press the FUNCTION button to select “CD” or “USB”. 4 Press the SKIP button (.or/) repeatedly to select a track/file, then press the MEMORY button.
To add a track to the end of the programme When the unit is stopped, press the PROGRAM button repeatedly until “PXX” blinks on the display. Select a folder number using the MP3/WMA FOLDER button and a track/file number using a SKIP (. or /) button and then press the PROGRAM button. The track/ file is added to the end of the programme. MEMORY/CLOCK ADJ / To check the programmed order To overwrite the programme In the stop mode, press the MEMORY button repeatedly.
Repeat/Shuffle Playback Repeat one track Press the PLAY MODE button once during playback. “REPEAT” lights. The track/file being played back will be played back repeatedly. If you press the SKIP button (.or/) and select another track/file, the track/file you selected will be played back repeatedly. The tracks/files will be played back repeatedly or randomly. Select the play mode during playback. Or select the play mode in stop mode and press the PLAY/PAUSE button (G/J) to start playback.
Listening to iPod Insert the iPod into the Dock of this unit. < Make sure to use an appropriate Dock adapter (see “Getting Started” on page 13). Select “iPod” using the FUNCTION button. If an iPod is already docked, playback will start. When no iPod is docked, the iPod indicator on the display blinks. < The battery of the iPod is recharged to the full whenever the iPod is docked. 25 ENGLISH Then push the PLAY/PAUSE button (y/J) on the iPod or this unit.
Operating iPod To go back to the previous menu B C A A To suspend playback temporarily (pause mode) Press the MENU button. This button works with the same functions as its iPod counterpart. Select the menu item Press the PLAY/PAUSE button (G/J) during playback. Playback stops at the current position. To resume playback, press the PLAY/PAUSE button (G/J) again. B Search for a part of a track During playback, hold down the SKIP button (.
Listening to an External Source 1 Connect the PHONES jack (audio output jack) of a portable audio player to the AUX IN jack of this unit using the supplied stereo mini plug cable. 2 Select “AUX” using the FUNCTION button. ENGLISH You can use this way of connection to listen to an iPod that has no Dock connector or that has, but an appropriate Dock adapter is not available. 3 Play the source, and adjust the volume of both this unit and the audio player.
Listening to the Radio If the reception is poor For the best reception, rotate the FM or the AM antenna until you get stations clearly. FM MODE button 1 2 3 Pressing this button alternates between Stereo mode and Mono mode. 1 Select “TUNER” using the FUNCTION button. 2 Select FM or AM using the FM/AM button. Stereo FM stereo broadcasts are received in stereo and the “STEREO” indicator lights in the display. 3 Select the station you want to listen to (auto selection).
Preset Tuning You can programme 20 FM and 20 AM channel presets. How to select a preset station 1 To select FM or AM, press the FM/AM button. 1 Tune in a station you want to listen to (see page 28). < If the clock is displayed, press the DISPLAY button to display the current band and frequercy. 2 Press the MEMORY button. 3 Within 10 seconds, select a preset channel to store the station using the TUNING button (. or/). 4 Within 10 seconds, press the MEMORY button.
RDS The Radio Data System (RDS) is a broadcasting service which allows stations to send additional information along with the regular radio programme signal. RDS works on the FM waveband in Europe only. 1 Tune in an FM RDS station (see page 28). The RDS indicator lights and the Programme Service name (station’s name) appears on the display. 2 Press the RDS button.
RDS (PTY Search) PTY (Programme Type) 1 2 3 A station can be searched by this function. 1 Press the FM/AM button to select FM. desired PTY programme. 3 Within 5 seconds, press the TUNING button (. or /). Searching will start. < When the programme that you have selected is found, searching will stop and the programme type will be displayed. < If the same programme type is not found during PTY Search, it will stop at the beginning frequency. < If you want to stop searching, press the PTY button.
Timer 1 4 Press the TIME button (. or /) to set the hour, and then press the ALARM 1 button. ALARM 1, ALARM 2 / 5 Press the TIME button (. or /) to set the minute, and then press the ALARM 1 button. < The unit can be set two different timer setting separately. < Adjust the clock before setting the timer (see page 15). Setting the timer (ALARM 1) 1 Press and hold the ALARM 1 button for more than 2 seconds to display “ON TIME”. Now the off time is set. The source blinks.
To turn off the timer When you do not use the timer, press the ALARM 1 or ALARM 2 button to turn it off. DISPLAY ALARM 1, ALARM 2 To turn on the timer 1 After setting the timer, press the ALARM 1 or ALARM 2 button to turn the timer on. or The Timer indicator ( ) disappears from the display. Press the ALARM 1 or ALARM 2 button again to turn it on. The Timer indicator ( or ) appears on the display. 2 Prepare the source. When the source is set to “CD”, set a CD.
Timer 2 How to use the snooze function Specifications TUNER Section Frequency Range (North American Model) FM . . . . . . . . . . . . . . . 87.5 MHz to 108.0 MHz (100kHz step) AM . . . . . . . . . . . . . . . . . . . 530 kHz to 1720 kHz (10kHz step) Frequency Range (Europe model) FM . . . . . . . . . . . . . . . 87.5 MHz to 108.0 MHz (50kHz sterp) AM . . . . . . . . . . . . . . . . . . . . 522 kHz to 1629 kHz (9kHz step) SPEAKER SYSTEM Section Type . . . . . . . . . . . . . . . . . . . . . . . . . . . . .
Troubleshooting If you have problems with your system, look through this chart and see if you can solve the problem yourself before calling your dealer or TEAC service center. General iPod Player Cannot insert the iPod. e Check the dock adapter (see page 13). e Remove dust or obstacles from the Dock connector of this unit and the iPod, and insert the iPod again. Will not play. e Remove the iPod from the dock, wait a few seconds, and insert it again. e Software update may solve the problem.
Sommaire Nous vous remercions pour l’achat d’un appareil TEAC. Lisez ce manuel avec attention pour obtenir les meilleures performances possibles de cet appareil. Avant utilisation . . . . . . . . . . . . . . . . . . . . . . . . . . . . . . . . . . . . . .36 Disques . . . . . . . . . . . . . . . . . . . . . . . . . . . . . . . . . . . . . . . . . . . . . .38 Bouton de secours . . . . . . . . . . . . . . . . . . . . . . . . . . . . . . . . . . .39 Raccordements . . . . . . . . . . . . . . . . . . . . . . . .
Entretien Si la surface de l’appareil devient sale, essuyez-la avec un chiffon doux ou utilisez un liquide de nettoyage neutre dilué. Veillez à complètement retirer toute l’humidité. N’utilisez pas de diluant, de benzine ou d’alcool car ils risqueraient d’endommager la surface de l’appareil.
Disques Disques lisibles par cet appareil : < CD audio conventionnels portant le logo “Compact Disc Digital Audio” : < CD-R/CD-RW correctement finalisés. Remarque: < SN'utilisez pas de disque de 8 cm avec cet appareil. < Selon la qualité du disque et/ou la qualité de l’enregistrement, certains CD-R peuvent ne pas être lisibles. < Les disques protégés contre la copie et les disques non conformes à la norme CD peuvent ne pas être lus correctement par cet appareil.
Bouton de secours Compatibilité MP3/WMA Cet appareil peut lire les fichiers MP3/WMA enregistrés sur CD-R, CD-RW ou mémoire USB. Reportez-vous au mode d'emploi du logiciel quand vous créez un fichier MP3 ou WMA à l'aide d'un ordinateur. < Cet appareil peut lire les fichiers MP3 mono et stéréo au format MPEG-1 Audio Layer 3 et ayant une fréquence d'échantillonnage de 44,1 ou 48 kHz et un débit binaire de 320 kb/s ou moins.
Raccordements PRÉCAUTION: < Coupez l’alimentation avant d’effectuer les raccordements. < Lisez les instructions qui accompagnent chaque appareil que vous avez l’intention d’utiliser en association avec cet appareil-ci. < Veillez à insérer chaque prise à fond. Afin d’éviter les bruits et ronflements, ne regroupez pas les fils électriques.
A Antenne FM Branchez ici l'antenne FM fournie. Déployez-la complètement et positionnez-la sur un encadrement de fenêtre ou mur offrant la meilleure réception puis fixez-la en utilisant des punaises ou des accessoires similaires. B Antenne cadre AM Branchez l’antenne cadre AM fournie à la prise AM ANTENNA. Placez l’antenne dans la direction donnant la meilleure réception.
Fonctions de l’appareil B C D E F G H A A R Q P O NM L K e Q R C a F f g h b K G c B d I H i J I A Haut-parleurs (stéréo) B DISPLAY En mode de veille, utilisez cette touche pour vérifier l’heure d’activation/désactivation du réveil. En mode CD, USB ou TUNER, utilisez cette touche pour afficher l'heure actuelle. C ALARM 1, ALARM 2 Maintenez ces touches enfoncées pendant plus de 2 secondes pour passer en mode de réglage de réveil.
G MEMORY/CLOCK ADJ En mode CD ou USB, utilisez cette touche pour programmer des plages. En mode TUNER, utilisez cette touche pour mémoriser des préréglages de canaux. Cette touche sert aussi au réglage de l'horloge en mode de veille. H STOP (H) a PRESET/SCROLL/FOLDER (‡/°) En mode TUNER, utilisez ces touches pour sélectionner une station préréglée. En mode iPod, utilisez ces touches pour faire défiler le menu vers le haut ou vers le bas.
Afficheur A B C D E F G L K G J I H A S’allume en mode de lecture en boucle, aléatoire ou des intros. B S’allume quand le réveil est activé. C S’allume durant la lecture de CD ou USB. D Quand l’appareil est allumé, un de ces témoins s’allume pour indiquer la source actuelle. E S'allume en mode de lecture programmée ou de syntonisation préréglée. F Clignote quand le son est coupé (Muting). G S'allume lorsqu'une station d'émission stéréo FM est captée.
Pour démarrer À la sortie d'usine, un cache recouvre le dock pour iPod de l'appareil. Afin d'utiliser le dock pour iPod, retirez ce cache et placez un adaptateur de dock approprié à votre iPod ou iPhone. iPhone Les deux adaptateurs suivants sont fournis avec l'appareil.
Télécommande La télécommande fournie permet la commande à distance de l’appareil. Pour utiliser la télécommande, pointez-la vers le capteur de télécommande du panneau avant de l’appareil. < Même si la télécommande est employée à portée de fonctionnement (5 m), la commande à distance peut être impossible s’il y a des obstacles entre l'appareil et la télécommande. Précautions à observer concernant les piles < Placez bien les piles en respectant les pôles plus “+” et moins “_”.
Réglage de l’horloge 4 Appuyez sur la touche CLOCK ADJ. La valeur des “minutes” clignote. / MEMORY/CLOCK ADJ 5 Appuyez sur la touche TIME (. ou /) pour régler les minutes. 1 En mode de veille, appuyez sur la touche CLOCK ADJ. ”12 HR” ou ”24 HR” clignote sur l’afficheur. Si vous désirez changer le mode d'affichage de l’horloge, appuyez sur la touche . ou /. 6 Appuyez sur la touche CLOCK ADJ. L’horloge démarre.
Fonctionnement de base Dimmer (atténuateur) 2 1 3 1 Appuyez sur la touche pour allumer l’appareil. Vous pouvez modifier la luminosité de l'afficheur de la face avant. Utilisez la touche DIMMER pour choisir la luminosité entre trois niveaux. < L’appareil s’allume sur la dernière source sélectionnée. Si un iPod en mode de lecture est inséré dans le Dock, l'appareil s'allume automatiquement et entame la lecture de l’iPod.
Réglage du son des basses et des aigus Vous pouvez modifier le son des basses et des aigus entre “–5” et “+5”. Appuyez sur la touche BASS ou TREBLE. Appuyez ensuite sur une touche VOLUME (– ou +) pour régler le niveau sonore dans les 3 secondes. Minuterie d’extinction À chaque fois que vous appuyez sur la touche SLEEP, cela vous permet de spécifier l’intervalle (de 15 à 90 minutes) au terme duquel l’appareil s’éteindra automatiquement et basculera en mode de veille.
Lecture des CD/disques MP3/WMA < L’appareil met quelques secondes à charger le disque. Pendant le chargement, aucune touche ne fonctionne. Patientez jusqu’à ce que le nombre total de plages et le temps total de lecture du disque s’affichent. < Si aucun disque n’est chargé dans le lecteur de CD, “NO DISC” s’affiche. Lorsqu’un CD est chargé 1 2 3 nombre total de plages temps total de lecture 1 Ap p u ye z s u r l a t o u c h e FU N C T I O N p o u r sélectionner “CD”.
Lecture d’une clé MP3/WMA (USB) < N’employez PAS de disque dur USB à grande capacité avec cet appareil. 1 Ap p u ye z s u r l a t o u c h e FU N C T I O N p o u r sélectionner “USB”. 2 Branchez votre clé USB dans la prise USB. < Vous pouvez inverser les étapes 1 et 2 . 3 Appuyez sur la touche LECTURE/PAUSE (y/J) pour lancer la lecture. La lecture commence par le premier fichier de la clé USB.
Lecture des CD/disques et clés USB MP3/WMA Pour sauter au fichier/plage suivant ou précédent / Pour interrompre la lecture temporairement (mode de pause) Pendant la lecture, appuyez sur une touche de saut (.ou/) de manière répétée jusqu’à ce que vous trouviez le fichier/plage désiré. Le fichier/plage sélectionné est lu depuis le début. En mode d’arrêt, appuyez sur une touche de saut (. ou /) de manière répétée jusqu’à ce que vous trouviez le fichier/plage désiré.
Pour afficher les informations MP3/ WMA Lecture des intros Vous pouvez écouter tour à tour 10 secondes du début de chaque fichier/plage. En mode d'arrêt, appuyez sur la touche INTRO. Puis appuyez sur la touche LECTURE/PAUSE (G/J). Pendant la lecture d'un disque ou d'une clé USB de MP3/WMA, appuyez sur la touche MP3. Les informations sur le fichier actuel s’affichent comme suit : nom de fichier (défilement) Appuyez à nouveau sur la touche INTRO pour annuler la lecture des intros.
Lecture programmée 3 Appuyez sur la touche FOLDER (‡ ou °) de façon répétée pour sélectionner un dossier d'un disque ou d'une clé USB de MP3/WMA. < Les fichiers MP3/WMA enregistrés à l’extérieur des dossiers se trouvent dans le dossier “001”. < Ignorez cette étape si vous lisez un CD. 1 3 4 5 2 Vous pouvez programmer jusqu’à 32 fichiers/plages dans l’ordre désiré. La lecture aléatoire ne fonctionne pas pendant la lecture programmée.
Ajout de fichier/plage à la fin du programme MEMORY/CLOCK ADJ / Pour vérifier l’ordre de programmation En mode d’arrêt, appuyez de manière répétée sur la touche MEMORY. Le numéro de programme, le numéro de dossier et le numéro de fichier/plage s'affichent. À l'arrêt, appuyez de manière répétée sur la touche PROGRAM jusqu'à ce que “PXX” clignote dans l'afficheur. Sélectionnez un numéro de dossier MP3/WMA à l'aide de la touche FOLDER et un numéro de fichier/plage à l'aide d'une touche de saut (.
Lecture en boucle/aléatoire Répétition d’une plage Appuyez une fois sur la touche PLAY MODE pendant la lecture. “REPEAT” s’allume. Le fichier/plage en cours de lecture est lu en boucle. Si vous appuyez sur une touche de saut (.ou/) et sélectionnez un autre fichier/plage, le fichier/plage sélectionné est lu en boucle. Les fichiers/plages seront lus de manière répétée ou aléatoire. Sélectionnez le mode de lecture pendant la lecture.
Écoute de l’iPod Insérez l’iPod dans le dock de cet appareil. Ensuite appuyez sur la touche LECTURE/PAUSE (y/J ) de l’iPod ou de cet appareil. Cet appareil s'allumera automatiquement et entamera la lecture des morceaux de la liste musicale de l’iPod. Sélectionnez “iPod” avec la touche FUNCTION. Si un iPod se trouve déjà sur le dock, la lecture commencera. S’il n’y a pas d’iPod sur le dock, l’indicateur iPod de l’afficheur clignote.
Contrôle de l’iPod Pour revenir au menu précédent B C A A Suspendre temporairement la lecture (mode pause). Appuyez sur la touche MENU. Cette touche a les mêmes fonctions que celle de l’iPod. Pour sélectionner un élément de menu Appuyez sur la touche LECTURE/PAUSE (G/J) durant la lecture. La lecture s’arrête sur la position actuelle. Pour la reprendre, appuyez à nouveau sur la touche LECTURE/PAUSE (G/J). B Rechercher un passage de plage. Durant la lecture, maintenez enfoncée une touche de saut (.
Écoute d’une source externe 1 Reliez la prise PHONES (prise de sortie audio) d’un lecteur audio portable à la prise d’entrée auxiliaire AUX IN de cet appareil à l’aide du câble à mini-jack stéréo fourni. Vous pouvez employer cette méthode de connexion pour écouter un iPod sans connecteur pour dock ou dont l’adaptateur pour dock n’est pas disponible. sonore de cet appareil et du lecteur audio.
Écoute de la radio Si la réception est faible Pour la meilleure réception, tournez l’antenne FM ou AM jusqu’à ce que vous receviez clairement les stations. Touche FM MODE Appuyez sur la touche FM MODE pour alterner entre les modes STEREO et MONO. 1 2 3 1 Sélectionnez “TUNER” avec la touche FUNCTION. 2 Sélectionnez FM ou AM avec la touche FM/AM. STEREO Les émissions FM stéréo sont reçues en stéréo et le témoin “STEREO” s’allume dans l’afficheur.
Préréglage de stations Vous pouvez prérégler (“programmer”) 20 stations FM et 20 stations AM. Comment rappeler une station préréglée 1 Pour sélectionner FM ou AM, appuyez sur la touche FM/AM. 1 Réglez l’appareil sur une station que vous voulez écouter (voir les étapes pour cela en page 60). < Si l'horloge est affichée, appuyez sur la touche DISPLAY pour afficher la bande et la fréquence. 2 Appuyez sur la touche MEMORY.
RDS Le Radio Data System (système de données radio RDS) est un service de diffusion qui permet aux stations d’émettre des informations supplémentaires en même temps que le signal normal du programme radio. Le RDS ne fonctionne que sur la bande FM en Europe. 1 Réglez une station FM RDS (voir page 60). L’indicateur RDS s’allume et le nom du service de programme (nom de la station) s’affiche. 2 Appuyez sur la touche RDS.
RDS (recherche de type de programme PTY) PTY (Type de programme) 1 2 3 Une station peut être recherchée par le biais de cette fonction. 1 Appuyez sur la touche FM/AM pour sélectionner FM. pour sélectionner le type de programme désiré. 3 Dans les 5 secondes, appuyez sur une touche TUNING (. ou /). La recherche commencera. < Quand le type de programme sélectionné est trouvé, la recherche s’arrête et le type de programme s’affiche.
Réveil 1 4 Appuyez sur une touche TIME (. ou /) pour régler les heures, puis appuyez sur la touche ALARM 1. ALARM 1, ALARM 2 / < Deux réglages de réveil différents peuvent être définis séparément sur l'appareil. < Réglez l’horloge avant de régler le réveil (voir page 47). 5 Appuyez sur une touche TIME (. ou /) pour régler les minutes, puis appuyez sur la touche ALARM 1.
< Si la source est réglée sur “iPod” alors qu’il n’y a pas d’iPod, l’appareil passe en mode TUNER. < Si la source est réglée sur “TUNER”, à l’allumage de l’appareil, ce dernier se cale sur la dernière station sélectionnée. Pour couper le réveil DISPLAY ALARM 1, ALARM 2 Si vous n’utilisez pas le réveil, appuyez sur la touche ALARM 1 ou ALARM 2 pour le couper. Pour activer le réveil 1 Après avoir réglé l’heure de réveil, appuyez sur la touche ALARM 1 ou ALARM 2 pour activer le réveil.
Réveil 2 Comment utiliser la fonction de report de réveil Caractéristiques techniques Section SYNTONISEUR Plage de fréquences (modèle nord-américain) FM . . . . . . . . . . 87,5 MHz à 108,0 MHz (paliers de 100 kHz) AM . . . . . . . . . . . . . . 530 kHz à 1720 kHz (paliers de 10 kHz) Plage de fréquences (modèle européen) FM . . . . . . . . . . . 87,5 MHz à 108,0 MHz (paliers de 50 kHz) AM . . . . . . . . . . . . . . . 530 kHz à 1629 kHz (paliers de 9 kHz) Section SYSTÈME DE HAUT-PARLEURS Type . . . . . . .
Guide de dépannage Si vous avez des problèmes avec l’appareil, veuillez consulter ce tableau et voir si vous pouvez résoudre le problème vous-même avant de consulter votre revendeur ou un service après-vente TEAC. Généralités Pas d’alimentation e Vérifiez que l’appareil est branché à une prise de courant. Assurez-vous que la prise de courant n’a pas d’interrupteur. Si la prise a un interrupteur, assurezvous qu’il est en position de fonctionnement.
Índice Antes de utilizar la unidad Gracias por confiar en TEAC. Lea atentamente este manual para obtener el mejor rendimiento de la unidad. Lea estas instrucciones antes de intentar cualquier operación Antes de utilizar la unidad . . . . . . . . . . . . . . . . . . . . . . . . . . . .68 Discos . . . . . . . . . . . . . . . . . . . . . . . . . . . . . . . . . . . . . . . . . . . . . . . .70 Interruptor de emergencia . . . . . . . . . . . . . . . . . . . . . . . . . . . 71 Conexiones . . . . . . . . . . .
Mantenimiento Si se ensucia la superficie de la unidad, pase un paño suave o utilice jabón líquido normal diluido. Limpie cualquier resto líquido que pueda quedar en la unidad. No utilice aguarrás, bencina ni alcohol, ya que podría dañar la superficie de la unidad.
Discos Discos que se pueden reproducir en esta unidad: < CDs de audio convencionales que llevan el logotipo “Compact Disc Digital Audio”: < Discos CD-R/CD-RW finalizados de manera adecuada. Nota: < No utilice discos de 8 cm con esta unidad. < Dependiendo de la calidad del disco y/o de las condiciónes de la grabación, algunos discos CD-R no se pueden reproducir.
Interruptor de emergencia Compatibilidad MP3/WMA Esta unidad puede reproducir archivos MP3/ WMA grabados en un disco CD-R o CD-RW o en una memoria USB. Remítase al manual de instrucciones del software cuando cree un archivo MP3 o WMA usando un PC. < Es ta unidad pue de repro ducir archivos MP3 monoaurales y estéreo que estén en formato MPEG-1 Audio Capa 3 con una frecuencia de muestreo de 44.1 o 48 kHz y una velocidad de bits de 320 kbps o menor.
Conexiones PRECAUCIÓN: < Apague (ponga en reposo) todos los equipos antes de realizar las conexiones. < Lea las instrucciones de cada componente que pretenda usar con esta unidad. < Asegúrese de insertar bien los conectores. Para evitar ruidos y zumbidos, no agrupe los cables de las conexiones.
A Antena de FM Conecte la antena de FM suministrada. Extiéndala por completo y muévala hasta conseguir la mejor recepción. Después sujétela al marco de una ventana o a una pared con chinchetas o algo similar. B Antena de bucle de AM Conecte la antena de bucle de AM suministrada al terminal AM ANTENNA. Coloque la antena en la dirección que ofrezca la mejor calidad de recepción. C AUX IN En esta entrada puede conectar un reproductor de audio portátil. Más detalles en la página 91.
Funciones B C D E F G H A A R Q P O NM L K e Q R C a F f g h b K G c B d I H i O j Observación: Para simplificar las explicaciones, las instrucciones del manual se refieren únicamente a los nombres de los botones y controles del panel frontal. Los botones y controles correspondientes del mando a distancia funcionan de la misma manera.
F FM/AM En modo TUNER, use este botón para seleccionar AM o FM. G MEMORY/CLOCK ADJ En los modos CD o USB, use este botón para programar pistas. En el modo de sintonizador TUNER, use este botón para guardar una presintonía en la memoria. Este botón también se utiliza para el ajuste del reloj cuando la unidad está en modo de reposo (apagada). H Parada (H) Utilice este botón para detener la reproducción. I Reproducción/Pausa (y/J) Use este botón para iniciar la reproducción o ponerla en pausa.
Pantalla A B C D E F G L K G J I H A Se ilumina en los modos de reproducción repetida (repeat), reproducción aleatoria (suffle) o reproducción de principios (intro). B Se ilumina cuando está programado el temporizador de encendido (ALARM 1/ALARM 2). C Se ilumina durante la reproducción de CD o USB. D Con la unidad encendida, uno de estos indicadores se ilumina para identificar la fuente seleccionada. E Se ilumina en modo de programa o modo de sintonización de presintonías.
Preparación Cuando sale de fábrica, esta unidad lo hace con una tapa puesta en la base Dock donde se conecta el iPod. Para usar la base Dock para iPod, quite la tapa y coloque un adaptador de base Dock apropiado que valga para su iPod o iPhone.
Mando a distancia El mando a distancia suministrado le permite controlar la unidad a distancia. Cuando utilice el mando a distancia, diríjalo hacia el sensor remoto en el panel frontal de la unidad. < Aunque se utilice la unidad dentro del margen de funcionamiento efectivo (5 m), es imposible controlarla a distancia si hay obstáculos entre el reproductor y el mando a distancia.
Ajuste del reloj 5 Pulse los botones TIME (. o /) para ajustar los minutos actuales. / MEMORY/CLOCK ADJ 1 Con la unidad en modo de reposo (apagada) pulse el botón CLOCK ADJ. Parpadea ”12 HR” o ”24 HR”. Si desea cambiar el modo horario, pulse el botón . o /. 6 Pulse el botón CLOCK ADJ. El reloj comenzará a funcionar. < Cuando no se pulsa ningún botón durante 10 segundos, el modo de ajuste del temporizador se cancela. 2 Pulse el botón CLOCK ADJ otra vez. Parpadeará el valor de ”las horas”.
Funcionamiento básico Intensidad luminosa 2 1 3 1 Pulse el botón para encender la unidad. < La unidad se enciende con la última fuente de sonido seleccionada. Si en la base Dock se inserta un iPod en modo de reproducción, esta unidad se enciende automáticamente y comienza la reproducción del iPod. < Si inserta un disco mientras esta unidad está apagada (en reposo), se encenderá automáticamente y comenzará la reproducción del disco. 2 Pulse el botón FUNCTION para seleccionar una fuente de sonido.
Ajuste de graves y agudos Puede cambiar los sonidos graves y agudos en una escala de “–5” a “+5”. Pulse los botones BASS (graves) o TREBLE (agudos). Y a continuación pulse los botones de VOLUME (–/+) para ajustar el nivel de sonido en los siguientes 3 segundos. Temporizador de apagado Al pulsar repetidamente el botón SLEEP se puede ajustar un intervalo (desde 15 hasta 90 minutos) después del cual se apagará la unidad automáticamente y cambiará a modo de apagado (reposo).
Escuchar CD/MP3/WMA (en disco) < La unidad tarda unos segundos en cargar el disco. Ningún botón funcionará durante la carga. Espere hasta que aparezca el número total de pistas y el tiempo total de reproducción del disco. < Cuando no se coloca ningún disco en el reproductor, en la pantalla aparece “NO DISC” (no hay disco). Cuando hay un CD cargado 1 2 3 Número total de pistas Tiempo total de reproducción 1 Pulse el botón FUNCTION para seleccionar “CD”.
Reproducción MP3 (USB) < NO puede utilizar un disco duro USB de gran capacidad con esta unidad. 1 Pulse el botón FUNCTION para seleccionar “USB”. 2 Conecte su memoria USB al terminal USB. < Se pueden invertir los pasos 1 y 2 . 3 Pulse el botón de Reproducción/Pausa (y/J ) para comenzar la reproducción. La reproducción comienza desde el primer archivo de la memoria USB.
Escuchar CD/MP3/WMA (en disco/USB) Para saltar a la pista/archivo siguiente o a la anterior / Para suspender la reproducción temporalmente (modo de pausa) Durante la reproducción, pulse uno de los botones de Salto (.o/) de manera repetida hasta que encuentre la pista/archivo deseado. La pista seleccionada se reproducirá desde el inicio. Con la reproducción parada, pulse uno de los botones de Salto (.o/) de manera repetida hasta que encuentre la pista/archivo que desee escuchar.
Para ver en pantalla la información de MP3/WMA Reproducción de los principios Usted puede escuchar los 10 segundos iniciales de cada pista/archivo secuencialmente. Con la reproducción detenida, pulse el botón INTRO y a continuación el botón de Reproducción/Pausa (G/J). Durante la reproducción de un disco MP3 o de una memoria USB, pulse el botón MP3.
Reproducción programada 3 Pulse uno de los botones FOLDER (‡ o °) repetidamente para seleccionar una carpeta de un disco MP3/WMA o de una memoria USB. < Los archivos MP3/WMA grabados fuera de carpetas irán a la carpeta “001”. < Salte este paso cuando se reproduzca un disco CD. 1 3 4 5 2 Se pueden programar hasta 32 pistas/archivos en el orden deseado. La función de reproducción aleatoria no funciona durante la reproducción programada.
Añadir una pista/archivo al final del programa MEMORY/CLOCK ADJ / Con la reproducción detenida, pulse el botón PROGRAM repetidamente hasta que en la pantalla parpadee “PXX”. Seleccione un número de carpeta usando uno de los botones FOLDER y un número de pista/archivo usando uno de los botones de Salto (. o /) y a continuación pulse el botón PROGRAM. La pista/archivo se añadirá al final del programa.
Reproducción repetida/aleatoria Repetir una pista Pulse el botón PLAY MODE una vez durante la reproducción. Se enciende “REPEAT” en la pantalla. La pista/archivo que se está reproduciendo se volverá a reproducir de manera repetida. Si se pulsa un botón de Salto (.o/) y se selecciona otra pista/archivo, la pista/archivo que seleccionó se reproducirá de manera repetida. Es posible reproducir las pistas/archivos en modo de repetición o en modo aleatorio.
Escuchar un iPod Inserte el iPod en la base Dock de esta unidad. Después pulse el botón de Reproducción/Pausa (y/J) del iPod o de esta unidad. Esta unidad se apagará automáticamente y comenzará a reproducir la lista de canciones del iPod. < Asegúrese de usar un adaptador apropiado para la base Dock (véase “Preparación” en la página 77). Selección del modo iPod Seleccione “iPod” con el botón FUNCTION. Si ya hay un iPod conectado a la base Dock, se iniciará la reproducción.
Control del iPod Retroceder al menú anterior B C A A Interrumpir momentáneamente la reproducción (pausa) Pulse el botón MENU. Este botón tiene las mismas funciones que el mismo botón del iPod. Elegir una opción de menú Pulse el botón de Reproducción/Pausa (G/J) durante la reproducción. La reproducción se detiene en la posición actual. Para reanudar la reproducción, pulse de nuevo el botón de Reproducción/Pausa (G/J).
Audición de una fuente externa 1 Conecte la salida de auriculares PHONES (salida 3 Reproduce la fuente sonora y ajuste el volumen de audio) de un reproductor de audio portátil al terminal AUX IN del SR-L250i utilizando el cable con mini-jack estéreo suministrado. tanto de esta unidad como del reproductor de audio. Puede usar este método de conexión si el iPod no dispone de conector para la base Dock o, en caso de que lo tenga, si no dispone de un adaptador adecuado.
Escuchar la radio Si la recepción de FM o AM es de baja calidad Para disfrutar de la mejor recepción, gire la antena hasta que las emisoras se sintonicen nítidamente. Botón FM MODE 1 2 3 Pulse este botón para conmutar entre los modos estéreo y monoaural. 1 Seleccione “TUNER” con el botón FUNCTION. 2 Seleccione FM o AM con el botón FM/AM. STEREO (estéreo) Las emisiones de FM estéreo se reciben en estéreo y el indicador “STEREO” se ilumina en la pantalla. 3 Selección automática de una emisora.
Presintonías Puede almacenar emisoras de FM y AM en los canales del 1 al 20. Cómo seleccionar presintonías 1 Pulse el botón FM/AM para seleccionar FM o AM. 1 Sintonice una emisora (ver página 92). < Si en pantalla aparece el reloj, pulse el botón DISPLAY para visualizar la banda y frecuencia. 2 Pulse el botón MEMORY. 2 Pulse los botones PRESET (‡/°) en el mando a distancia repetidas veces hasta localizar la presintonía deseada.
RDS El sistema RDS es un servicio que permite a las emisoras enviar información adicional junto con la señal habitual de la programación de radio. 1 Sintonice una emisora de FM con RDS (ver página Señal horaria (CT) de RDS La configuración del reloj se ajustará automáticamente con los datos CT. Si sintoniza una emisora RDS que emita datos CT incorrectos, es posible que el reloj se ajuste incorrectamente y que llegue a afectar al funcionamiento del temporizador. 92).
RDS (búsqueda PTY) 1 2 3 Esta función permite buscar emisoras por tipo de programa. 1 Pulse el botón FM/AM para seleccionar FM. 2 Pu lse e l b otón P T Y re p e t id am e nte para seleccionar el tipo de programa. (. o /). Se iniciará la búsqueda. < Cuando se localiza el programa seleccionado, la búsqueda se interrumpe y el tipo de programa se visualiza en la pantalla. < Si no se encuentra el mismo tipo de programa durante la búsqueda PTY, se detendrá en la frecuencia inicial.
Temporizador de encendido 1 4 Pulse los botones TIME (. o /) para ajustar la hora y, a continuación, pulse el botón ALARM 1. ALARM 1, ALARM 2 / 5 Pulse los botones TIME (. o /) para ajustar los minutos y, a continuación, el botón ALARM 1. < La unidad puede ajustarse a dos opciones diferentes de alarma independientemente. < Ponga el reloj en hora antes de programar el temporizador de encendido (ver página 79).
< Si se ha seleccionado “iPod” como fuente pero no hay un iPod conectado, la unidad cambiará al modo TUNER. < Si se ha seleccionado “TUNER” como fuente, la unidad se pondrá en funcionamiento con la última emisora sintonizada. Para desactivar el temporizador DISPLAY ALARM 1, ALARM 2 Si no va a utilizar el temporizador de encendido, pulse el botón ALARM 1 o ALARM 2 para desactivarlo. Para activar el temporizador 1 Una vez programado el temporizador, pulse el botón ALARM 1 o ALARM 2 para activarlo.
Temporizador de encendido 2 Especificaciones Cómo utilizar la función Snooze (interrupción del temporizador de encendido) Sección de sintonizador Margen de frecuencias (modelo para Norteamérica) FM . . . . . . . . . . . . . 87,5 MHz-108,0 MHz (pasos de 100kHz) AM . . . . . . . . . . . . . . . . . 522 kHz-1620 kHz (pasos de 10kHz) Margen de frecuencias (modelo para Europa) FM . . . . . . . . . . . . . . 87,5 MHz-108,0 MHz (pasos de 50kHz) AM . . . . . . . . . . . . . . . . . .
Solución de posibles fallos Si tiene algún problema con su equipo, busque en esta página y verá si puede resolver el problema usted mismo antes de llamar a su distribuidor o al centro de servicio de TEAC. En general No hay corriente. e Verifique la conexión a la toma de electricidad. Verifique y asegúrese que la toma de electricidad no es una toma con interruptor, y si lo es, que el interruptor esté encendido.
Z TEAC CORPORATION 1-47 Ochiai, Tama-shi, Tokyo 206-8530 Japan Phone: (042) 356-9156 TEAC AMERICA, INC. 7733 Telegraph Road, Montebello, California 90640 U.S.A. Phone: (323) 726-0303 TEAC CANADA LTD. 5939 Wallace Street, Mississauga, Ontario L4Z 1Z8, Canada Phone: (905) 890-8008 TEAC MEXICO, S.A. DE C.V. Río Churubusco 364, Colonia Del Carmen, Delegación Coyoacàn, CP 04100, México DF, México Phone: (5255)5010-6000 TEAC UK LTD.