WAP-AR100 WAP-AX100 WAP-AX250 Wireless Audio Player INSTRUCTION MANUAL
Copyright Notices Copyright (c) 2009 by TEAC Europe GmbH – All Rights Reserved. The Product “TEAC WAP-AR100, -AX100, -AX250“ (hereinafter referred to as the "Product") includes Open-Source software packages. These Open-Source software packages are subject to specific licenses, disclaimers and notices, which are reproduced on the CD-ROM provided with the Product (see “Licenses.txt”).
Contents Copyright Notices....................................................................................................... 2 After unpacking.......................................................................................................... 5 Controls and connectors............................................................................................6 Assembly ...................................................................................................................
Network Interface..................................................................................................... 36 WLAN Settings......................................................................................................... 36 IP Settings for LAN and WLAN.................................................................................36 Troubleshooting........................................................................................................
Dear User, we are pleased that you have chosen a wireless audio player from TEAC and congratulate you on this choice. With your TEAC WAP-AR100/-AX100/-AX250 you have acquired a modern piece of wireless audio technology that is in equal measure attractive and of high quality. We are sure that this product will provide useful service and a lot of fun over the coming years. ... your TEAC team! After unpacking After unpacking you should first check that the contents are complete.
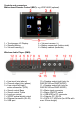
Controls and connectors Bidirectional Remote Control (BRC): e.g.
17 = Status LED 18 = Volume - button red ~ Standby 19 = Muting button green ~ Ad-Hoc (direkt) Mode 20 = Volume + button blue ~ Network Mode (LAN/WLAN) flashing green/blue ~ Configuration Mode 7
Assembly Switching standby on/off as well as volume can be done by the buttons on top of the BRC.
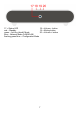
BRC stand usage and battery charge The BRC (optional accessory) contains a powerful rechargable Lithium Ion battery, which allows many hours of wireless operation for the WAP system, due to high battery capacity and the integrated power saving management of the BRC. Before first wireless BRC usage, the battery requires recharging. Connect the BRC power supply to the backside connector of the stand. The BRC can be operated while placed in the stand.
Initial System Setup By the following initial system setup, you will connect the BRC and the SMR to each other and to your network and also do basic settings to prepare the operation. The data interchange between BRC and SMR of the WAP is realized by a WLAN connection. Benefits of the WLAN connection are the definite identification between the connected partners and the transmission by radio signals, which do not require visible connection between transmitter and receiver and offer a wide operation area.
● ● Next, you have the possibility to rename the SMR according to its place in the system, e.g. “Livingroom”. Select “Yes” and input the desired name for the SMR device and confirm by the “return” button. Now, the Network Type screen appears. The Network Type screen offers you 3 wizards and two manual choices to easily setup WAP.
1. Wired Network (LAN) Wizard: If the SMR is connected to a LAN network (DHCP), the BRC directly controls the SMR by WLAN connection (ad-hoc mode). Connect the Ethernet cable from Router to the SMR and select the LAN wizard. The network wizard now transmits the settings to the selected SMR and the SMR connects to the network. During this procedure you can see the SMR screen again. After few seconds you can read a message window “SMR connected!“. Now, the BRC also connects itself to the network.
2. Wireless Network (WLAN) Wizard: SMR and BRC are each connected to a WLAN Network Router or Access-Point. Chose the Wireless (WLAN) Network Wizard If you chose this option, you will see the “Select AP” screen where you can chose the WLAN (DHCP) to connect to. Select your router/AP from the list. You will be prompted to confirm to change to the selected network. Press on “Yes”.
Next, you will see the virtual keyboard to input your WLAN security password. Input the password. Please care for upper- and lowercase letters. Then confirm by touching the “return” button field. The network wizard now transmits the settings to the selected SMR and the SMR connects to the network. During this procedure you can see the SMR screen again. After few seconds you can read the message window “SMR connected!“. Now, the BRC also connects itself to the network.
3. No Network Wizard: If the WAP will NOT connect to any network, the BRC controls the SMR by a direct (so-called “ad-hoc”) WLAN connection. Operation without network connection just allows to use the USB playback function. Select the “No Network Wizard”. The network wizard now transmits the settings to the selected SMR. During this procedure you can see the SMR screen again. After few seconds you can read the message window “SMR connected!“. Now, the BRC also connects itself to the SMR.
4. Manual settings for LAN or WLAN: this offers individual settings without guidance by a “wizard”. For experienced users or if your network offers specific requirements like manual Wlan security and IP settings etc. Example: manual WLAN setting ● After above Network Type setting is finished, BRC and SMR are connected and the main screen will be displayed. The LEDs on the SMR stop flashing.
Notes: Just after power on the SMR, it may take some waiting period to boot up and recognize the device by BRC, until it is available in the SMR listing. The SMR will be ready for playback when the LED indicates static green (Ad-Hoc) or static blue (LAN and WLAN) light. If you power on the SMR mains and the BRC at the same time, the BRC is ready much earlier than the SMR and cannot connect to the SMR though. The BRC will then show a message window.
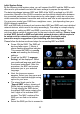
Operation The main screen contains several areas: options- and status area (headline) – functions area (below) ● Options keys – these three buttons change their function dependant from actual screen. In main screen: Settings: settings for display, date/time, network and upgrading. Multiroom: Directly opens the device list for selecting the SMR device to control. Choice from multiple SMRs if available. Playback functions: Stop/Play/+Playlist depending the actual playback.
Audio Server operation For browsing media server content and choose tracks to play. When searching through the lists during playback, light touching the button “BACK“ (top left corner) brings you back to the previous screen. The scroll bar offers quick scrolling up/down in the list. The scroll arrows move the scrollbar up/down. Select the desired contents by simply touching it. When you touch the magnifier symbol, you can search for track, artist etc.
Auto-fullcover mode: after some seconds of playback without any touch on screen, the cover fullscreen display appears. Here you can also skip to previous/next track by the skip buttons. By touching on the cover picture, you will return to the playback menu.
USB/SATA-HDD Audiomanager disk content browsing and tracks playback. The USB Audiomanager integrated in the WAP offers comparable comfort to an audioserver, for precisely sorted access to your USB audio data by the ID3 contents stored in your audio files. Note: USB input has disk insertion auto-detection. Please wait until you find the green marking in the USB icon of the BRC main screen before using this function.
which searches for changes in the directories to add them to the database. If a complete new parsing of all files is required, you can delete ort rename the MediaDB directory on your USB storage device. If there is no MediaDB, the initial parsing procedure will proceed. Direkt-/Playlist toggle function This item toggles the function mode between “direct playback” and “playback from playlist”.
Internet Radio By WAP, you can listen to Internet Radio stations without the help of a PC. You can store your favorite stations for quick access and even „record“ the current Internet Radio contents to a connected USB storage! Note: Make sure your WAP is well connected to your network! Scroll through the lists and touch the entry of the desired station for playback. By touching the magnifier symbol you can search for desired stations. Simply input the station name and confirm by “return“ key.
Aupeo!: This is another kind of webradio service (www.aupeo.com), providing you selectable playlists of artists, genres or moods on your choice. Blue dot stations are free service but yellow stars require subscription by Aupeo! You may use the free limited service as installed or order the full Aupeo! service at a low cost. Auto-fullcover mode: after some seconds of playback without any touch on screen, the station cover fullscreen display appears.
My Favorites (station memory) your personal preselection. Browse “My Favorite Stations” list, as you have previously saved from internet radio playback screen. From optional FM radio tuner you can store FM stations into a separate FM favorites list and name each station individually. Adding stations to the My Favorites list: ● During radio playback you can open the options menu by pressing the “+“ button. By this function, you can store the actual playing station url for quick access.
Line Input the line input provides connection to any external audio device, like e.g. a CD player for playback through your WAP.
Special functions Balance Control When pushing the volume buttons (3 or 4) a popup window appears, showing the actual volume setting position through a bar graph. Right above the volume bar in this window, there is a double speaker symbol. Press on the symbol to change over to balance control function. The function of the volume control buttons as well as the popup window will change for balance function. You can now shift the balance of the audio channels by the volume buttons (3 or 4) from left to right.
NOTE: for the recording function, an USB/SATA storage with free available memory connected to the SMR is required! The USB storage must not be separated from SMR during the recording session! ATTENTION: please consider the recording requires – depending from datastream quality – apprx. 0.5-3 MB memory per minute! It is recommended to provide plenty of USB storage memory when starting a recording! ● Start Internet Radio playback as explained above. ● To start the recording, touch the “Record“ button.
If you require renaming, cutting and transcoding of a recording file, this can easily be done with your USB storage connected to a PC. There are numerous audio editing programs available from commercial and from free sources. A famous example of a free Audio Editor is “Audacity“. Import of Internet Stations by USB storage Create/Add your own Internet radio URL entries. This function needs Windows™ Media Player or WinAmp™ application program.
● ● Now you can browse the WPL/M3U files by WAP and select them for playback: scroll on the file and touch the list entry. The included internet radio station url will be called for playback. As final step you can easily - as usual - store the station to your My Favorites list in your WAP, as described in section Internet Radio. Harddisk Slot The harddisk slot of your WAP is provided to hold one optional 2,5“ SATA harddisk (2.5“ Sata HDD with max. 9.
● Attention: the end of the harddisk shall be facing out of the back panel of the SMR for apprx. 15mm (depends on model), to make it easy to pull out the HDD if required! Never press in the HDD by strong force! Re-install the HDD slot cover to protect the HDD.
SMR Settings Provide all SMR settings: Date & Time Touch the NTP checkbox to enable/disable the network time synchronization. Check/uncheck for daylight saving time setting. Scroll the Time Zones and touch to select your appropriate time zone. In case you do not use the NTP function (NTP deactivated), you can set the system time and date manually. Additionally, under time you can select the format of 12 or 24 hours time display. Language here you can select your preferred display language.
Maintenance The Maintenance menu shows the device name and the actual firmware informations of your System. In the Maintenance menu you can rename the SMR, update the system's firmware, reset the system to factory defaults and backup your settings including all entries of My Favorites list to your USB storage device. Name Let your system have a useful name, for clear identification in a multiroom environment. Upgrade: firmware (F/W) upgrade of SMR and BRC. ● Download the new firmware from www.teac.
Reset With this entry, the SMR can be reset to the factory defaults and then it returns to Config mode (green/blue flashing LED). You will be prompted to confirm to reset the system, for security reasons. Attention: all Settings and the favorites will be erased by the reset! Tip: before reset, proceed a USB backup of your settings. Note: After the reset, the startup wizard will be available to guide you through the basic settings. Config.
Information here you will find informations concerning firmware and maintenance, license info, network info and a RESET function for the BRC. Search SMR If the SMR LED shows green/blue flashing during config mode, you can search for the SMR for new configuration. The SMR just appears in this screen when in config mode! If the SMR is already configured for network or ad-hoc connection, yu can find it in the „Select SMR“ screen.
Manual network settings Network Interface You have the choice between LAN (via Ethernet cable) and WLAN (wireless). For return to Network settings main menu simply touch the arrow left from the choice list. Not available items will be greyed out. WLAN Settings Here are the settings for your WLAN: SSID: input the SSID Security: you can select the security options here. No Security: WEP and WPA functionality is switched off! WEP: enter the WEP security key. When the key is complete, touch the ENTER button.
Troubleshooting Often after time spent troubleshooting, the problem is traced to something as simple as a loose connection. Check the following before proceeding to the problemspecific solutions. COMMON PROBLEMS AND SOLUTIONS ● Use some other electrical device to confirm that the electrical outlet is working. ● Make sure both devices (BRC and SMR) are powered on, ensure you see the LEDs of the SMR and the Display of the BRC light up... ● Ensure all connecters are securely attached.
Unfortunately, there are some external, portable 2.5“ USB storages which have requirements exceeding the USB standards (e.g. too high current consumption), which causes no recognition between the USB storage and the SMR USB ports or the USB storage cannot boot up, even if this storage can be operated connected to a PC without separate power supply for the storage.
Wireless: ● Check the signal strength is acceptable. ● Check the WLAN security setting, if enabled, is correct. ● Follow steps of static wired connection to confirm the IP address is properly configured. PROBLEM: WINDOWS SECURITY ALERT IS DISPLAYED AT STARTUP.
Advice on location, care and safety ● To connect your WAP with power supply system, please make sure to have a socket close to your sound-system. ● If the WAP is not in use for a longer period of time, be sure that the power source is disconnected from your system. ● Do not use alcohol, benzene, thinner or acids to clean the cabinet. ● Do not place your WAP near radiators, airconditioning or radio-controlled systems.
● ● ● ● ● ● ● Prior to take batteries out of the unit, you have to switch off the device and disconnect it from the charging adapter. Check charging adapters for their model number prior using it for charging the device. Avoid losses of data by regularly making backups of your data. Do not open the cabinet, contact qualified personnel only. For service staff: Never open cabinet, when speaker system is connected to 230 V AC power supply system.
Specifications ● Wireless audio player with bidirectional data radio display remote control (optional available) ● Colour LC touchscreen for function and track informations (ID3 tags, album cover, file name etc.) ● Rechargeable Lithium-Ion battery included, user-replacable ● On/Standby, mute and volume by separate device buttons and all functions also controlled via bidirectional remote control ● Audioserver playback: UPnP and DLNA compatible client ● Internet Radio Stations acces, Podcasts etc.
CE – Declaration of conformity We herewith declare, the TEAC Wireless Audio Player WAP-AR100, WAP-AX100 and WAP-AX250 complies with the following norms or normative documents: EMC Directive 1999/5/EC EN 301 489-1 V1.8.1:2008-04, EN 301 489-17 V2.1.