
User Manual


23
:: Tuning Tips
Tips for Beginners:
Before making any changes to the standard setup, make sure you can get around the track without crashing.
Changes to your vehicle will not be beneficial if you can’t stay on the track. Your goal is consistent laps.
Once you can get around the track consistently, start tuning your vehicle. Make only ONE adjustment at a time, testing
it before making another change. If the result of your adjustment is a faster lap, mark the change on the included setup
sheet (make adddtional copies of the sheet before writing on it). If your adjustment results in a slower lap, revert back
to the previous setup and try another change.
When you are satisfied with your vehicle, fill in the setup sheet thoroughly and file it away. Use this as a guide for future
track days or conditions. Peridicaly check all moving suspension parts. Suspension components must be kept clean
and move freely without binding to prevent poor and/or inconsistent handling.
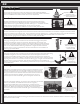
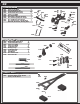
Slipper Clutch:
The assembly instructions give you a base setting for your clutch. Turn the nut on the shaft so that the end of the top
shaft is even with the outside of the nut, then tighten with three more turns. At the track, tighten or loosen the nut in
1/8 turn increments until you hear a faint slipping sound for 1-2 feet on takeoffs. Another popular way to set the clutch
is to hold both rear tires firmly in place and apply short bursts of throttle. If the clutch is properly set, the front tires
should lift slightly up off the surface.
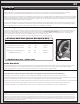
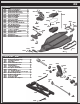
Motor Gearing:
Proper motor gearing will result in maximum performance and run time while reducing the chance of overheating and
premature motor failure. The gear ratio chart lists recommended starting gear ratios for the most widely used
motor types. Gear ratios will vary depending upon motor brand, wind, and electronic speed control. Consult your
motor and electronic speed control manufacturers for more information.
Team Associated is not responsible for motor damage due to improper gearing.
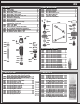
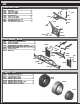
Set The Gear Mesh:
You should be able to rock the spur gear back and forth in the teeth of the pinion gear without making the pinion gear
move. If the spur gear mesh is tight, then loosen the #31531 screws and move the motor away, then try again.
A gear mesh that is too tight or too loose will reduce power and damage the gear teeth.
Motor Maintenance:
Brushed motors require frequent maintenance to keep performance levels at their maximum.
Periodically, remove the brushes from their holders and inspect the tips for wear or burning. If there is
noticeable wear (less than 75% of the brush remaining), replace the brush with a new pair. If the tips become a burned
blue color, the lubricant in the brush has been burned away and new brushes should be installed.
Occasionally, the motor should be cleaned with a soft brush to prevent dirt build up around the brush hood area and ball
bearings. At this time, it is a good idea to add one drop of bushing / bearing oil to each bushing or ball bearing.
If using a brushless motor, please refer to the motor manufacturer’s guidelines for proper maintenance.
16
*28
*26
*24
18
Pinion
87
*75
*75
87
87
Spur
14.13:1
6.96:1
7.50:1
9.42:1
12.57:1
Final Drive Ratio
Radon Motor
17.5 Reedy Sonic Brushless
13.5 Reedy Sonic Brushless
10.5 Reedy Sonic Brushless
3300kV Brushless
Motor
* Optional spur gear / pinion used
SC10 Gear Ratio Chart (Internal Gear Ratio 2.60:1)