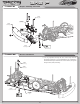
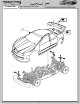
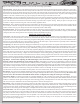
BAG F STEP F-01 Bumper Assembly and Install 22 A4239 Body Post A4239 Upper Bumper A4234 Foam Bumper 4 x1 L 4-40 x 3/16” 33 A4239 11 Lower Bumper STEP F-02 x8 4-40 x 3/8” Receiver Installation • It is very important to keep the servo wires away from the drivetrain components. It is recommended to use a small piece of double-sided tape to hold the wire to the Chassis, away from the Spur Gear, Belt, and Pulley.
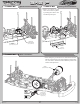
BAG F STEP F-03 STEP F-04 Speed Control Installation Battery Foam Installation • Secure the Speed Control Wires to the Rear Top Plate by sticking them down with two Battery Foam pads. A4004 Double-Sided Tape (Cut to Desired Size) Electronic Speed Control (NOT SUPPLIED) A4320 Battery Foam STEP F-05 Motor Installation • When setting the gear mesh, leave a small amount of backlash for proper function.
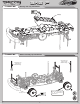
BAG F STEP F-06 Battery and Tray Installation x2 4-40 x 3/8” A4308 Battery Tray STEP F-07 Wheel and Body Clip Installation Place Body Clip in hole #11 for SKODA2 Body Place Body Clip in hole #5 for SKODA2 Body A7807 Dish Wheel, 24mm x2 L 8-32 x 11/32” Mount the Tires of choice per the manufacturer’s specifications L LL RR 17
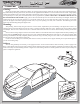
BAG F STEP F-08 Body Painting and Mounting Painting: Prepare the Lexan® Body and Wing for painting by washing them thoroughly (inside and out) with warm water and liquid detergent. Dry both the Body and Wing with a clean, soft cloth. Use the supplied Window Masks to cover the windows from the inside. A high-quality masking tape should be used on the inside of the Body to mask off any stripes, panels, or designs that you wish to paint on the Body or Wing.
BAG F STEP F-09 Bag F Completed Assembly x2 4-40 x 5/16” Al A8063 Skoda2, Body and Wing x2 FL 4-40 x 1/4” 19
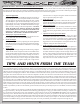
CHECKLIST BEFORE RUNNING YOUR NEW JRX-S EXPERT RACING SEDAN for the first time, you should run down the following checklist in order and complete the listed tasks. We’re sure you’re anxious to get out and run your new JRX-S now that its built, but please note that fine tuning of the initial setup is an essential part of building a high performance racing sedan such as your new JRX-S. Following this simple Checklist and the Team Tips will help to make the first run with your new car much more enjoyable. 1.
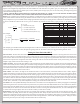
SETUP GUIDE Motor Gearing: The important thing is to keep the motor in its optimal RPM range as much as possible around the entire track. This will depend on the straight-away length and the size of the infield turns. The chart below is a guide to give you a starting point. You may want to try gearing up (larger pinion or smaller spur) or down (smaller pinion or larger spur), one size at a time, noting the straight-away speed and acceleration through the infield.
SETUP GUIDE Front Droop: Droop is the amount of down-travel that the suspension has. It is adjusted with the set screw from the top of the arm. Droop is easily measured by removing the front tires and setting the chassis on the droop gauge (included) so that the gauge extends across the chassis from the center, out to the arm with the graduated notches to one side. Slide the gauge inward using the set screw boss on the bottom of the spindle carrier as a reference.
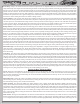
SETUP GUIDE degrees) will decrease stability and traction in corners, but will increase high speed stability. Shock Location: Leaning the top of the shocks inward on the tower will provide less forward traction and more rotation in a corner. Moving the top of the shocks outward on the tower will provide less rotation in a corner and the car will become more responsive with increased forward traction.
24
HARDWARE Cap Head Flat Head Button Head Set 2-56 x 5/16” (A5330) 2-56 x 3/16” (A6239) 2-56 x 1/4” (A6232) 4-40 x 1/8” (A6227) 4-40 x 3/8” (A6206) 4-40 x 3/8” (A6210) 4-40 x 1/4” (A6234) 4-40 x 7/16” (A6248) 4-40 x 1/2” (A6204) 4-40 x 1/2” (A6220) 4-40 x 5/16” (A6245) Locating Pin (A6243) 4-40 x 5/16” ALUM. (NA) 5-40 x 3/16” (A9757) 4-40 x 3/4” (A6205) 4-40 x 3/8” (A6229) 3mm x 6mm (A6238) Ball Studs Washers Female (A6009) Metal Shims #4 x .
26