
User Manual


20
2020
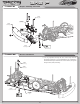
1. Adjust the Differential:
While holding the chassis with only the left side tires fi rmly on
the ground, give the car about one quarter throttle, for 10 seconds.
The right side tires should spin freely during this time. Repeat
this with only the right side tires held fi rmly to the ground, al-
lowing the left tires to spin. Feel the differential (diff) action and
tighten slightly, if necessary. The differential should have a tight,
thick feel when rotating it after fi nal adjustment. CAUTION!
YOUR DIFFERENTIAL SHOULD NEVER BE ALLOWED
TO SLIP WHEN RUNNING (A SLIPPING DIFFERENTIAL
CREATES A “BARKING” SOUND). IF IT DOES, STOP IM-
MEDIATELY AND TIGHTEN TO PREVENT DAMAGE.
2. Check for free suspension movement:
All suspension arms and steering components should move free-
ly. Any binds will cause the car to handle poorly.
3. Set the ride height:
Set the ride height to 5mm by adjusting the shock adjustment
nuts, effectively increasing or decreasing pre-load on the springs.
See the Setup Guide for additional information on ride height
adjustment.
4. Set the camber:
Adjusting the tierod length changes the camber setting. Using the
Team Losi fl at wrench to adjust the tierods once installed. Rotat-
ing the tierods towards the back end of the vehicle will shorten
the length, increasing negative camber. Rotating the tierods to-
wards the front of the car will lengthen them, increasing negative
camber. Set the front tires to have 1 degree of negative camber
and ensure that they are adjusted equally, left to right. Set the
BEFORE RUNNING YOUR NEW JRX-S EXPERT RACING SEDAN for the fi rst time, you should run down the following checklist
in order and complete the listed tasks. We’re sure you’re anxious to get out and run your new JRX-S now that its built, but please note that
fi ne tuning of the initial setup is an essential part of building a high performance racing sedan such as your new JRX-S. Following this simple
Checklist and the Team Tips will help to make the fi rst run with your new car much more enjoyable.
rear tires to have .5-1 degrees of negative camber and ensure that
they are adjusted equally, left to right.
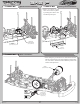
5. Set the front toe-in:
Adjust the front steering tierods so that when the servo is cen-
tered on the transmitter, the front tires are both pointing straight.
Refer to the Setup Guide for more information on toe-in/out.
6. Charge a battery pack:
Charge a battery pack as per the battery manufacturer’s and/or
charger manufacturer’s instructions so that radio adjustments
can be made. Never plug the battery into the speed control back-
wards.
7. Adjust the electronic speed control (ESC):
Following the manufacturer’s instructions, adjust your speed
control and set the throttle trim on your ESC so that the car does
not creep forward when no transmitter input is applied. Make
sure that there is not too much brake being applied when the
trigger/stick is in the neutral position. Some speed controls have
a high/low setting for the throttle and brake.
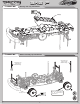
8. Set the transmitter steering and throttle trim:
The steering trim tab on the transmitter should be adjusted so
that the car rolls straight when you are not touching the steering
wheel/stick. If the servo was installed correctly, as per Table 1,
the wheels should turn equally to the left and right. If this is not
the case, refer to Table 2 and ensure that the steering servo and
horn was properly installed. Make sure the throttle trim is set
so that the motor does not run when in the neutral position. You
may wish to run one “click” of brake to be safe.
Before you start making changes on your JRX-S Expert Racing Sedan, you need to make a few decisions. Tires, and how they are setup,
have a tremendous impact on overall performance. Before you start making changes on the chassis setup, take a movement to observe a few
of the fastest cars at the track and what type of tire and inner liner they are running. Also, note the wheel diameter and width, as this can also
effect how the tires perform. When making chassis changes, you should fi rst decide where you feel the car needs to be different. This is com-
monly referred to as changing the “balance”. Since the
JRX-S is a four-wheel drive chassis, you have two ends of the car working separately,
yet together. First decide if the front of the car needs to be adjusted or the back. You will want to work with the rear if the car enters the turn
with the front end sticking, and tracking well, while the rear end either does not want to follow, or simply doesn’t know what it wants to do.
The opposite is true if the rear end seems to want to push the front end through the corners or if the front drives into the corner uncontrollably.
You will notice that several different adjustments have similar effects on the handling as well. You will fi nd the best adjustment will become
a personal decision based on the “feel” that each of these adjustments yield. This also refl ects on the “balance” we referred to earlier. Never
make more than one change at a time; if the change you made works adversely, or doesn’t address your need, return to the previous position
and try something else. Team Losi’s development team has put hundreds of hours on the JRX-S to arrive at the setup we put in the instruction
manual. If you fi nd that you have lost the “handle” go back to the kit (stock) setup, as this setup has proven to be reliable, consistent, and easy
to drive.
All of us at Team Losi are sure that you will fi nd the JRX-S Expert Racing Sedan to be the most versatile and easiest car to drive fast,
with great consistency. We hope the information in the following guide helps you to enjoy your JRX-S Sedan, and racing it, as much as we
do. For the latest in setup and accessory parts information, visit the Team Losi web site at: www.teamlosi.com regularly. For any technical
questions go to the “Meet the Team” tab on the left side of the page. We will try to answer your questions in the order received, to the best of
our knowledge, by our own Team Losi R&D race team. Please check the Team Losi web site periodically to fi nd out new setup information as
we are always testing on all types of tracks and surfaces. Also note, that there are many ways to setup a car. The rules we follow can reverse
sometimes with different driving styles or different setup styles, so test for yourself and you will fi nd a setup that works right for you.
TIPS AND HINTS FROM THE TEAM
CHECKLIST