
User Manual


55
54
71
56
32
43
54
38
72
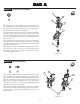
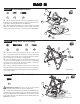
There is a small container/package of White Grease
(71) in this bag. It is recommended that a small amount of this be
applied to the threads of the Turnbuckles before trying to thread on
the plastic Rod Ends. Please use this lube sparingly as it will be used
during the assembly of the Differential as well.
*NOTE: The two ends of the Turnbuckle are threaded opposite.
The end closest to the groove, next to the square, has standard right-
hand threads, the other end has left-hand threads. This allows the
length of the Tierods, once installed, to be adjusted without remov-
ing them.
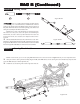
1.Thread a plastic Rod End (54) onto each end of a 2-3/8" Turn-
buckle (55). Tighten both Rod Ends equally until the Tierod is the
same length, and the Rod Ends are in the same orientation, as the
assembled Tierod in Figure B-8B (Left).
2. Assemble the second camber link with the Rod Ends orien-
tated as Figure B-8B (Right).
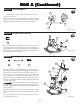
6
BB
BB
B
AA
AA
A
G B (ContinG B (Contin
G B (ContinG B (Contin
G B (Contin
ued)ued)
ued)ued)
ued)
Step B-9
Figure B-8B
Step B-8
Figure B-8A
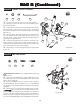
*NOTE: Assure that the grooves on all of the front Turnbuckles
are located on the drivers right-hand side for easier adjustment later.
1. Place a "Foam Thing" (56) over the Ball Studs (72) on each of
the Spindle Carriers (41) (43) and on the Ball Studs (38) (72) on both
sides of the Bulkhead (32). Next, attach one side of a camber link
assembly (Figure B-8B; Left) to the Ball Stud on the left side of the
Bulkhead. Attach the other side of the camber link assembly to the
silver colored Ball Stud in the Spindle Carrier.
2. Attach the second camber link Tierod to the right side of the
car in the same fashion.
Tierod - Camber Link Assembly:
Camber Link Install:
Figure B-9
Right
Left
54
55