
Installation Sheet


1.0
Installation Instructions for
Dyna Linear Suspension
700LSDYNA_
1
920LSDYNA
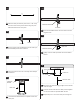
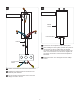
Prepare for installation
Remove the screws from the canopy to remove the
mounting plate/bar. (Three screws for the surface mount
and two for the remote.)
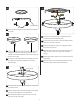
1
1A
NOTE: The power cord does not support the fixture. For a
casual “lazy cord” look, cut the power cord several inches
longer than the drop height of the fixture.
4
Use the lock washer and hex nut to attach either the
coax only strain relief if using two cable supports or the
aircraft cable strain relief, depending on the desired
fixture configuration.
1B
SUSPENSION
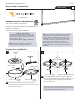
GP I :ENERAL RODUCT NFORMATION
This product is suitable for damp locations.
This product may be dimmed with a low-voltage electronic
dimmer or triac dimmers.
This instruction shows a typical installation.
NOTE: This product has several mounting methods.
Depending on the availability of the electrical box
location and the desired mounting position. First
configuration uses one cable post and one canopy
with built-in cable post. The other uses two cable
posts and one canopy with power cord only.
Additionally there is a surface and remote mount
transformer options. Use appropriate instructions for
installation.
NOTE: Due to the complexity of this fixture,
assistance will be needed for installation.
CAUTION RISK OF FIRE-
This product must be installed in accordance with
the applicable installation code by a person familiar
with the construction and operation of the product
and the hazards involved.
Use minimum 90°c supply conductors.
3
MOUNTING
BAR
COAX STRAIN RELIEF
AIRCRAFT CABLE STRAIN RELIEF
REMOTE TRANSFORMER
CANOPY
MOUNTING
PLATE
SURFACE TRANSFORMER
CANOPY
CANOPY SCREW
MOUNTING
BAR
CANOPY SCREW
LOCK WASHER
HEX NUT
1
2