
Installation Sheet
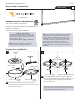
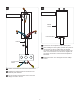


Slide the jumper over the coax and fasten it in place with
provided set screw.
Cut the coaxial cable to the desired length. (Leave longer
than the aircraft cables for a lazy cable look.)
Slide back the braiding to expose the inner wire and
strip some of the inner jacket.
6
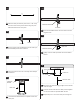
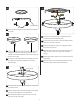
Secure the mounting plate to the junction box with #8-
32 screws.
3E
13
If using one cable post insert the aircraft cable into the
canopy port and secure with the provided set screw.
Feed the coaxial cable though the hole on the side of the
port into the canopy.
If using two cable post feed the coax through the center
port and secure with the provided set screw at the
desired length.
3F
14
15
3G
16
17
18
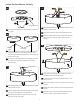
Connect the mounting plate to a suitable ground in
accordance with local electrical codes.
Connect the inner coax wire to the low-voltage neutral
power line wire with a wire nut.
Connect the black wire to the low-voltage hot power
line wire with a wire nut.
Wrap the coaxial cable and coax jumper with electrical
tape, ensuring no part can make contact with the
canopy.
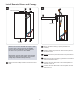
Neatly place all wires and wire nut connections into the
junction box.
Place the canopy onto the mounting plate and secure
with the canopy screws. (Reversal of step 1A.)
3H
19
20
21
22
23
24
COAX JUMPER
16
17
18
19
21
20
24
24
13
13
MOUNTING BAR
#8-32 SCREW
14
15
22