
Installation Guide

2
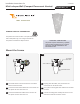
Install the Lamp & Glass Shade
2A
1
LAMP PINS
SOCKET
1
Place the glass shade over the mounting plate against
the wall.
Slide the cage nuts aligning their holes with the glass
shade holes.
2B
2
3
2
3
3
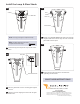
GLASS SHADE HOLE
CAGE NUT
2C
4
BALL
SCREW
GLASS SHADE
Slightly screw (Do Not Tighten) the ball screws through
the glass shade holes into the cage nut holes so that the
glass shade is held in place.
4
CAGE NUT
Firmly push the glass against the wall and finish
tightening the ball screws.
2D
5
5
NOTE: Use only your fingers to replace the lamp.
Push the lamp pins firmly all the way into the socket
holes.
Max 13 Watt 2GX7 Base Twin Tube
Compact Fluorescent Lamp.
4
5
SAVE THESE INSTRUCTIONS!
7400 Linder Ave, Skokie, IL 60077
847.410.4400
www.techlighting.com
© 2008 Tech Lighting, L.L.C. All rights reserved. The "Tech Lighting" graphic is
a registered trademark of Tech Lighting, L.L.C. Tech Lighting reserves the right
to change specifications for product improvements without notification.
A Generation Brands Company