
Installation Instructions

3
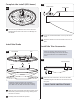
CEILING
Using the mark points that were determined in step 5,
tap the anchor into the ceiling up to the threaded
portion with a hammer.
ANCHOR
CEILING
1D
5
5
1E
Screw the anchor in the rest of the way with a Phillips
screwdriver.
6
6
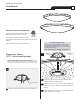
Connect the Fixture (All J-boxes)
3A
Ground the fixture in accordance with local electrical
codes.
Connect the black fixture wire to the hot power line
wire with a wire nut.
Connect the white fixture wire to the neutral power line
wire with a wire nut.
1
2
3
2
1
3
1
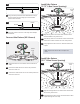
Align the Key Slots in the fixture base with the #8-32
screws installed in the junction box.
Push the Key Slots on to the #8-32 screws and twist the
fixture base counter-clockwise to lock it into position.
Firmly tighten the #8-32 screw to hold the fixture base
in place.
4A
2
1
2
3
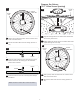
Install the Fixture
(2.75” J-Box Screw Spacing)
1B1B1B5A
Install the fixture
(3.5” J-Box Screw Spacing)
2
Align the through holes in the fixture base with the #8-
32 screws to junction box.
Firmly tighten the #8-32 screws to hold the fixture base
in place through the next steps.
3
1
2
21
2
Note: Skip ahead to Section 6A to complete the
install.
FIXTURE
BASE
FIXTURE
BASE
1
2
KEY
SLOT
THROUGH
HOLE
#8-32 SCREW
#8-32 SCREW
FIXTURE
BASE