
Installation Instructions

4
SAVE THESE INSTRUCTIONS!
1
8A
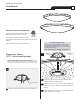
Attach the trim accessories to the rim of the shade.
Imbedded magnets will allow the accessories to snap
into place.
TRIM ACCESSORY
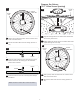
Install the Shade
7A
Align the pegs on the shade with the keyed slots on the
fixture base, push the shade up evenly, making sure it
sits flush on all sides.
Carefully rotate the shade into position.
1
SLOT
SHADE
PEG
2
FIXTURE BASE
CAUTION: Improperly aligning the pegs before
rotating the shade into place may cause damage to
slots. Make sure the shade sits flush before rotating.
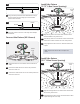
7B
THUMB SCREW
FIXTURE BASE
Locate the small threaded hole on the top side of the
shade.
Screw the thumb screw into the shade to secure it in
place.
3
4
SHADE
6A
Place the four provided #8 screws in the holes and
carefully tighten them to be sure to not damage the
LED board.
1
#8 SCREW
1
1
1
1
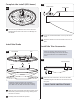
Complete the install (All J-boxes)
1
1
Install the Trim Accessories
NOTE: This collection ships with several trim
accessoriesdepending on the size of the fixture.
The trimaccessories are not included with the
others.