
Installation & Assembly

2
2
1
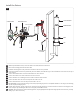
With the provided Allen wrench, remove the Allen screws both sides of the fixture base.
Remove the mounting plate from the fixture base
Install the mounting plate to the junction box with the two #8-32 screws provided.
Insert the inner diffuser into the cup followed by the outer diffuser, then slide the ring over the outer diffuser and screw it into the cup to
secure in place.
Connect the black/blue driver wire to the black fixture wire with a wire nut.
Connect the red driver wire to the red fixture wire with a wire nut.
Connect the fixture to a suitable ground in accordance with local electrical codes.
Connect the white driver wire to the neutral power line with a wire nut.
Connect the black driver wire to the hot power line with a wire nut.
For 277V Only: If using 0-10V dimming, connect the purple and gray wires to a compatible dimmer. If not using 0-10V dimming,
cap off the purple and gray wires.
Properly place the driver, all wires, and wire nut connections into the junction box, mount the fixture base onto the mounting plate, and
secure it in place by reinstalling the Allen screws using the provided Allen wrench.
Optional: This fixture features a slotted mounting plate for easy height adjustment. Adjust the height position of the fixture by carefully
sliding it up or down as necessary.
1A
Install the Fixture
4
3
6
5
7
9
8
9
8
11
10
ALLEN WRENCH
& SCREW
MOUNTING PLATE
4
JUNCTION BOX
SLOT
OUTER DIFFUSER
DRIVER
INNER DIFFUSER
RING
CUP
#8-32 SCREW
7
12