
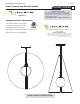
Installation & Assembly

1A
Install the Fixture
2
1
2
3
CAUTION: To reduce the risk of a burn or electric shock during re-lamping, disconnect the power to the fixture.
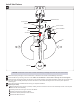
Install the lamp by inserting it into the socket. Refer to the label on the socket for Max Wattage Information.
Install the diffuser by screwing it over the socket. Make sure the diffuser is secure before releasing. Do not over tighten.
Install the fin by inserting the hooks into the slots on the socket assembly, then sliding downward. Tighten the set screws at the
top of the socket assembly and Phillips screw at the bottom of the socket assembly to secure the fins in place. Repeat for
remaining fins.
Follow the instructions included with the canopy to complete installation.
Replacing the Lamp:
While keeping the fixture as still as possible, carefully unscrew and remove the set screws and Phillips screws at the top and
bottom of the socket assembly.
Carefully remove the fins to gain access to the diffuser.
Carefully unscrew and remove the diffuser.
Remove the old lamp and replace with new one.
Reinstall the diffuser and fins.
4
5
CANOPY
MOUNTING PLATE
#8-32 SCREW
CORD
SET
SCREW
STRAIN RELIEF
SOCKET
DIFFUSER
FIN
FIN
SOCKET ASSEMBLY
PHILLIPS SCREW
SET SCREW
2
3
3
3