
Installation Instructions


2
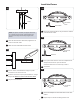
NOTE: The power cord does not support the fixture.
For a casual “lazy cord” look, cut the power cord
several inches longer that the drop height of the
fixture.
Once the desired look is determined, tighten the set
screw on the strain relief.
Mark the cord underneath the strain relief.
CORD
1C
8
7
8
4"
Leave 6" of the cord behind the canopy for power
connections. Cut the excess cord.
From the end of the cord, strip the insulation 4" using a
sharp knife. .Make sure not to nick the inner wires
Strip the end of the wires.
1D
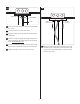
Install the Fixture
10
11
9
Line up an anchor with the center of a backplate hole
and push the anchor in up to the threads.
Screw the anchor the rest of the way in with a
screwdriver.
2B
2
3
7
Secure the mounting plate to the junction box with the
provided #8-32 screws.
2A
1
Secure the backplate to the anchor with a screw and
washer.
Repeat steps 2-4 for the remaining anchor hole.
2C
4
5
1
2
4
#8-32 SCREW
ANCHOR
SCREW
MOUNTING
PLATE
MOUNTING
PLATE
MOUNTING
PLATE
WASHER