
Installation & Assembly

4
SAVE THESE INSTRUCTIONS!
7400 Linder Ave, Skokie, 60077IL
847.410.4400
www.techlighting.com
© 2018 Tech Lighting, L.L.C. All rights reserved. The "Tech Lighting" graphic is
a registered trademark of Tech Lighting, L.L.C. Tech Lighting reserves the right
to change specifications for product improvements without notification.
A Generation Brands Company
1
2
3
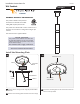
While another person holds the fixture, connect the
fixture to a suitable ground in accordance with local
electrical codes.
Connect the white driver wire to the neutral power line
wire with a wire nut.
Connect the black driver wire to the hot power line wire
with a wire nut.
3A
2
3
1
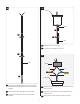
Install the Fixture
It is recommended to have another person
hold the fixture up through out this series
of steps.
3B
Neatly place all wires and wire nut connections inside
the canopy.
Align the canopy holes with the mounting plate holes.
Secure the canopy in place by tightening the canopy
screws using the provided Allen Wrench.
4
5
ELECTRICAL BOX
CANOPY
SCREW
5 5
5
CANOPY
ALLEN WRENCH
4A
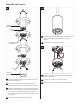
Separate the modules by reversing the assembly process
for the modules as described in 2A.
Disconnect the connector from each end and unscrew
the four screws on one cover plate.
Slide the inner module out of the glass to create enough
room to clean the glass. Repeat as needed for all
modules.
For reassembly, refer back to step 2A.
1
2
2
3
SCREW
COVER PLATE
CONNECTOR
( )Access Inner ModulesOptional
Due to ventilation holes in the fixture it is
possible that cleaning the interior of the
glass modules may be necessary. Please
turn off power to the fixture and have an
assistant support the fixture to prevent
damage during this process.
4