Contents Important Notice.............................................3 Safety Instructions..........................................4 Before Using the Player..................................5 Product feature...............................................5 Front view.......................................................7 Minimum System Requirements ...................8 Connect USB..................................................8 Get Started......................................................
Game Mode..................................................24 Settings Mode...............................................25 Using the AVI Converter Software...............30 Troubleshooting............................................
Important Notice: Always Keep a Copy of Your Original Data before you deliver your product for warranty services .Please backup all data, including all software programs. You will be responsible for reinstalling all data. Data recovery is not included in the warranty service and our company is not responsible for data that may be lost or damaged during transit or a repair.
Safety Instructions * Do not expose to extreme temperatures. * Do not allow any liquid form into the device. * Do not apply or subject the player to excessive pressure. * Do not expose to direct sunlight or heat sources. * Do not try to disassemble and repair the device yourself. * Do not expose device to chemicals such as benzene or thinner. * Do not store device in dusty or damp area. * our company will claim no responsibility for any damage on data loss due to breakdown, repair or other causes.
Before Using the Player Product Features * Sleek and lightweight design. * 1.8'' TFT 262K Color LCD display (128x160). * Graphic user interface. * Playback MP3, WMA and WAV audio format. * Supports AVI video format (comes with AVI Converter Software) * Supports photo browsing in JPEG format. * Digital voice recording. * Text viewer in TXT format with bookmark function. * Synchronous lyrics display in LRC format. * Personal data file storage. * USB 2.0.
* Built-in rechargeable li-polymer battery. Audio Playback (Maximum up 8 hours). Video Playback (Maximum up 4 hours). * Supports Windows 2000 and Windows XP.
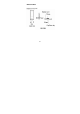
FRONT VIEW =7=
Minimum System Requirements * Intel Pentium processor 200MHz and above. * Windows 2000 and Windows XP. * 32MB of RAM (128MB recommended) * Up to 100MB of available hard-disk space * Standard USB Port USB Connect * Connect one end of the supplied mini USB cable to the player. * Connect the other end of the mini USB cable to the computer. * Charging process begins automatically.
Get Started 1.Power ON / Power OFF Turn Power ON/OFF switch to ON position, press & hold key to power ON. In any mode, press & hold key to power OFF. 2.Set Key Lock Press & hold “VOL+” key and “VOL–“ key (for 2 seconds) at the same time to set Key Lock. Note: All keys on the player will be locked. In Lock mode, press & hold “VOL+” key and “VOL–“ key (for 2 seconds) at the same time again to unlock. Note: All keys on the player will be unlocked.
3. Music Playback 3.1 In Main menu, select Music menu and press “ M ” key to enter Music mode. Music playback begins automatically. During Music playback, press “M” key to enter Music playlist. Note: If a folder is displayed, press key to return to the previous menu Press “ ” or “ ” key to select a Music file. Press “M” key and Music playback begins automatically.
During Music playback, press pause. While in Pause mode, press again to resume playback. key to key NO Function NO Function 1 Song Title & ID3 7 Equalizer / Song Display Lyrics Display 2 Playback Time 8 Track Duration 3 Playback Mode 9 Battery Indicator 4 Play/Pause Status 10 A-B Repeat 5 Playback Setting 11 Current Track number 6 Volume Level 12 Total Track number 3.2 Adjusting Volume During Music playback, press “VOL+” key or “VOL–“ key to adjust volume level.
Note: Press & hold “VOL+“ key or “VOL–“ key can also make adjustment to volume level (value settings from 00 to 40). 3.3 Skipping to Previous / Next Music File During Music playback, Press “ ” or “ key to skip to Previous or Next track. 3.4 Deleting a Music File During Music playback, press “M” key to enter submenu. Press “ ” or “ ” key to select a folder or a Music file. When a folder is selected, press “M” key to enter folder. When a Music file is selected, press “VOL–” key to delete.
previous submenu options. Note: Press & hold “M” key or key to return to Main menu. 3.5 A-B Repeat During Music playback, press & hold “M” key. “A-B Repeat” indicator displays “A”. Press & hold “M” key again, “A-B” is displayed. Music will now repeat “A-B” playback in a loop. To cancel “A-B” repeat playback, press & hold “M” key to resume. 3.
4. Video Playback 4.1 In Main menu, select Video menu and press “M” key to enter Video mode. When Video playlist is displayed, press “ ” or “ ” key to select a Video file. When a folder is selected, press “M”key to enter folder. When a Video file is selected, press “M”key and playback begins automatically. 4.2 FW / FF a Video file During Video playback, press & hold “ ” or “ ” key to FW or FF playback.
4.3 Adjusting Volume During Video playback, press “VOL+” key or “VOL–“ key to adjust volume level. Note: Press & hold “VOL+” key or “VOL–“ key can also make adjustment to volume level (value settings from 00 to 40). 4.4 Deleting a Video File In Video submenu, press “ ” or “ ” key to select a folder or a Video file. When a folder is selected, press “M” key to enter folder. When a Video file is selected, press “VOL–”key to delete. press key and the delete interface will be displayed.
5. Photo Mode 5.1 In Main menu, select Photo menu and press “M” key to enter Photo mode. When Photo playlist is displayed, Press “ ” or “ ” key to select a Photo file. When a folder is selected, press “M” key to enter folder. When a Photo file is selected, press “M” key and Photo playback begins automatically. Press “ ” or “ ” key to view previous or next photo file.
During Photo playback, press “M” key to return to Photo playlist or press & hold “M” key to return to Main menu. 5.2 Deleting a Photo File In Photo playlist, when a photo file is selected, press “VOL–” key to delete. press key and the delete interface will be displayed. At the “Delete File” prompt, select “YES” option and press “M” key to confirm deletion.
6.Text Mode 6.1 In Main menu, select Text menu and press “M” key to enter Text mode. When Text playlist is displayed, press “ ” or “ ” key to select a Text file. When a folder is selected, press “M” key to enter folder. When a Text file is selected, press “M” key and playback begins automatically. Press “ ” or “ ” key to scroll backward or forward to view text.
During Text playback, press “M” key to return to Text playlist or press& hold “M” key to return to Main menu. 6.2 Deleting a Text File In Text playlist, when a Text file is selected, press “VOL–” key to delete. press key and the delete interface will be displayed. At the “Delete File” prompt, select “YES” option and press “M” key to confirm deletion. 6.3 To Bookmark a Page The Text function supports up to 3 bookmark pages for quick search purpose.
press key and the 3 bookmark will be displayed. Press “ ” or “ ” key to Scroll to any of the 3 following bookmarks and press “M” key to confirm settings. To View a Bookmark Page - During Text playback, press “VOL + ” key to view the 3 bookmarks. Press “ ” or “ ” key to select a bookmark followed by “M” key and the bookmark page will be displayed automatically.
7.Record Mode 7.1 In Main menu, select Record menu and press “M” key to enter Record mode. In Record mode, press key and recording begins automatically. During recording, press key to pause recording and press k again to resume. To end recording, press & hold “M” key to save the recording a return to Main menu. Note: Recording files (WAV format) can be playback in Music menu.
8. Explorer Mode The Explorer mode displays all the folders and files stored in the player. In Main menu, select Explorer menu and press “M” key to enter 8.1 Explorer mode. When Explorer playlist is displayed, press “ ” or “ ” key to select a file. When a folder is selected, press “M” key to enter folder. When a file is selected, press “M” key and playback begins automatically. Note: During playback, press & hold “M” key to return to Main menu. 8.
press key and the delete interface will be displayed. At the “Delete File” prompt, select “YES” option and press “M” key to confirm deletion. Note: Deletion of folder is NOT supported.
9 Game Mode 9.1The player comes with a free built-in Brick Game. - In Main menu, select Game menu and press “M” key to enter Game mode. 9.2 Game Control Keys To begin / pause, press key. To move to left or right, press “ ” or “ ” key. To rotate the “Falling Brick”, press “VOL-” key.
10 Settings Mode There are 7 settings available in the Settings mode. In Main menu, select Settings menu and press “M” key to enter Settings mode. Press “ ” or “ ” key to select the desired settings in each options 10.1Music Settings Repeat Mode Once: To play all the files once. Repeat 1: To repeat one file.
Folder Once: To play all the files in the folder once. Folder Repeat: To repeat all files in the folder. All Once: To repeat all files once. All Repeat: To repeat all files. Intro: To play the first 10 seconds of each music file. Play Mode Order: Music playback in sequence. Shuffle: Music playback randomly.
“VOL –” key to adjust on each individual frequency segment. (60Hz、300 Hz、 1KHz、3KHz、6KHz) Frequency settings are adjusted in -6dB~ +6dB interval. Press “ ” or “ ” key to skip to adjust the next frequency segment. (activated segment will be indicated in red color) Press “ ” or “ ” key to skip to “YES” option and press “M” key to save changes and exit. 10.2 Record Settings REC Quality: Recording quality & file size settings High Quality: Better recording quality with larger file size.
with smaller file size. REC Volume: The highest settings +5 will produce the loudest recording quality. +1 / +2 / +3 / +4 / +5 10.3 Display Settings Blight Time: To set the backlight ON timer (unit in seconds). This function will be disabled when the time is set to Always On. 5s/ 10s / 15s / 20s / 30s / Always On Lum: To set the backlight brightness.
10.4 System Settings About: To display information on firmware version, date and memory status. Upgrade: For firmware upgrade (if any). Default Set: To restore the player to original default settings. 10.5 PowerOff Time Settings When no key is pressed within the time set, player will be turned OFF. (This function will be disabled when time is set to OFF) -OFF/10 Minutes/15 Minutes/30 Minutes/60 Minutes/120 Minutes 10.6 Languages Settings To change the desire language settings on the player.
Using the AVI Converter Software This player supports AVI format video files and can transform other video formats to the supported AVI format by using the bundled AVI Converter Software. The software fully support fast speed video conversion of multi-video format into high quality AVI format.
Follow the on-screen instructions to complete the installation. Upon a successful installation, an AVI Converter program icon will be created on the computer desktop. Double click on the AVIConverter icon to begin. 1. Click on Add button to select a video file to convert.
2. Click on Source File button. 3. Select the Target File Path button to save the converted video file.
4. Finally, click on Convert Now button to start video conversion process. Conversion is complete when the status information shows 100% and OK. Click on Close button to quit. Finally, transfer (using copy & paste) the converted video file (AVI format) into the player and you are now ready for video playback. Note: Please use only the bundled AVI Converter Software in this player for video conversion. Video files converted using third party software might not be able to work properly with this player.
Troubleshooting 1. No power: Please check if it is power ON 2. No sound from the earphone: 1. Make sure the volume level is not set to “0”. 2. Check if the earphone is properly connected to the player. 3. Check if the music file is corrupted. Try again with other music files. 3. Error message: “Warning File Format Error”: Please try the following: Turn the Power ON/OFF safety switch to OFF. Connect the player to the PC and remove the file that is corrupted or non-standard audio/video file on the player.
player is detected, the error message will occur. If this error occurred on a video file, try to convert the video file by using the AVI Converter and try again. 5. Cannot transfer music:1. Check if the USB cable is working properly.2. Make sure the product drivers has been installed correctly (if require). 3. Check if the computer USB port is working properly. Restart the computer and try again.