Technaxx® Easy Security Camera Set TX–28 User Manual The Declaration of Conformity for this device is under the Internet link: www.technaxx.de/ (in bottom bar “Konformitätserklärung”) Before using the device the first time, read the user manual carefully.
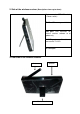
. Side of the wireless receiver (Descriptions from up to down) Wireless receiver OFF / ON switch (= Power switch) TF: MicroSD memory card slot USB port: USB connecter for wireless receiver software to to update only AV-OUT port: use AV cable to connect with TV/LCD DC 12V Input 3.
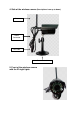
4. Side of the wireless camera (Descriptions from up to down) Antenna Power Connector Pair code Camera stand 5.
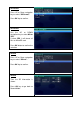
6. Remote Control Menu: Press Menu key to show Main Menu. Cam: Press Camera key to change channels. Screen: Press Screen key to show 4 video same time, press it again, video auto to show one by one, press it again to enlarge one of 4 video. Rec: Press Video Record key to record a video, press it again to stop recording. Press OK key (round key in the middle) to confirm the selection. Press UP / DOWN / LEFT / RIGHT navigation key (the keys with the arrows) to select the mode 7.
Connect the 5VDC power adapter to the camera, connect the 12V/1A DC power adapter to the Receiver and turn on the receiver (has a built-in battery). Press “Pair Code” at the wireless camera power connector to pair the camera to the receiver. When the connection is established you see in the background of the Main Menu the motion the camera is focused on. 8.1. Playback Mode Press Menu key to display the main menu. Press LEFT or RIGHT navigation key to select the “Playback Mode”. Press OK key to enter it.
Manual Capture Now you see different methods to record. Use the LEFT or RIGHT navigation key to select: Manual, Take 1 photo, Take 3 photos, Take 5 photos, 5s video, 10s video, 30s video, 1 Min video. Press OK button to confirm the selection. Select Exit with the UP/DOWN navigation key to go back to the Record Mode. Loop recording Press UP or Down navigation key to select “Loop Recording”. Press OK key to confirm. Loop recording Use the LEFT or RIGHT navigation key to select ON or OFF.
SD Format Press UP or Down navigation key to select “SD Format”. Press OK key to confirm. SD Format Use the UP or DOWN navigation key to select NO or YES. If select YES, it will format all files on MicroSD card. Press OK button to confirm the selection. SD Info Press UP or Down navigation key to select “SD Info”. Press OK key to confirm. SD Info Then the SD Information is shown. Press OK key to go back to Record Mode.
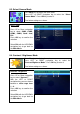
.3. Select Camera Mode Press Menu key to display the main menu. Press LEFT or RIGHT navigation key to select the “Select Camera Mode”. Press OK key to enter it. Then below settings are shown: Select CAM Press UP or Down navigation key to select: CAM1, CAM2, CAM3, CAM4, Quad view, Exit Press OK key to confirm the selection. Select Exit with the UP/DOWN navigation key to go back to the Main Menu. 8.4. Contrast / Brightness Mode Press Menu key to display the main menu.
Contrast / Brightness Press UP or Down navigation key to select “Brightness”. With the LEFT or RIGHT navigation key you can choose between a value range from 1 – 9. Press OK key to confirm the selection. Select Exit with the UP/DOWN navigation key to go back to the Main Menu. 8.5. Recording Schedule Mode Press Menu key to display the main menu. Press LEFT or RIGHT navigation key to select the “Recording Schedule Mode”. Press OK key to enter it.
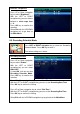
8.6. Motion Detection Mode Press Menu key to display the main menu. Press LEFT or RIGHT navigation key to select the “Motion Detection Mode”. Press OK key to enter it. Then below settings are shown: Motion Detection Press UP or Down navigation key to select “Enable”. With the LEFT or RIGHT navigation key you can select ON or OFF. If select ON, it will turn on auto Motion Detection Mode. Press OK key to confirm the selection. Motion Detection Icon Press UP or Down navigation key to select “Sensitivity”.
8.7. Setting Mode Press Menu key to display the main menu. Press LEFT or RIGHT navigation key to select the “Setting”. Press OK key to enter it. Then below settings are shown: Setting Press UP or Down navigation key to select “Pair” and press OK key to confirm the selection. With the LEFT or RIGHT navigation key you can select Cameras. Pair Select CAM1 and press OK key to pair with the camera. If succeed, you will see this picture. With CAM2, CAM3, CAM4 paring procedure is the same.
Date & Time With the UP or DOWN navigation key you can set the Date. Press OK key to confirm the setting. Select Exit with the UP/DOWN navigation key to go back to the Main Menu. Date & Time With the UP or DOWN navigation key you can set the Time. Press OK key to confirm the setting. Select Exit with the UP/DOWN navigation key to go back to the Main Menu. Date & Time With the UP or DOWN navigation key you can set the Stamp. Default setting is ON. If select OFF, Date & Time will NOT be shown on the LCD.
Auto Switch Setting Mode Press UP or Down navigation key to select “Switch Time”. Default setting is 5 sec. You can select: 5 sec, 10 sec, 30 sec. Press OK key to confirm the selection. Select Exit with the UP/DOWN navigation key to go back to the Main Menu. LANGUAGE MODE (under Setting Mode) Press UP or Down navigation key to select “Language”. Press OK key to enter it. With the LEFT or RIGHT navigation key you can select the desired language. Press OK key to confirm the selection.
Advanced Setting Press UP or Down navigation key to select “TV out Format”. Default setting is NTSC. Press LEFT or RIGHT navigation key to select PAL or NTSC. Press OK key to confirm the selection. Select Exit with the UP/DOWN navigation key to go back to the Main Menu. Reset to Factory Default Press UP or Down navigation key to select “Advanced Setting”. Press OK key to enter it. Reset to Factory Default Press UP or Down navigation key to select NO or YES.
About & Version Here you can see the Software Information. Press OK key to go back to Setting Mode. Select Exit with the UP/DOWN navigation key to go back to the Main Menu. 9. Signal Strength Indicators – Description ^ Perfect 10. Problem: No video Low No signal Make sure, camera and monitor are in effective range. 11.
13. Technical Specifications WIRELESS RECEIVER (Monitor) Display 7” TFT LCD Video Format NTSC / PAL Compression Format MPEG-4 Video input / Video output 4CH wireless single / 1 composite output Audio input / Audio output 4CH wireless single / 1 composite output Frame rate 640 x 480 VGA with 20fps 320 x 240 QVGA with 25fps Memory card MicroSD card up to 32GB Transmission range ≥ 200m (open range) Power supply DC 12V / 1A Operating temperature approx.
15. Connecting the Camera Set TX-28 via “My Secure” Connect the monitor of the TX-28 with a computer/notebook via the included USB cable. Install the SIPCam software from the included CD-ROM and follow the installation instructions on the screen. After installation is completed, this icon is shown on your desktop. Double-click on the icon and run the SIPCam. In the hidden icons [right hand side in the below task bar] you find the icon for SIPCam (see picture). Click with the right mouse button on the icon.
Login to the browser (only IE) website: http://ie.scc21.net Install “My Secure” on your computer or notebook. You can find the software for „My Secure“ on the included CD-ROM. Put the installation CD in the CD-slot on the computer/notebook. Follow the installation process on the screen to install „My Secure“. After installation is completed, “My Secure” starts automatically. Click on the “WAN” button and input Cam ID/User and Login Password (both you can find on the monitor back side).