MODEL RTA - 2706A Thanks for purchasing one of our products. Please read carefully the assembly instructions before the installation. Please save this manual for future reference.
MODELO RTA - 2706A Gracias por comprar uno de nuestros productos. Por favor lea cuidadosamente las instrucciones de ensamblaje antes de instalar la unidad. Por favor guarde este manual para referencias futuras.
RTA-2706A DIMENSIONS Product Size: 37.8"W x 22"D x 34.
RTA-2706A P.
RTA-2706A PART QTY. ITEM P.5 PART QTY.
RTA-2706A P.
RTA-2706A P.
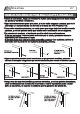
RTA-2706A P.8 1 2 1 4 4 3 4 Insert the Studs (4) at the bottom of the Left, Central & Right Structures (1,2&3). Inserte los topes (4) en las patas de las estructuras izquierda, derecha y central (1,2,3). 2 Before doing this step, make sure that all the nuts in the panel are properly aligned to receive the screws! A1. A2. A3. B1. B2. B3.
RTA-2706A P.9 3 3 2 A1. A2. A3. B1. B2. B3. Before doing this step, make sure that all the nuts in the panel are properly aligned to receive the screws! Antes de hacer este paso, asegúrese que las tuercas en el panel estén alineadas para recivir los tornillos! SCREWS 7 TORNILLOS B 6X50 MM 4PCS Use screws B to assemble the CPU Panel (7) between the Central and Right Structure (2&3).
RTA-2706A P.10 5 2 3 Top hole Tabs 14 14 Right Left Derecho Izquierdo SCREWS TORNILLOS E 4X28 MM 4PCS Use screws E to assemble one pair of Sliders (14) to the Central & Right Structures (2&3) noting that the they must slide-out to the front of the desk. You will find four holes in the metal structures, use the top two.
RTA-2706A P.11 7 12 SCREWS 13 TORNILLOS F 3X15 MM 4PCS Use screws F to assemble the thiner part of the Sliders (12) to the Drawer (13). Use tornillos F para fijar los deslizadores de gaveta (12) a la Gaveta (13), note que debe fijar la parte delgada del deslizador. 8 3 2 12 X2 13 SCREWS TORNILLOS E 4X28 MM 4PCS Use screws E to assemble the wider part of the Drawer’s sliders (12) to the Central & Right Structures (2&3).
RTA-2706A P.12 9 8 SCREWS 3 TORNILLOS B 6X50 MM 6PCS 2 1 Use screws B to assemble the back face of the Main Panel (8) to the Main Structures (1,2&3). Use tornillos B para fijar el Panel Principal (8) a las estructuras derecha, izquierda y central (1,2,3). 10 9 X4 14 Izquierdo Left 14 Derecho Right Tabs SCREWS TORNILLOS D 4X4 MM 4PCS Use screws D to fix the Hooks (9) to the other pair of Sliders (14).
RTA-2706A P.13 11 Use screws G to fix the Hooks (9) to the underside of the Main Panel. Use tornillos G para fijar las bases (9) a la parte inferior del Panel Principal (8). 8 9 X4 14 Right Derecho 14 SCREWS Left TORNILLOS G 6X12 MM Izquierdo 4PCS 12 Use screws C to assemble the back face of the Keyboard Panel (10) to the Sliders (14). Con tornillos C y por debajo, ensamble el Panel de Teclado (10) con los deslizadores (14).
CARE AND MAINTENANCE English - DO NOT EXPOSE THE SURFACES TO DIRECT SUNLIGHT, OR EXTREME ENVIRONMENTAL CONDITIONS. EXPOSURE WILL DAMAGE THE PRODUCT, WHICH IS NOT COVERED BY THE WARRANTY. - DO NOT USE SOLVENTS OVER SURFACES OR STRUCTURAL TUBES. SURFACES MUST BE CLEANED WITH A SOLUTION OF A SMOOTH SOAP AND WATER, THEN CLEARED WITH A DRY TOWEL. - PRODUCTS THAT ARE HEAVY SHOULD BE LIFTED OR MOVED BY AT LEAST 2 PERSONS, AND ALL OBJECTS SHOULD BE REMOVED FROM THE PRODUCT.