
Instructions / Assembly
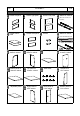


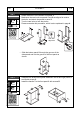
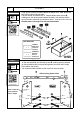
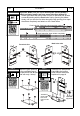
Table Of Contents

• Grab all the 8 pieces of sliders 8 and set aside the 4 “Flat” pieces as
they will be used until next step.
• Flip the drawer and attach the “L” shaped sliders with screws B,
making sure the wheel goes towards the back, and that the sliders
don’t protrude, otherwise, the drawers raise 1” and won’t fit in the unit.
• Repeat steps 1 through 3 for the second drawer.
• Assemble the “Flat” sliders 8 to the middle and bottom sets of holes
on the side panels 9 and 10 with screws B, making sure the wheels
go facing towards the front and facing down (there will be 2 empty
holes above the wheel).
• It is recommended to attach at the front first, then the back.
STEP 3
Hardware:
B
ST3x15
4
Pcs
Scan QR Code
to view this step
STEP 4
Hardware:
B
ST3x15
8
Pcs
Scan QR Code
to view this step
(F(Froronntt))
((BaBacckk))
((TTop)op)
((Top))
(F(Froronntt))
((Front))
10
9
P. 7
RTA-8211
P. 7
8
These 3 holes are
for the scanner
slider in step 5
8
8
VERY IMPORTANT!
INCORRECT:
Raises the
drawer 1”
and won’t fit!
CORRECT:
Sliders don’t
protrude on
the bottom.
Attach using these holes
8
8