
Instructions / Assembly
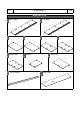
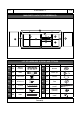


Table Of Contents

ASSEMBLY STEPS (Note: the unit will start assembling with its front facing down)
• Install bolts B in the indicated holes on the faces of panels 2, 5, 6 & 7.
• Note 1: Other holes are intended for other kind of hardware.
• Note 2: On panel 7, the bolt is installed on both faces.
STEP 2
Hardware:
B
M6x20
22
Pcs
(NOT INCLUDED)
P. 6
RTA-9500TV
P. 6
On panel 7, the bolt is
installed on both faces.
5
2
6
7
•
•
Install brackets H into the groove of panel 10 with screws D. If there
are no pre-drilled holes or markings, just calculate a good distance
between them, but you must leave at least 1” space from each end.
Install the sliding tracks L on the bottom panel 1 and the Top panel 2.
STEP 1
Hardware:
D
ST3.5x14
4
Pcs
H
4
Pcs
L
4
Pcs
(NOT INCLUDED)
1
2
1
10
L
H
D
(Top)
(Bottom)
Leave at least 1"
space at each end