P.1 ASSEMBLY INSTRUCTIONS MODEL RTA-TS200 Thanks for purchasing one of our products. Please read carefully the assembly instructions before the installation. Please save this manual for future reference. OR P.
P.2 P.2 RTA-TS200 PRODUCT DIMENSIONS: GENERAL DIMENSIONS: WIDTH: 47.25” DEPTH” 23.5” HEIGHT: 41.5” NET WEIGHT: 41.75 Lbs SHIPS IN 1 BOX 7.75” 2.5” 41.5” 26.5” 29.5” 36.5” 2.25” MAXIMUM WEIGHT CAPACITIES 7 Lbs. 7 Lbs. 12 Lbs.
P.3 P.3 RTA- TS200 PARTS LIST (Part number, Description, Qty): 1. Tabletop, 1 pc 2. Main structure, 2 pcs 3. Horizontal bar, 1 pc 4. Cross bars, 2 pcs 5. Top support bar, 1 pc 6. Monitor shelf, 2 pcs 7. Shelf support, 4 pcs 8. Tablet holder, 1 pc 9. Adjustable CD rack, 1 pc 10. Cup holder, 1 pc 11. Headphone holder, 1 pc 12. Wire basket, 1 pc A. M6*45mm, 4 pcs B. M6*30mm, 4 pc C. M6*12mm, 5 pc D. ØM6 nut, 1 pc E. M4*12mm, 16 pcs 19. Stud, 4 pc 20.
P.4 RTA- TS200 P.4 GENERAL HOW TO ASSEMBLY ASSEMBLE TIPS PARTS AND USING TROUBLESHOOTING CAM BOLTS AND DURING CAM LOCKS: ASSEMBLY: Before you start assembling, make sure that you have all the parts and hardware by doing a quick inventory. The unit might or not include all the necessary tools. Read first the instructions and analize all illustrations before starting the assembly. Follow the assembly instructions step by step and do not skip any.
P.5 RTA- TS200 ASSEMBLY STEPS: Insert the studs (F) into the bottom of the structures (2) as shown. Assemble the tube (3) in between the structures (2) using screws (A) as shown. P.
P.6 RTA- TS200 Assemble the cross bars (4) to the structures (2) and to each other using screws (C) and nuts (D) as shown. Screw loose and tighten until all screws are in their places. Assemble the tabletop (1) to the structures (2) using screws (B) as shown. P.
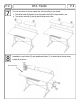
P.7 RTA- TS200 P.7 Assemble the top support bar (5) to the tabletop (1) using screws (A). Then assemble the wire basket (12) to the underside of the tabletop using screws (E) as shown. Assemble the shelf supports (7) to the monitor shelves (6) using screws (E) as shown. Then unfold the support tubes of the tablet holder (8) as shown.
P.8 RTA- TS200 P.8 You can now place on the top support bar, and according to your needs: • The tablet holder (8) beside one of the monitor shelf (6) for single monitor use. • Two monitor shelves (6) side by side for dual monitor use. Assemble the cup holder (10) and headphone holder (11) to either side of the unit using screws (E) as shown.
P.9 RTA- TS200 P.9 CARE, MAINTENANCE AND WARNINGS: ⚠ ⚠ Do not expose the surfaces to direct sunlight or to extreme environmental conditions. Damages caused by this kind of exposure is not covered by the product’s warranty. Clean the surfaces preferable with a soft cloth damped with a solution of mild soap And water, then dry with a clean towel. Do not use solvents or abrasive materials to clean any part of the unit. Do not allow children to play over or under the unit.