Skype on TV User Guide 0.
Table of Contents Table of Contents Welcome & About Skype on TV. . . . Get to Know the Parts. . . . . . . . . . . . Camera. . . . . . . . . . . . . . . . . . . . . . . . . . . . Adaptor Box. . . . . . . . . . . . . . . . . . . . . . . . . Remote. . . . . . . . . . . . . . . . . . . . . . . . . . . . 3 4 4 5 6 Setup. . . . . . . . . . . . . . . . . . . . . . . . . . . .
Welcome & About Skype on TV 3 Welcome! This User Guide is where you’ll find answers to questions along with easy to follow, step-by-step guidance on how to set up and use Skype™ on TV in your home. Learn how to maximize the full potential of every feature, make a call or text a friend—everything you need to know is right here. Have a question? We may have already answered it in the FAQ section on page 59.
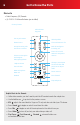
Get to Know the Parts Get to Know the Parts Camera • High-Definition Video Resolution (720p at 30 fps) • On/Off Indicator • Digital/Optical Zoom Lens with Shutter • Built-In Directional Microphones • Adjustable Clip for Secure Placement For camera placement, see Camera Setup on page 9. Front of camera Lens with Shutter Shutter closes when camera is off. Microphones Microphones On/Off Indicator Glowing LED indicates camera is on. Clip Adjust for placement.
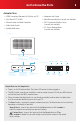
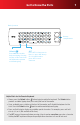
Get to Know the Parts 5 Adaptor Box • HDMI Connections Between Set-Top Box and TV • Integration with Skype • Dual-Band 802.11n WiFi • New Message Indicator (currently not available) • Ethernet-Ready for Wired Connection • WPS-Capable for Wireless Setup (currently not available) • Digital Audio Output • SD Slot for Viewing Media (currently not available) • Audible Notifications Top of adaptor box WPS WPS Use for WiFi setup with WPS capable routers (Currently not available).
Get to Know the Parts Remote • Radio Frequency (RF) Remote • (2) CR2032 3V Lithium Batteries (pre-installed) Front of remote LED indicates key press Use to pair remote Switch profiles Return home Close and return to TV Accept incoming calls and access contacts End call and ignore incoming call Place call on hold, mute mic and pause camera Select current option and navigate left/right/up/down Change screen layout *Adjust volume Zoom self-view and pan/scan to adjust video See self-view Mute mic
Get to Know the Parts 7 Back of remote Battery compartment Unlock Press Unlock to enable keyboard typing. Pressing any key on the front locks the keyboard to prevent accidental typing. ALT Press ALT for characters in blue—i.e. press ALT then Q for 1. You will need to press ALT for each character. Helpful Hints for the Remote Keyboard • Always press the Unlock button before typing to enable the keyboard. The Unlock button prevents accidental typing when you’re using the front of the remote.
Set Up Set Up What You’ll Need to Get Started • HDMI-Capable Comcast set-top box and HDTV • Internet connection with at least 1.5 Mbps simultaneous upload and download speeds (check your speeds at http://speedtest.comcast.net) Comcast Account • You must use your primary Comcast ID for activation. • You can add up to six more secondary Comcast IDs, in addition to the primary Comcast ID. • To add more Comcast IDs to your primary account, please visit http://customer.comcast.
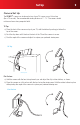
Set Up 9 Camera Set Up The XFINITY® camera can be placed on top of your TV screen or on a flat surface (like a TV console). The recommended viewing distance is 5’ - 12’. The camera should not be used near strong magnetic fields. TV Top a) Place the front of the camera on top of your TV, with the bottom lip resting just below the top of the screen. b) Push the clip down until it touches the back of the TV and the camera is secure.
Set Up Helpful Hints for Set Up • The camera’s broad angle will give you the ability to relax across the room while enjoying conversation. Run the Camera Test (during the TV activation or go to Settings > System Settings > Video Settings at any time) to see what area will be captured during a video call. • Position table/standing lamps in front of you to avoid appearing silhouetted.
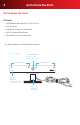
Set Up 11 Connect the Cables The steps below may differ slightly depending on your media setup, but the equipment order should remain the same. 12:30 Messages Set-Top Box Power Network Messages SD Card Power TV XFINITY® Adapter a) Plug the provided HDMI cable to your set-top box and the other end to the HDMI Cable In port on your adaptor box. b) Plug a second HDMI cable (not provided) to the HDMI TV Out port on your adaptor box and the other end to one of the available HDMI ports on your TV.
Set Up HDMI 12:30 HDMI Messages Power Back of Modem if using Ethernet Back of TV Camera Digital Audio Receiver Outlet OR Not available at this time Power adaptor (1) TV Out Cable In HDMI Ethernet HDMI Camera USB Power adaptor cable (1) Audio HDMI cable (1)
Set Up 13 Power Up If you need help with set up, please call 855-417-9342. a) Plug the Power adaptor into the Power port on the power adaptor cable to an electrical outlet. There is no actual power button on your adaptor box so this power cable is the only way to turn the system on and off. b) Turn on your TV, set-top box and audio receiver (if you have one). c) After turning on your devices, you’ll see a black screen. d) In a few minutes (up to 15), you’ll be greeted with a Welcome screen.
Activate Activate If you need help with activation, please call 855-417-9342. Follow the onscreen instructions to activate. The tips in this section will help you complete the process. Remote Pairing a) Begin the activation process by pressing the Setup button to pair the remote included in the box with the adaptor box. (Note: If you haven’t already done so, pull the tab from the remote’s battery compartment before using.) b) Flip the remote to the keyboard side.
Activate Connect to Your Home Network An Internet connection is required, but the screen(s) you’ll see depends on your choice of network connection. You have several options for network connectivity: 1. Wired connection using an Ethernet cable 2. WiFi connection to an available or hidden network 3. WiFi connection using WPS (for WPS-capable routers only/currently not available)) If you need additional help, please visit http://xfinity.comcast.
Activate Choose between connecting to an available or a hidden WiFi network. Available WiFi Networks Follow these steps if you’re using an available WiFi network: a) Select your WiFi Network from the list of networks within range. b) Enter your Network Password. Helpful Hints for Available WiFi Networks • If your WiFi network can’t be found, make sure your wireless router or modem is working properly and reconnect.
Activate Hidden WiFi Networks Follow these steps if you want to connect to a hidden WiFi network: a) Select Join Another Network. b) Enter the Network Name (SSID) of the hidden WiFi network. c) Select the Security Type of the hidden WiFi network. d) Enter your Network Password.
Activate e) This screen will appear once you’ve connected to the hidden network. Helpful Hints for Hidden WiFi Networks • If you’ve tried to join a network that that can’t be found or is no longer in service, verify the information you entered is correct and try again. • You can also join an available WiFi network or connect using an Ethernet cable instead. • If you have a hidden network, you will need to know the Network Name (SSID), Security Type, and Network Password to connect.
Activate 19 WPS Capable Routers Follow these steps if you’re using a WiFi router with WPS capability. WPS (or WiFi Protected Setup) technology securely connects the XFINITY adaptor box to your WiFi Network without the need to enter any network information manually. a) The adaptor box will automatically find your WPS- capable WiFi router. Follow the onscreen instructions to pair the adaptor box with your router. b) This screen confirms the connection to your home network.
Activate System Check After you’re connected to the Internet, you’ll have the option of running some short tests to ensure everything is working properly. These are quick diagnostic tests that will check your hardware and uncover any problems or issues. These tests are optional and can be run later by choosing SKIP TESTS. Go to Settings > System to run them at any time. These tests are optional and can be run later by choosing SKIP TESTS. Go to Settings > System to run them at any time.
Activate Camera Check The camera test checks that your camera is working and positioned to capture your preferred viewing area. Test your camera, make any adjustments (if needed), then select I SEE MYSELF to continue. Helpful Hints for Camera Check • If your camera is properly adjusted and you still don’t see yourself, select I DON’T SEE MYSELF. Check to see if the camera’s USB cable or USB extension cable, if used, are securely plugged into the Camera Input of the adaptor and try again.
Activate Set Volume While the microphone test confirms that you will be heard, the volume check verifies that you’ll be able to hear your contact speaking. Follow the steps to set your volume. Helpful Hints to Set the Volume • If you can’t hear anything, make sure your TV sound is not muted. • If you’re using an audio receiver, disconnect the SPDIF (Optical Digital Audio) cable from your set-top box, plug it into the audio port and try again.
Activate Skype Sign-In If you already have a Skype account you want to use, enter the information to continue. Helpful Hints for Skype Sign-In • Each Comcast ID must be linked with a unique Skype Name. • Linking your Comcast ID and Skype Name will give you one list of contacts on your TV. • If you can’t remember your Skype account information, select Forgot your Skype Name and Password at the bottom of the screen or visit https://login.skype.com.
Activate Sync Contacts By syncing your contacts, you’ll be able to access your XFINITY and Skype contacts from one place, making it even faster and easier to find a family member or friend. ! Syncing cannot be undone. It will merge your XFINITY and Skype contact lists. Before you begin, double check that you’re signed in under your own profile to make sure that you’re syncing the right contacts.
Profiles Profiles The Profiles screen displays your status and mood, as well as your Skype information (location, birthday, email and phone). To manage your profile settings, go to Settings > Profile Settings. When you activate Skype on TV for the first time, you must use your primary Comcast ID and link it to a Skype account. This creates your first profile. See the Activate section on page 14 for details. Later in this section you’ll learn how to create up to six more profiles.
Profiles If you are already signed in to a profile, but want to sign in using another profile, click the Profile button on your remote and select another profile. You can also sign out and then choose another profile. Helpful Hints for Sign-In If you don’t remember your Comcast account information select I forgot my Comcast ID and Password at the bottom of the screen. • Forgot your Comcast Sign-In information? You’ll need your Comcast Account Number or SSN. - Using a web browser, go to https://login.
Profiles 27 My Profile Display Name Go to Settings to edit the name seen by your contacts Avatar Skype Avatar Status Skype Name Mood Update Status Your status indicates your availability. Update it at any time to alert your contacts when you’re available to connect. a) Select your profile to view and edit. b) Click SET STATUS.
Profiles c) Select a status option: Available, Away, Do Not Disturb, Invisible, or Offline. A Quick Look at Status Options Available Your contacts can see that you’re online and can call or text you. This is your status when you first sign in. Away You’re signed in, but may not be active. Your contacts can still call or text you. Your contacts may still try to call or text you but you can decide whether to respond. Do Not Disturb You’re signed in, but not ready to talk or chat at the moment.
Profiles Update Your Mood Mood is a short update of what you’re doing, how you’re feeling, or just what’s on your mind. a) Select your profile and press OK. b) Select SET MOOD. c) Update your message (maximum number of characters is 200). Helpful Hints for Setting Your Mood • If your message cannot be saved, please try again at a later time.
Profiles Your Contacts’ Information Select a contact to view more information. When you select a contact, you’ll be able to see the avatar, name, status, mood—as well as your contact’s Skype information (location, birthday, email and phone). You can also choose to remove or block this person. Connect, block, remove or view contact profile right from this screen: a) From Contacts or Recent, select a contact. b) Select VIDEO CALL, AUDIO CALL or TEXT CHAT.
Calls and Chats Calls and Chats Connect with family and friends by selecting someone from your contacts or from your Recent list, then choose how you’d like to connect—by video, audio, or text. Make a Video Call A video call is a face-to-face conversation that happens right on your TV. During a video call, you have the option of turning off the video and switching to an audio call instead. You can turn the video back on again at any time during the call session.
Calls and Chats Video Call Options • Mute (On Remote) There are two Mute options on your remote: Mic – Select to mute yourself so the other person can’t hear you. Press again to turn back on. Sound – Select to mute the other person. Press again to turn back on. • Video (On Remote) Press this to momentarily turn off your camera and pause your video transmission. Press again to turn back on.
Calls and Chats Helpful Hints for Video Calls • After 4 hours, your video call will automatically end. You will be offered the option to CONTINUE if you want to keep talking. • You can make and accept video calls while watching TV, including On Demand or DVR programming. Simply make or accept a call, as you normally would then use your remote to select VIEWS on the bottom of the screen. Choose the view that balances your preference of TV program and caller video.
Calls and Chats Make an Audio Call An audio call works much like a video call except there is no actual video. Instead, you’ll see your contact’s Skype avatar or photo during the call. Even if you make an audio call, you have the option of turning on video any time during the call. a) Select someone from your contacts or Recent lists. b) Choose AUDIO CALL. c) You’ll see the following as the call is being placed and a message is being sent to your contact.
Calls and Chats 35 Audio Call Options • Mute (On Remote) There are two Mute options on your remote: Mic – Select to mute yourself so the other person can’t hear you. Press again to turn back on. Sound – Select to mute the other person. Press again to turn back on. • Hold (On Screen and Remote) Select HOLD at the bottom of your screen or press Hold on your remote to pause the transmission of audio from your microphone. This will also mute incoming sound.