
Installation Guide


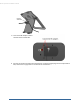
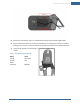

Table Of Contents
- Audience
- Typographic Conventions
- Overview
- Installation Tools
- Installing the Security System
- Step A: Setting up the Router
- Step B: Installing the Technicolor TouchScreen
- Step C: Ensure Your TouchScreen Configuration Information Is Correct
- Step D: Activating the System
- Step E: Adding Sensors to the Security System
- Step F: Testing the Alarm Functionality of the Security System
- Step G: Setting and Validating the Security Information
- Step H: Mounting the Sensors
- Step I: Configuring the TouchScreen
- Step J: Activating the Subscriber Portal

Installing the Security System
9
10. Position the TouchScreen near an un-switched wall outlet (not controlled by a light switch).
10. If the installation plan does not involve the TouchScreen connecting to the customer’s network
wirelessly, then connect an Ethernet cable to the TouchScreen and the iControl-dedicated router.
11. Insert the A/C adapter into the bracket as
shown.
Table 1: A/C Power Supply Ratings
Rating Value
Voltage 100 - 240 V
Current 0.5A
Power
Frequency 50/60 Hz