
- Philips Rear-projection HDTV Monitor Brochure


12
C
ONNECTING A STANDARD
DVD P
LAYER
VIDEO
Pb
Pr
VIDEO
S-VIDEO
L
AUDIO
L
R
AUDIO
L
R
G/Y
R/Pr
B/Pb
V
H
SYNC
L
R
AUDIO
HD INPUT-AV 4
INPUT-AV 2OUTPUT
INPUT-AV 1
ANTENNA IN 75Ω
Y
Rear of TV
*(Example: Philips DVD model DVD712)
Rear of DVD Player*
COAXIAL
DIGITAL AUDIO OUT
PCM-MPEG2-Dolby Digital-DTS
L
R
(CVBS)
VIDEO OUT
AUDIO OUT
S-VIDEO OUT
(Y/C)
SUB WF OUT
OPT OUT
1
2
1
2
Y
P
B
/C
B
P
R
/C
R
VIDEO OUT
2
1
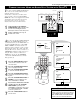
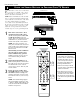
C
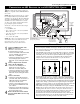
omponent video inputs allow the highest pos-
sible color and picture resolution in the play-
back of digital signals, such as those of DVD
players. The color difference signals (Pb, Pr) and
the luminance (Y) signal are connected and
received separately. The result is better color
bandwidth information than is possible with com-
posite video (labeled VIDEO on your TV’s jack
panel) or S-Video connections.
To make the connections shown in this example,
you will need:
• three cables for video connections (standard
RCA connectors)
•two cables for audio connections (standard
RCA connectors).
NOTE: The cables are not supplied with your TV.
You should be able to buy them at most stores
that sell electronics. Or you can call our
Customer Care Center at 1-800-531-0039.
1
Connect the YPbPr (component)
VIDEO OUT jacks from the DVD player
to the INPUT-AV 1 YPbPr (component
video) jacks on the rear of the TV.
NOTE: The INPUT-AV 1 YPbPr jacks
will accept 480i (interlaced) output sig-
nals only. The connection example on this
page assumes the use of a DVD player
with interlaced output. Some DVD play-
ers, however, have YPbPr outputs that can
be switched between interlaced and pro-
gressive scan. If you are attempting to use
a DVD player with progressive-scan (480p
output) capability to make the connection
shown in this example, you must be sure
to switch the DVD player to interlaced. If
necessary, refer to the DVD player’s direc-
tions-for-use manual for help. If you want
to use the DVD player in progressive-scan
mode, you must use the
HD INPUT-AV 4 jacks (see page 12).
2
Connect the AUDIO OUT L(eft) and
R(ight) jacks from the DVD player to the
INPUT-AV 1 AUDIO jacks on the rear of
the TV.
3
Press the AV button on the remote con-
trol as many times as necessary to select
the CVI (component video input) source
on the TV.
4
Turn the DVD player on and press
PLAY to view the DVD program on the
TV.
Connecting Accessory Devices to Your TV
CVI
3
•To simplify making connections, the con-
nectors on audio and video cables are
often color coded. The jacks on your TV
are likewise color coded to match the
connectors.
•The names for the component video jacks
may differ depending on the DVD player
or accessory digital source equipment
used. For example, besides YPbPr, you
may see R-Y/B-Y/Y; or CrCbY. Although
abbreviations and terms may vary, the let-
ters B and R stand for the blue and red
color component signal connectors, respec-
tively, and Y indicates the luminance sig-
nal. If necessary, refer to the directions-for-
use manual for your DVD or digital acces-
sory for more information.
•You can also connect a satellite receiver
to the TV in a manner similar to the
example shown on this page. If you con-
nect a satellite receiver to the TV, you
will need to use the receiver’s channel-
memorization system to store channels in
the receiver’s memory.
• If you experience difficulties receiving
sound with a DVD disc, check the sound
settings through the DVD disc’s menu.
• CVI is not accessible in the PIP window.
See pages 6 and 7 in the Quick Use and
Setup Guide for more on the PIP feature.
HELPFUL HINTS
To prevent uneven picture-tube aging, do not
leave nonmoving images or border bars on the
screen for an extended period. See page 60.
WARNING