
- Philips Rear-projection HDTV Monitor Brochure


49
TURNING THE
AUTOLOCK™ BLOCKING CONTROL ON OR OFF
T
he BLOCKING control can be thought
of as the “master switch” for
AutoLock™. Use it to turn ON or OFF all
of the settings (based on ratings). This
control does not affect channel blocks (see
page 46).
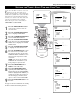
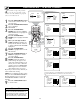
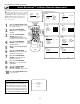
1
Press the MENU/SELECT button
on the remote control to show the
onscreen menu.
2
Press the CURSOR RING DOWN
twice to highlight
FEATURES.
3
Press the CURSOR RING
RIGHT. Then press the CURSOR
RING DOWN once to highlight the
AutoLock control.
4
Press the CURSOR RING
RIGHT again to highlight ACCESS
CODE.
5
Enter your four-digit ACCESS
CODE.
6
Press the CURSOR RING DOWN
repeatedly until BLOCK OPTIONS
is highlighted.
7
Press the CURSOR RING
RIGHT to enter the BLOCK
OPTIONS submenu. BLOCKING
will be highlighted.
8
Press the CURSOR RING
RIGHT or LEFT to turn
BLOCKING ON or OFF.
9
Press the STATUS/EXIT button
to exit the menu.
Using the Onscreen Submenus: Features
PICTURE
SOUND
FEATURES
INSTALL
TIMER
AutoLock
CLOSED CAP
FORMAT
TIMER
AutoLock
CLOSED CAP
FORMAT
TIME
START TIME
STOP TIME
CHANNEL
ACTIVATE
FEATURES
TIMER
AutoLock
CLOSED CAP
FORMAT
FEATURES
ACCESS CODE
- - - -
FEATURES
ACCESS CODE
- - - -
TIMER
AutoLock
CLOSED CAP
FORMAT
FEATURES
ACCESS CODE
X X X X
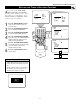
1
2,6
3,4,
7,8
9
5
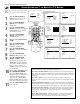
AutoLock
BLOCKING
BLOCK UNRATED
NO RATING
FEATURES
SETUP CODE
CLEAR ALL
MOVIE RATING
TV RATING
BLOCK OPTIONS
BLOCK OPTIONS
AutoLock
OFF
AV3
ALL
1
2
BLOCKING
BLOCK UNRATED
NO RATING
BLOCK OPTIONS
AutoLock
ON
AV3
ALL
1
2
BLOCKING
BLOCK UNRATED
NO RATING
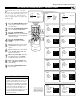
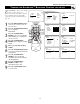
AutoLock
2
3
4
5
6
FEATURES
BLOCK CHANNEL
SETUP CODE
CLEAR ALL
MOVIE RATING
TV RATING
TIMER
AutoLock
CLOSED CAP
FORMAT