
- Philips Rear-projection HDTV Monitor Brochure


55
USING THE
PICTURE-FORMAT CONTROL
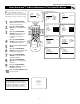
Using the Onscreen Submenus: Features
Selecting a picture Format
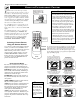
Using the TV Buttons
Should your remote control become lost or other-
wise unavailable for use, follow the steps below
to use the buttons on the front of the TV to access
the onscreen menu and select a picture-format
control.
1
Press the Volume + and – buttons
simultaneously. The onscreen menu
appears.
2
Press the Channel Down button
repeatedly until FEATURES is high-
lighted. Then press the Volume + but-
ton to enter the FEATURES submenu.
3
Press the Channel Down button
repeatedly until FORMAT is highlight-
ed. Then press the Volume + or – button
until you select the picture format you
want.
4
Press the Volume + and – buttons
simultaneously and repeatedly until
you back out of the menu screens.
PICTURE
SOUND
FEATURES
INSTALL
TIMER
AutoLock
CLOSED CAP
FORMAT
FEATURES
TIMER
AutoLock
CLOSED CAP
FORMAT 4:3
OR
FORMAT EXPAND 4:3
OR
FORMAT PANORAMA
TIMER
AutoLock
CLOSED CAP
FORMAT
TIME
START TIME
STOP TIME
CHANNEL
ACTIVATE
FEATURES
OR
FORMAT WIDE SCREEN
1
2,4
3,5
6
To prevent uneven picture-tube aging, do not
leave nonmoving images or border bars on the
screen for an extended period. See page 60.
W
ARNING
The TV’s Picture-format options are avail-
able only with video sources connected to
the ANTENNA, AV1, CVI, AV2, AV3 (side
panel) inputs on the TV. The picture formats
of video sources connected to the HD inputs
are controlled through the HD set-top box
or progressive-scan-capable DVD player
providing the video source.
HELPFUL HINT