SpeedTouch™605s Business SHDSL Router Setup and User’s Guide Release R4.
SpeedTouch™605s Setup and User’s Guide Release R4.
Status Change Note Short Title Copyright v1.0 PeckelbeenS Setup and User's Guide ST605s R4.2 (en) © 2003 THOMSON. All rights reserved. Passing on, and copying of this document, use and communication of its contents is not permitted without written authorization from THOMSON. The content of this document is furnished for informational use only, may be subject to change without notice, and should not be construed as a commitment by THOMSON.
Contents 1 SpeedTouch™ Installation ............................................ 3 1.1 Getting Acquainted with the SpeedTouch™.................................................... 4 1.2 Setting up the SpeedTouch™............................................................................. 6 1.3 SpeedTouch™ Configuration Setup .................................................................. 7 1.3.1 Configuration Setup for Microsoft Windows Operating Systems ........................................
2 4 SpeedTouch™ NAPT Manager .................................. 51 5 SpeedTouch™ System Software Upgrade ................ 57 5.1 The SpeedTouch™ Upgrade Wizard .............................................................. 58 5.2 Manual System Software Management via BOOTP Server ......................... 62 6 Troubleshooting ........................................................... 65 6.1 General..................................................................................................
1 SpeedTouch™ Installation 1 SpeedTouch™ Installation Introduction Thank you for purchasing the SpeedTouch™605s Business SHDSL Router! With the SpeedTouch™605s Business Symmetrical High speed Digital Subscriber Line (SHDSL) Router, surfing the Internet will become a whole new experience. In this Setup and User's Guide This User's Guide will assist you in getting acquainted with the SpeedTouch™605s Business SHDSL Router and in getting connected quickly to the Internet.
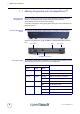
1 SpeedTouch™ Installation 1.1 Getting Acquainted with the SpeedTouch™ Introducing the SpeedTouch™ Prior to proceeding, please make sure to read the SpeedTouch™Quick Installation Guide first. It provides important package content and safety information. Check whether all items are present in your package. In the event of damaged or missing items, please contact your local product dealer for further information.
1 SpeedTouch™ Installation Indicator Ethernet port(s) LEDs Description Name Color State PWR/Alarm Green Flashing Back-to-defaults On Power on, normal operation Orange On Self test Red Flashing Power on On Power on, selftest failed The Ethernet port on the rear panel has one LED: Link Integrity/Activity LED 10/100Base -T Indicator Name Color State Description Integrity/Activity Green Off No connection on this port On Ethernet link up.
1 SpeedTouch™ Installation 1.2 Setting up the SpeedTouch™ Local network Ethernet Cables For Ethernet connectivity you need at least: • A computer with installed Ethernet Network Interface Card (NIC) or available on-board Ethernet port • If needed, a hub or switch and the necessary connection cables In the SpeedTouch™605s box, a full wired Cat.5 straight-through RJ45/RJ45 Ethernet cable, further referred to as LAN cable is included. You can use LAN cables other than the one provided in the box.
1 SpeedTouch™ Installation 1.3 SpeedTouch™ Configuration Setup Internet connectivity Some configuration may be required to prepare the SpeedTouch™ for Internet connectivity. What you need from your ISP You might need a user account with an Internet Service Provider (ISP) for Internet access. For this user account, your ISP will provide you with: • A user name (logon ID) • A password Other information may be required, depending on the ISP's specific requirements.
1 SpeedTouch™ Installation 1.3.1 Configuration Setup for Microsoft Windows Operating Systems Microsoft Windows One of the following Windows operating systems must be installed on your PC(s): • Windows 98 • Windows 98SE • Windows ME • Windows NT4.0 SP6 • Windows 2000 • Windows XP You may need the Windows installation CD-ROM during installation.
1 SpeedTouch™ Installation The detection procedure The detection procedure proceeds as follows: 1 Insert the SpeedTouch™ Setup CD-ROM in your PC's CD-ROM drive. The SpeedTouch™ CD Browser will start automatically. Note 2 If the SpeedTouch™ CD Browser window does not appear automatically, open a Run window via Start > Run from the Start menu and enter the following path: D:\Menu.exe, where D stands for the drive letter of your CD-ROM drive.
1 SpeedTouch™ Installation 5 The Welcome to the SpeedTouch™ Setup Wizard window appears: Click Next to proceed. 6 The Software License Agreement window appears: You must accept before continuing. Therefor click Yes to accept. Note 7 10 If you have already accepted this License Agreement in a previous configuration setup, this window will not be shown. The Setup wizard will continue to search for the SpeedTouch™ on the network.
1 SpeedTouch™ Installation 8 The Setup wizard should find your SpeedTouch™ device on the local network. This is indicated by the following window: In case more than one SpeedTouch™ device is found, a listing is provided from which you can select your SpeedTouch™. Note If the Setup wizard does not find any SpeedTouch™ on the network an error window pops up. In this case check: • Whether the SpeedTouch™ is turned on and fully initialized.
1 SpeedTouch™ Installation The configuration procedure The Configuration procedure proceeds as follows: 1 Once the SpeedTouch™ Setup wizard has detected your SpeedTouch™ device, you can proceed with the configuration procedure. If more than one SpeedTouch™ device is listed, select the appropriate one. Then, click Next to proceed. Note If the SpeedTouch™ has been configured before, it may be protected by a system password.
1 SpeedTouch™ Installation 6 The SpeedTouch™ Setup wizard will appear again to announce that the configuration has been successful: Click Finish to close the wizard. Note In some cases, the SpeedTouch™ Setup wizard may ask you to restart your computer. Most configuration profiles will enable SpeedTouch™’s DHCP server - and a PC’s Ethernet port is configured as DHCP client by default.
1 SpeedTouch™ Installation 1.3.2 Configuration Setup for other Operating Systems Supported Systems As the SpeedTouch™ is OS-independent, this configuration setup can be used by any computer system. Note TCP/IP The following procedure may equally be used on MS Windows OSs. Ensure that your operating system has a valid TCP/IP configuration. Configure your computer with a static Net10 private IP address, e.g. 10.0.0.1. Ensure, however, that you do NOT use the 10.0.0.
1 SpeedTouch™ Installation 5 The following window invites you to select the appropriate connection profile for your internet connectivity: In the Service list, click the connection profile of your choice. Note You can add services to the Services list by uploading templates. See “ Templates” on page 48 for more information on uploading templates. 6 Subsequent screens guide you through the configuration setup of both your SpeedTouch™ and/or your PC.
1 SpeedTouch™ Installation 9 After the configuration is applied on the SpeedTouch™ some additional configuration of your computer system may be necessary. Note 10 16 The required settings for your computer should be provided by your Service Provider, if applicable. To check whether the new configuration was successfully completed, you can browse to the SpeedTouch™ and check its current status. E-SIT-CTC-20030605-0003 v1.
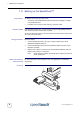
1 SpeedTouch™ Installation 1.4 Dr SpeedTouch™ Installation Introduction The Dr SpeedTouch™ application allows you to diagnose and troubleshoot your SpeedTouch™605s With the Dr SpeedTouch™ application you can do the following: Supported Operating Systems Installation procedure • View the status and performance of the SpeedTouch™ device • Run a Diagnostics program to locate a connectivity problem • Run a Troubleshooter to help you solve a connectivity problem.
1 SpeedTouch™ Installation Using Dr SpeedTouch™ By default Dr SpeedTouch™ is started automatically at boot of your system and runs in the background, i.e. minimized in the status area. To pop up Dr SpeedTouch™: Dr SpeedTouch™ features 18 1 Double-click in the status area. 2 Dr SpeedTouch™ searches your network for SpeedTouch™ devices. If more than one device is found, a list of available devices will be provided. If this is the case, select the SpeedTouch™ of your choice and click OK.
1 SpeedTouch™ Installation • Monitor the downstream and upstream performance. of your DSL connection: • Test and troubleshoot the connectivity of your computer and the SpeedTouch™605sdevice to your ISP and the Internet via the Diagnostics wizard. Note E-SIT-CTC-20030605-0003 v1.0 For more information on Dr SpeedTouch™ please click Help in the application or press F1 context sensitive help.
1 SpeedTouch™ Installation 20 E-SIT-CTC-20030605-0003 v1.
2 SpeedTouch™ Internet Connectivity 2 SpeedTouch™ Internet Connectivity Introduction This chapter provides information on how to access the Internet and how to configure your SpeedTouch™ according to your preferences. Adding UPnP to a Microsoft Windows XP system If you are running Microsoft Windows XP, we strongly recommend to add the Universal Plug and Play (UPnP) component to your system. To add the UPnP component proceed as follows: 1 On the start menu, click Control Panel.
2 SpeedTouch™ Internet Connectivity 2.1 Surfing the Internet Introduction Access methods As soon as the SpeedTouch™ and the computers have been configured as outlined in “1.3 SpeedTouch™ Configuration Setup” on page 7, you can connect to the Internet. Depending on the configuration of the SpeedTouch™ you may have: • Direct access • Dial-in access As soon as the initial configuration has been performed, continuous and immediate access is available via the DSL line.
2 SpeedTouch™ Internet Connectivity 2.2 Connect to the Internet via SpeedTouch™’s embedded PPP client. Introduction The SpeedTouch™ supports both two most popular connection methods: Routed PPP over ATM (PPPoA) and PPP over Ethernet (PPPoE). The connection method to use depends on the preferences of your ISP, hence the configuration profile you must apply to the SpeedTouch™.
2 SpeedTouch™ Internet Connectivity 2.2.1 Internet Sessions via Windows XP’s UPnP Starting an Internet session via Windows XP’s UPnP To connect to the internet via Windows XP’s Internet Connection icon proceed as follows: 1 Click Control Panel on the Start menu. 2 The Control Panel window appears. Double-click Network Connections. 3 The Network Connections window appears: Double-click the Internet Connection icon.
2 SpeedTouch™ Internet Connectivity 2.2.2 Internet Sessions via the SpeedTouch™ Web Pages (all OSs) Starting a PPP session Terminating an opened PPP session E-SIT-CTC-20030605-0003 v1.0 To open a Routed PPP connection to the Internet: 1 Open a web browser on your computer and browse to the SpeedTouch™ web pages: 2 If needed, expand the Basic Topics, and click Connections to open the Connections web page. 3 In the Connections table all configured Routed PPP entries are shown.
2 SpeedTouch™ Internet Connectivity 2.3 Connect to the Internet via a Broadband Dial-in Client Introduction This section explains how you can connect to the Internet using a broadband dial-in application on a computer running: • Microsoft Windows XP • Mac OS X. To use a broadband dial-in client, the SpeedTouch™ needs to be configured for Bridged Ethernet or Routed PPPoE (with PPPoE relay) via the SpeedTouch™ Setup wizard or embedded Easy setup wizard. 26 E-SIT-CTC-20030605-0003 v1.
2 SpeedTouch™ Internet Connectivity 2.3.1 Using the Windows XP Dial-in Client Configuring a dial-in connection on a Windows XP platform To create a new dial-in connection proceed as follows: 1 On the Start menu, click Control Panel. 2 The Control Panel window appears. Click Network and Internet Connections. 3 The Network and Internet Connections window appears. Click Network Connection. 4 In the Network Tasks menu, click Create a new connection.
2 SpeedTouch™ Internet Connectivity 7 In the next window, choose how you want to connect to the internet: Select Connect using a broadband connection that requires a user name and password. Click Next to continue. 28 8 In the next window, give a name to the connection you are creating, e.g. MyISP. 9 In the next window, select whether the connection is available to any user or only to yourself. 10 In the next window, fill in the Internet account information.
2 SpeedTouch™ Internet Connectivity should be provided by your Service Provider. 11 At the end of the configuration the following window appears: Click Finish to complete the configuration. The Connect MyISP window (see below) appears. Starting a dial-in Internet session from Windows XP To connect to the internet proceed as follows: 1 On the Start menu, point Connect To and click the name of the connection you’ve created, e.g. MyISP.
2 SpeedTouch™ Internet Connectivity 2.3.2 Using the Mac OS X Dial-in Client Configuring a dial-in connection on a Mac OS X platform To create a dial-in connection proceed as follows: 1 On the Apple menu, click System Preferences. 2 The System Preferences window appears. Click the Network icon. 3 The Network window appears: In the Show list, select Ethernet Adaptor (enx) and click the PPPoE tab.
3 SpeedTouch™ Web Interface 3 SpeedTouch™ Web Interface Introduction The SpeedTouch™ comes with integrated local configuration capabilities. The local configuration, via the SpeedTouch™ web interface, is based on the HTTP server/web browser concept. It allows you to configure your SpeedTouch™ via a web browser using HTML pages from any local computer attached to the Ethernet interface.
3 SpeedTouch™ Web Interface Result As a result the System Information page appears: From now on, the SpeedTouch™ acts as a web server, sending HTML pages/forms at your request. You can fill out these pages/forms and submit them to the SpeedTouch™. The latter scans the pages and performs the appropriate configurations. Topic menu and links On the left of each of the SpeedTouch™ web pages a topics menu is provided. This menu navigates you via links through all configurational aspects of the SpeedTouch™.
3 SpeedTouch™ Web Interface Advanced topic links The following table lists all advanced topic links: ADVANCED topic menu Help Click... To... Diagnostics View SpeedTouch™ diagnostics. Easy Setup Configure the SpeedTouch™. IP Addresses View/configure the SpeedTouch™ IP interfaces. IP Routing View/configure the SpeedTouch™ IP router. NAPT View/configure static NAPT entries. View/configure multi-NAT entries. Define a default local server for inbound connectivity. Configure UPnP.
3 SpeedTouch™ Web Interface 3.1 Basic Topics Menu Links System Information Click this link to display the System Information page. This page is also the SpeedTouch™ home page.
3 SpeedTouch™ Web Interface • Click the System tab to view some important system information of the SpeedTouch™: The System table lists: Connections • The SpeedTouch™ product name. • The unique Medium Access Control (MAC) address of your SpeedTouch™. This MAC address can be used to identify your SpeedTouch™. • The SpeedTouch™ Software Release. • The SpeedTouch™ Board Name. • The SpeedTouch™ Serial Number • The SpeedTouch™ Product Code. Click this link to view the Connections page.
3 SpeedTouch™ Web Interface System Log Click this link to view the System Log page. This page allows you to view the activity on the SpeedTouch™ since power on: 36 E-SIT-CTC-20030605-0003 v1.
3 SpeedTouch™ Web Interface 3.2 Advanced Topics Menu Links Diagnostics Click this link to display the Diagnostics page. This page consists of three expandable sections: • Expand the System section to view some important system information: • Expand the Wan section to view the current DSL state and connection information click the plus next to DSL and Connections: Click • E-SIT-CTC-20030605-0003 v1.0 to perform an IP connectivity test.
3 SpeedTouch™ Web Interface Easy Setup To configure the SpeedTouch™ using the Easy Setup wizard: 1 Click Advanced > Easy Setup to start the Easy Setup wizard. 2 The Welcome to the SpeedTouch™ Setup Wizard window appears: 3 The following window invites you to select the appropriate connection profile for your internet connectivity: In the Service list, click the connection profile of your choice. Note 4 38 You can add services to the Services list by uploading templates.
3 SpeedTouch™ Web Interface 5 In a final step all configurations are applied to the SpeedTouch™: 6 The SpeedTouch™ Setup Wizard appears again to announce that the configuration has been successful: Click Finish to close the wizard. Most configuration profiles will enable SpeedTouch™’s DHCP server - and a PC’s Ethernet port is configured as DHCP client by default.
3 SpeedTouch™ Web Interface IP Addresses Click this link to display the IP Addresses page. This page allows you to view or add/delete specific IP address entries for SpeedTouch™'s interfaces: To add an IP address for one of the SpeedTouch™ interfaces: 40 1 Click New. 2 In the Interface field, select the interface to which the IP address applies (use eth0 for assigning to the SpeedTouch™ Ethernet interface). 3 In the Address/Mask field, provide IP address and (sub)netmask in IP prefix notation (e.
3 SpeedTouch™ Web Interface IP Routing Click this link to display the IP Routing page. This page allows you to view or add/delete static IP routes for SpeedTouch™'s IP router: Routing can be useful when subnetting your local network. To add a static IP route proceed as follows: 1 Click New. 2 Specify the destination IP address (use the prefix notation to apply a subnetmask), Gateway, Interface and Metric. Note E-SIT-CTC-20030605-0003 v1.
3 SpeedTouch™ Web Interface NAPT Clicking this button displays the Network Address and Port Translation (NAPT) page. This page allows you to: • View or add/delete specific static NAPT entries: To add static NAPT entries proceed as follows: 1 Click New. 2 Specify the outside address and inside address for the entry as well as the protocol and port to which the entry applies. Note 3 If the NAPT entry is applied to a connection's dynamically assigned local peer IP address, you should specify 0.0.0.
3 SpeedTouch™ Web Interface • Define a default server: By specifying a default server IP address (e.g. 10.0.0.154 as shown above), all incoming connections that don’t match a specifically configured static NAPT entry will be forwarded to the device with this IP address. This setting should be adequate for most server applications and eliminates the need for specific static NAPT entries. • Configure UPnP: The three UPnP configuration options are: E-SIT-CTC-20030605-0003 v1.
3 SpeedTouch™ Web Interface DHCP Click this link to display the Dynamic Host Configuration Protocol (DHCP) page. This page allows you to: • Click the DHCP Server tab to access the DHCP server page.
3 SpeedTouch™ Web Interface Under Properties you can select: • • DHCP server: To enable the SpeedTouch™ DHCP server. In addition, select the appropriate Auto DHCP • Auto DHCP (default): The SpeedTouch™ will not start its DHCP server immediately, but will first probe the network for a possible concurrent DHCP server for some period of time (set by Client timeout in seconds).
3 SpeedTouch™ Web Interface • Click the DHCP Relay tab to view the DHCP relay page. This page has two tabs: • Click the Relay Config tab to view the current SpeedTouch™ DHCP relay status: Via this table you can also manually add static SpeedTouch™ DHCP relay entries for specific interfaces, if applicable.
3 SpeedTouch™ Web Interface DNS Click this link to display the Dynamic Name System (DNS) page. This page allows you to: • View the current SpeedTouch™ DNS server hostname leases: Via this table you can also add static DNS hostname entries. This may be useful for devices which do not support DNS, e.g. a printer. By adding a name for your network printer, identified by its IP address, you will be able to contact this printer by name rather than by IP address.
3 SpeedTouch™ Web Interface System Password • View the current system software version, file name and the SpeedTouch™ board type: • Check for the latest SpeedTouch™ software upgrades. Click this link to display the System Password page. This page allows you to configure a system password to restrict access to the SpeedTouch™: It is highly recommended that you configure a system password. To protect the SpeedTouch™ you should change the System password on a regular basis.
3 SpeedTouch™ Web Interface Language Click this link to view the Language page. This page allows you to select the SpeedTouch™ web page language. By default, the only available language is english. Another language can be made available on the SpeedTouch™ web pages by running the SpeedTouch™ Setup wizard from the SpeedTouch™ Setup CD-ROM. At the start of the setup procedure, select the desired language.
3 SpeedTouch™ Web Interface 50 E-SIT-CTC-20030605-0003 v1.
4 SpeedTouch™ NAPT Manager 4 SpeedTouch™ NAPT Manager Introduction Supported Operating Systems Using SpeedTouch™ NAPT Manager The detection procedure The SpeedTouch™ NAPT Manager allows you to add static NAPT entries for specific applications. The NAPT Manager is only supported for following Microsoft Windows Operating Systems: • Windows 98 • Windows 98SE • Windows ME • Windows NT4.
4 SpeedTouch™ NAPT Manager 3 The following window appears: Click Configure NAT Settings. 4 The NAPT Manager window appears: Click Next. 5 The Software License Agreement appears: You must accept before continuing. Therefor click Yes to accept. Note 52 If you have already accepted this Software License Agreement in a previous session of NAPT Manager, this window will not be shown. E-SIT-CTC-20030605-0003 v1.
4 SpeedTouch™ NAPT Manager 6 NAPT Manager will continue to search for the SpeedTouch™ on the network. The following window shows the detection progress: 7 The NAPT manager should find your SpeedTouch™ device on the local network. This is indicated by the following window: In case more than one SpeedTouch™ device is found, a list with the different devices is shown.Select the SpeedTouch™ of your choice and click Next.
4 SpeedTouch™ NAPT Manager The configuration procedure Proceed as follows to add a static NAPT entry using SpeedTouch™ NAPT Manager: 1 Once the SpeedTouch™ Setup wizard has detected your SpeedTouch™ device, you can proceed with the configuration procedure. If more than one SpeedTouch™ device is listed, select the appropriate one. Then, click Next to proceed. Note If the SpeedTouch™ has been configured before: • It may be protected by a system password.
4 SpeedTouch™ NAPT Manager 4 NAPT Manager adds the NAPT entry to the list: Click Next to save the new entries. 5 NAPT Manager saves the new NAPT entries to persistent memory: 6 At the end of the procedure the following window appears: Click Finish to quit NAPT Manager. E-SIT-CTC-20030605-0003 v1.
4 SpeedTouch™ NAPT Manager 56 E-SIT-CTC-20030605-0003 v1.
5 SpeedTouch™ System Software Upgrade 5 SpeedTouch™ System Software Upgrade Introduction The SpeedTouch™ products continue to evolve as extra and new functionalities are made available. This chapter describes how to upgrade the SpeedTouch™ system software. System software updates (all OSs) You can check for system software upgrades via the SpeedTouch™ web pages. See “ System” on page 47 for more information. System software upgrades may also be available from your Service Provider.
5 SpeedTouch™ System Software Upgrade 5.1 The SpeedTouch™ Upgrade Wizard Using the Upgrade Wizard The procedure described in this section are valid only in case you run an MS Windows Operating System or Mac OS X 10.1/10.2. During the upgrade procedure all configuration settings are backed up by the wizard and restored after upgrading the system software. Therefore, you do not need to back up the SpeedTouch™ configuration yourself.
5 SpeedTouch™ System Software Upgrade 2 The Welcome to the SpeedTouch™ Upgrade Wizard window appears: Click Next to proceed. 3 The SpeedTouch™ Software License Agreement window appears: You must accept before continuing. Therefor click Yes to accept. Note 4 E-SIT-CTC-20030605-0003 v1.0 If you have already accepted this License Agreement in a previous upgrade, this window will not be shown. The Setup wizard will continue to search for the SpeedTouch™ on the network.
5 SpeedTouch™ System Software Upgrade 5 The Setup wizard should find your SpeedTouch™ device on the local network. This is indicated by the following window: In case more than one SpeedTouch™ device is found, a listing is provided from which you can select your SpeedTouch™ from. Note If the Setup wizard does not find any SpeedTouch™ on the network an error window pops up. In this case check: • Whether the SpeedTouch™ is turned on and fully initialized.
5 SpeedTouch™ System Software Upgrade 8 The following window allows you to overview your selection: Click Next to continue. 9 You can follow the configuration progress in following window: 10 After upgrading the SpeedTouch™, a final window appears to announce that the upgrade has been successful: Click Finish to close the wizard. E-SIT-CTC-20030605-0003 v1.
5 SpeedTouch™ System Software Upgrade 5.2 Manual System Software Management via BOOTP Server SpeedTouch™ system software management The SpeedTouch™ system software is based on BOOTP, a standard mechanism used for booting diskless stations. The SpeedTouch™ is able to slip in BOOTP mode, allowing a BOOTP server to manage the SpeedTouch™ file system, and submit upgrade files to it.
5 SpeedTouch™ System Software Upgrade E-SIT-CTC-20030605-0003 v1.0 5 While holding the Defaults button, power on the SpeedTouch™ and keep holding the Defaults button until the Power/System, Line Tx and Line Rx LEDs lit green (approximately six seconds). This indicates that the SpeedTouch™ entered BOOTP mode and is sending BOOTP requests. 6 The BOOTP server will reply to the BOOTP requests and will perform the required operations to send the system software to the SpeedTouch™.
5 SpeedTouch™ System Software Upgrade 64 E-SIT-CTC-20030605-0003 v1.
6 Troubleshooting 6 Troubleshooting Introduction This chapter provides information on how to identify and correct some common problems you may encounter when using and configuring the SpeedTouch™. If the following troubleshooting tips do not resolve the problem contact the company from which you purchased the SpeedTouch™ for assistance. E-SIT-CTC-20030605-0003 v1.
6 Troubleshooting 6.1 General Configuration problems If you encounter DSL connectivity problems due to misconfiguration, you might consider a hardware reset to factory defaults (as described further in this chapter). However, please note that resetting the SpeedTouch™ to its factory settings will revoke all the changes you made to the configuration. Dr SpeedTouch™ Dr SpeedTouch™ enables you to test your computer and SpeedTouch™ connectivity via its Diagnostics wizard.
6 Troubleshooting 6.2 SpeedTouch™ Default Configuration Reset to default configuration Proceed as follows to perform a hardware reset to factory defaults: 1 Make sure the SpeedTouch™ is powered on. 2 Use a pencil to press the Defaults button at the back of the SpeedTouch™ until all the LEDs on the front panel start flashing. Defaults button 3 User configuration profile Release the button. The SpeedTouch™ reboots and will come online again with factory defaults.
6 Troubleshooting 68 E-SIT-CTC-20030605-0003 v1.
© 2003 THOMSON. All rights reserved. E-SIT-CTC-20030605-0003 v1.0 TCM35726010 www.speedtouch.