00_DTH8657_cov.
00_DTH8657_cov.qxp 10/05/06 DVD / VIDEO PLAYER CD / CD 14:12 Page 2 FR ATTENTION - RAYONNEMENT LASER EN CAS D'OUVERTURE. NE PAS REGARDER DANS LE FAISCEAU. EN CAUTION - LASER RADIATION WHEN OPEN. DO NOT STARE INTO BEAM. DE VORSICHT - LASERSTRAHLUNG,WENN ABDECKUNG GEÖFFNET. NICHT IN DEN STRAHL BLICKEN. ES PRECAUCIÓN IT ATTENZIONE - RADIACIÓN LÁSER CUANDO ESTA ABIERTO. NO MIRAR FIJAMENTE AL RAYO DE LUZ. - QUANDO E' APERTO EMETTE RADIAZIONI LASER. NON GUARDARE DENTRO IL FASCIO.
02_DTH8657_en.qxp 10/05/06 14:13 Page 1 To begin About your device DTH 8657 ➔160 Gb Your DVD recorder is a digital video player and recorder. Thanks to its tuner you can record TV progammes on DVD R/RW (DVD +R/-R/+RW/-RW) discs or on the integrated hard disc.The hard disc is also called the HDD or DVR. It can play the majority of 8 cm and 12 cm discs, with the exception of DVD Ram and DVD audio.
02_DTH8657_en.qxp 10/05/06 14:13 Page 2 Precautions to take • Ensure that the mains supply in your house complies with that indicated on the identification sticker located at the back of your device • Install your device horizontally, on a suitable base (furniture), with enough space around it for ventilation (7 to 10 cm) • Ensure that the ventilation slots, and the device itself, are not covered by objects such as a mat, newspapers, curtain, etc.
02_DTH8657_en.qxp 10/05/06 14:13 Page 3 Connections and initial set up Basic connections The connections suggested below are recommended first of all for installing the channels explained later on. By following, the instructions in this page you will avoid any setup problems related to the interaction between several devices. If you have any other audio video devices, do not connect them now; add them after you have installed the channels.
02_DTH8657_en.qxp 10/05/06 14:13 Page 4 Connections and initial set up The sockets and their uses There are several ways in which you can incorporate your DVD player into an Audio-Video system.This depends on the sockets and other appliances you have. Sound and image quality depend to a large extent on the types of connections used. Familiarise yourself with the characteristics of the different sockets on your recorder.
02_DTH8657_en.qxp 10/05/06 14:13 Page 5 Connections and initial set up Other Audio - Video connections If there is no Peritel-Scart socket available on the television, check to see if there are any other Video sockets (Components, S-Video or Composite) to connect your player by using the corresponding sockets. In this case, do not forget to also connect the player’s Audio outputs (AUDIO OUT) to the Audio input sockets (AUDIO IN) on your television.
02_DTH8657_en.qxp 10/05/06 14:13 Page 6 Connections and initial set up The front of your player recorder 14 1 2 13 3 4 5 6 7 8 9 10 11 12 10 USB socket - La prise USB socket is used 1 On / Off to play and/or copy JPEG images, MP3 files or AVI files. 2 Change channel or skip chapter. 3 Open and close the drawer. Note: recognised players: USB 1.1 MASS STORAGE CLASS. Note: to access the peripheral files, in the main menu select USB Device. 4 Stops the playback or recording.
02_DTH8657_en.qxp 10/05/06 14:13 Page 7 Connections and initial set up Main indications on the display menu live pr1 live av2 record live pr5 live pr3 One of the recorder's menus is activated on the screen. No functions are activated. EN Channel 1 in progress. Images from a device connected to the SCART socket AV2 (SCART IN). Start of the recording. Recording of the current channel 5 to hard disc (HDD). Recording of the current channel 3 to DVD R/RW disc.
02_DTH8657_en.qxp 10/05/06 14:13 Page 8 Connections and Setup About other displays (menus and banners) Depending on the operating mode, your recorder will display different interfaces on your TV screen to let you access settings, select functions or obtain information. DVD disc menu Each DVD video disc offers menus and for which the presentation and organisation depends on the disc’s editor.The disc menu is displayed on the screen when a DVD disc is loaded and it starts to play.
02_DTH8657_en.qxp 10/05/06 14:13 Page 9 14:35 Recording functions To watch TV Programmes 1. Turn on your TV set. 2. Turn on your DVD recorder using the STANDBY/ON. The time displayed on your DVD recorder is replaced by the word MENU. • After a few seconds the main menu of the player appears on the television screen. • The Watch TV function is already selected. 00 : 00 : 10 Note: turn off any unused devices to avoid problems of selecting sockets or other types.
02_DTH8657_en.qxp 10/05/06 14:13 Page 10 Recording functions Record the current programme Configured recording (HDD or DVD discs) Configured recording lets you record the programme after a quick adjustment of the duration, the quality and the destination of the programme to be recorded to the hard disc (HDD) or to a DVD R/RW disc.
02_DTH8657_en.qxp 10/05/06 14:13 Page 11 Recording functions Saving the buffer This function lets you start to record a programme to the DVR hard disc even if you missed the start thanks to the Time Shift function. In the recording menu which appears, select then activate (position YES) the Save Buffer function with the ▼ and B keys. Confirm with OK. The programme is recorded to the hard disc and its references (name, times, etc.) are stored in the video library.
02_DTH8657_en.qxp 10/05/06 14:13 Page 12 Recording functions Programming a recording or a transfer Your DVD recorder lets you program recordings or transfers. Programming several recordings is really useful when it uses the high capacity of the hard disc, thereby enabling you to go beyond the limited capacities of DVD R/RW discs.You can programme recordings using the manual 9 step method or by choosing, for channels which broadcast the programme guide, the Naviclick programming.
02_DTH8657_en.qxp 10/05/06 14:13 Page 13 Recording functions VPS/PDC If the channel broadcasts the VPS/PDC signals, activate the VPS/PDC function to start the recording at the time when the programme actually starts. Recording destination Select the disc where the programme will be recorded (DVD R/RW or internal DVR) Quality Choose a recording quality. Note: selecting the quality enables you to adapt the recording time on the DVD disc. The lower the quality, the longer the time available on the disc.
02_DTH8657_en.qxp 10/05/06 14:13 Page 14 Recording functions Automatic programming (Naviclick) Your DVD recorder offers you a TV programming guide for certain channels.The information it provides are broadcast by these channels and can be downloaded.The updating of Naviclick information is carried out once every 24 hours. Naviclick allows you to display on your screen the programmes of those channels and to select the broadcasts you wish to record simply by clicking on them.
02_DTH8657_en.qxp 10/05/06 14:13 Page 15 Recording functions Libraries The library lets you locate the various recordings present on the DVR hard disc or the different DVD R/RW discs in your DVD library. The library groups together the recording names and parameters and lets you look for them using the search functions.The names of the recordings are distributed according to the nature of the files and title in four sub-libraries.
02_DTH8657_en.qxp 10/05/06 14:13 Page 16 Recording functions Library (on DVD R/RW discs) The (disc) library brings together the names of all the titles recorded to the different DVD R/RW discs in your DVD collection.When there is a DVD disc in the recorder a disc symbol is displayed before the name of each title. - • Choosing a title then pressing OK to confirm gives you access to the following functions: Rename title, Play title, Play all chapters, Delete title, Clear chapter, Copy to DVR.
02_DTH8657_en.qxp 10/05/06 14:13 Page 17 Connections and Setup Copy to disc (DVD R/RW) You may copy titles or files from the DVR hard disc to a DVD R/RW disc. In the Library menu select Copy to disc and press OK to confirm. Select the type of file/title to be copied and follow the indications which appear on the screen. Note:Your recorder has a separate setting for the recording quality on the DVR hard disc and on the DVD R/RW discs (settings from 1 to 6).
02_DTH8657_en.qxp 10/05/06 14:13 Page 18 Connections and Setup Copying titles and files Your recorder lets you copy titles and files from one media form to another.The illustrations on this page summarise the different possibilities and the functions to be chosen in the different menus for copying.
02_DTH8657_en.qxp 10/05/06 14:13 Page 19 Playing a disc Readable discs • DVD - Video - 12 cm and 8 cm, single or double sided, single or dual layer. DVDs are high density optical discs on which high quality picture and audio are recorded by means of digital signals. Region code number - Your DVD recorder responds to the regional management information recorded on DVDs.The regional code of your DVD recorder is 2. Before buying a DVD, make sure that it bears the correct logo. ALL means all regions.
02_DTH8657_en.qxp 10/05/06 14:13 Page 20 Playing a disc Loading and playing a disc Switch on your TV set and DVD recorder. It may be necessary to turn off other appliances. If the player menu is not displayed on TV screen, select the TV set Scart Peritel socket to which you connected your DVD recorder. Note: the Disc heading is shown as transparent when there is no disc in the device or if the disc is not compatible.
02_DTH8657_en.qxp 10/05/06 14:13 Page 21 Playing a disc Playing discs – Displaying the information banner To access the information banner, press INFO on your remote control unit during playback. Use the arrow keys C and B on the remote control unit to select the various icons.When an icon is selected it is highlighted. The line under the banner is an information and instruction line.When small arrows appear above and below the selected icon these point to other possible options.
02_DTH8657_en.qxp 10/05/06 14:13 Page 22 Playing a disc Subtitle and dialogue language Select the subtitle or dialogue language if they are available on the disc.The name of the language selected appears under the banner. Note: selecting the language of subtitles only involves the disc being played. If you remove the disc or if you switch off the DVD recorder your selection will be cancelled. In this case the default language, chosen when your DVD recorder was first installed, will be reactivated.
02_DTH8657_en.qxp 10/05/06 14:13 Page 23 Playing a disc Camera angles Changing camera angles A few DVD discs contain scenes shot from various different angles. If a disc being played back offers different camera angles the icon in the banner will show the number of the angle on the screen.With the disc in playback, press ANGLE on the remote control unit and choose the angle using the same key or the ▲ or ▼ keys.
02_DTH8657_en.qxp 10/05/06 14:13 Page 24 Playing a disc Interactive banners In addition to menus, your DVD recorder has interactive information banners with icons representing functions or information. Some banners provide access to disc playback functions (for DVDs, CDs,VCDs, etc.) while others give you information on the channels and related functions. While watching a channel Access: INFO key.
02_DTH8657_en.qxp 10/05/06 14:13 Page 25 Playing a disc Edit menu (DVD RW disc and DVR hard disc) The edit menu can be accessed from the information banner while you are playing a title on a DVD R/RW disc or on the internal DVR.This lets you carry out operations on the recordings which have been made. Access to the edit menu 1. Title being played INFO OK. EN 2. Select the edit icon then OK.
02_DTH8657_en.qxp 10/05/06 14:13 Page 26 Playing a disc Playing image and audio (JPEG, mp3, wma) Your player can play JPEG files with a resolution of up to five million pixels. However beyond 400,000 pixels there is no perceptible improvement in the quality of pictures displayed on your TV screen. MENU Disc OK OK Music Pictures Video OK Note: the play menu depends on the content of the disc being played. Sound: Select a folder or a title, possibly a playback function and press OK.
02_DTH8657_en.qxp 10/05/06 14:13 Page 27 Playing a disc To play DivX files Your player is an Officially Certified DivX™ device. It can play DivX®5, DivX®4, DivX®3 and DivX®VOD files according to the DivX Certified™ technical specifications. The correct playing of DivX in your player, depends on the preparation and production of the audio and video files, the codecs used, the type of recording equipment employed and the parameters of your computer.
02_DTH8657_en.qxp 10/05/06 14:13 Page 28 Menus Disc menu The Disc menu is only accessible if a disc is inserted in your DVD recorder. This menu allows access to the list of titles of the Disc Title Menu or the images menu of the Player Menu for your recorded discs (DVD R/RW). With DVD video discs you directly access the disc menu, the selection of the language, chapter, play order and contents varies depending on the disc. Note: if no disc has been inserted the line Disc remains greyed out.
02_DTH8657_en.qxp 10/05/06 14:13 Page 29 Menus Title menu MENU Disc OK Title menu OK Select a title and press OK. Rename Title Using a character chart your DVD recorder allows you to change the names of discs or titles allocated when the recording was made. Select Rename Title in the Rename Title or Rename Disc in the Disc Actions menu using the ▲ or ▼ keys and press the OK key. In the following screen select YES and confirm with OK. The character chart is displayed.
02_DTH8657_en.qxp 10/05/06 14:13 Page 30 Menus Disc options MENU Setup OK Disc options OK Disc Autoplay • Select Autoplay On, if you want the disc to be played automatically once the DVD recorder tray is closed. Screen Format - (DVD / VCD) Depending on the format of the DVD disc being played, select the image format that corresponds best to the format of your television screen - cinema screen 16 x 9, classic screen 4 x 3 (Letter Box or Standard).
02_DTH8657_en.qxp 10/05/06 14:13 Page 31 Menus Selecting Languages (DVD) Your DVD recorder gives you a selection of languages to choose from.You can change the language of the DVD recorder menus, the language of the disc menus, the language of the dialogues and that of the subtitles. In the menu, choose your preferred language for dialogues and subtitles. If it is available on the DVD you will be playing, it will be selected automatically.
02_DTH8657_en.qxp 10/05/06 14:13 Page 32 Menus Parental control Your DVD recorder has a child lock function which enables you to restrict access to certain DVDs.The discs whose content may be deemed unsuitable for your children will therefore not be visible unless a code that you have previously chosen is entered. MENU Setup OK Parental control OK Choose a play mode and confirm with OK. Note: the padlock tells you whether or not the DVD recorder is locked.
02_DTH8657_en.qxp 10/05/06 14:13 Page 33 Menus Ratings limits This function makes it possible to restrict viewing of certain DVD discs by programming a restriction on your DVD recorder.This function can only be used with DVD discs provided with the function.Your DVD recorder proposes restriction ratings between 1 and 8. In Europe ratings limits are as yet uncommon on DVD discs on sale. MENU Setup OK Parental control OK EN 1. Select Restriction level and press OK. 2.
02_DTH8657_en.qxp 10/05/06 14:13 Page 34 Menus System Options The System Options menu in the Setup menu offers you settings to configure certain useful functions and optimise the performances of your DVD recorder to match those of the devices connected to it. MENU Setup OK System Options OK DivX Selecting DivX displays the authorisation number for the videos you have purchased over the Internet (VOD:Video On Demand).
02_DTH8657_en.qxp 10/05/06 14:13 Page 35 Further information Recommendations and information concerning discs (12 cm) Disc maintenance Always handle your discs with care. Hold a disc with fingers on the border or hole. Always place disc with the label facing upward (in case of a single-sided disc). Always place the disc properly into the tray using the proper guide area. Always use a soft cloth to clean discs if necessary, wipe from the centre to the border.
02_DTH8657_en.qxp 10/05/06 14:13 Page 36 Further information Using the remote control unit correctly When you use remote control, point the unit at the appliance you want to control (DVD recorder,TV set or satellite receiver). Ensure that there is no obstacle between the remote control unit and the appliance, otherwise the infrared signal carrying the remote control commands will be blocked.
02_DTH8657_en.qxp 10/05/06 14:13 Page 37 Further information Troubleshooting guide If you encounter difficulties Advisors are at your disposal to help you solve your problems at this telephone number. MAJ 02/2004 You can contact THOMSON by dialling: 0871 712 1312 (For Great-Britain, all calls will be charged 0,10£ / mn) www.thomson-europe.com This symbol indicates that your unusable electronic appliance must be collected separately and not thrown away with household waste.
02_DTH8657_en.qxp 10/05/06 14:13 Page 38 Further information Sound problems Problems playing DivX version 5.1 and the version 2.5 player No sound • With certain recent version, coding problems may arise with DivX files which are related directly to the capacities of your computer.The coding may require the entire capacity of the microprocessor and alter the quality of the image or desynchronise the image and the sound.
02_DTH8657_en.qxp 10/05/06 14:13 Page 39 Further information • You can also change the language while a disc is playing by pressing the INFO key and selecting the icon for dialogues or for subtitles. This choice is only valid for the disc if it has not been removed from the disc drawer. seconds, until INIT is displayed on the screen of your DVD recorder.The recorder switches off after a few seconds; switch it back on.
02_DTH8657_en.qxp 10/05/06 14:13 Page 40 Further information Disconnect the power cable from the mains electricity supply if the DVD recorder malfunctions. Note: Dolby Digital is a sound compression technique developed by Dolby for multi-channel digital audio signals. The Dolby Digital system enables any audio channel configuration, from a stereo sound (2 channels) up to the digital “surround” sound 5.1. Manufactured under license from Dolby Laboratories.
00_DTH8657_cov.qxp 10/05/06 14:12 Page 3 Safety information - UK socket Equipment for the UK is supplied with a mains cable fitted with a moulded plug. Mains connection This appliance is suitable for use on A.C. mains supply, 230 V - 50 Hz only. It must not be connected to D.C. mains. Note:The mains lead of the appliance is fitted with a moulded plug. If the mains sockets are not compatible or if for any reason the plug is removed please follow the directions below.
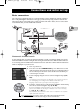
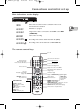
HDMI • Y-Pr-Pb • RGB auto 576p 720p 1080i 1h yuv OUTPUT IN OUT COAXIAL DIGITAL HDMI OUT AUDIO OUT Pb/Cb AV 1 (TV) L AUDIO R ANTENNA /CABLE rgb COMPONENT VIDEO OUT Y VIDEO Pr/Cr AV 2 (SAT-CABLE-DECODER) 2 1 rgb " auto " 576p 1h yuv ! 1080i ! 720p 3 EN Connection via HDMI or Y-Pr-PB (also see page 5 of the manual) Your DVD recorder is preset to provide RGB and CVBS output video signal.
00_DTH8657_cov.qxp 10/05/06 14:12 Page 4 Model and serial number DTH8657E THOMSON Sales Europe 46, quai A. Le Gallo 92648 Boulogne Cedex FRANCE 322 019 464 RCS NANTERRE http://www.thomson-europe.
QSG 10/05/06 14:17 Page 1 DVD DTH 8657 Quick Start Guide
QSG 10/05/06 14:17 Page 2 1 2 3 United Kingdom Ireland Europe 230 V 50 Hz OUTPUT IN OUT COAXIAL DIGITAL HDMI OUT AUDIO OUT Pb/Cb AV 1 (TV) L AUDIO R ANTENNA /CABLE COMPONENT VIDEO OUT Y VIDEO Pr/Cr AV 2 (SAT-CABLE-DECODER)
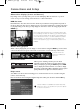
QSG 10/05/06 14:17 Page 1 Basic Set up EN Automatic channel set-up 1. Switch on your TV set. 2. Press and release the STANDBY/ON button on the recorder.Wait a few seconds until the language menu appears. If no menu is displayed after a moment or two, select the AV socket on the TV set that you have connected your recorder to. 3. Use the , and, OK buttons to choose a language.
QSG 10/05/06 14:17 Page 4 Model and serial number DTH8657E THOMSON Sales Europe 46, quai A. Le Gallo 92648 Boulogne Cedex FRANCE 322 019 464 RCS NANTERRE http://www.thomson-europe.